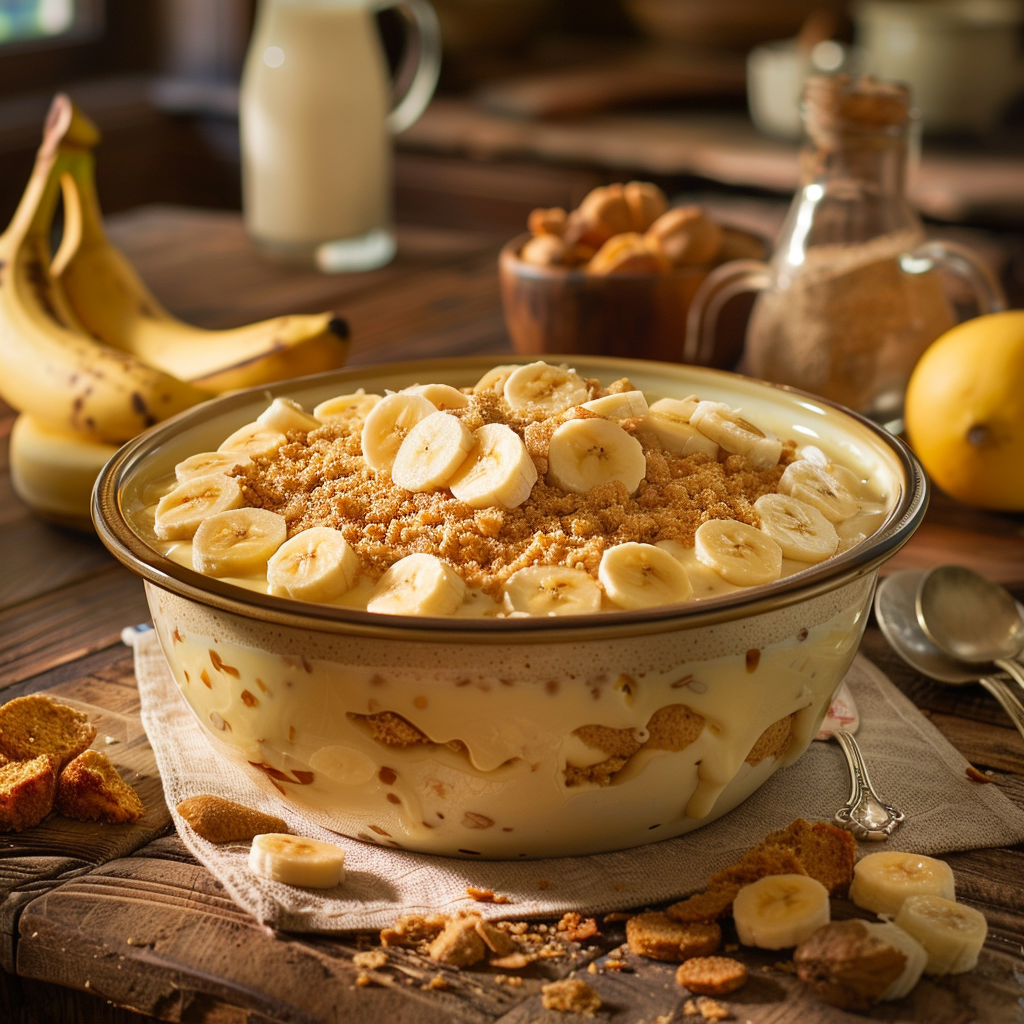
There’s something inherently heartwarming about a perfect bowl of Nilla Wafer Banana Pudding. This classic dessert, with its layers of creamy vanilla pudding, sweet bananas, and crisp, vanilla-infused wafers, is a taste of pure nostalgia. It’s the kind of simple, homemade treat that brings smiles to faces and reminds us of cozy kitchen memories. Making it from scratch is wonderfully rewarding, and this recipe ensures your banana pudding is lusciously smooth and utterly delicious every single time.
Why This Recipe Works
This Nilla Wafer Banana Pudding recipe is a beloved classic for good reason. It balances creamy, fruity, and crunchy textures perfectly, creating a satisfying dessert that isn’t overly complicated. The key to its success lies in using good quality ingredients and layering them thoughtfully. The slight chewiness of the Nilla Wafers soaking up the pudding, combined with the fresh sweetness of ripe bananas, creates a delightful contrast. It’s a timeless comfort food that’s as enjoyable to make as it is to eat.
The simplicity of this recipe makes it accessible for bakers of all skill levels. You don’t need fancy equipment or difficult techniques. It’s the kind of dessert that feels special enough for a celebration but is easy enough for a weeknight treat. This recipe focuses on achieving that perfect, melt-in-your-mouth pudding consistency that is the hallmark of exceptional banana pudding.
Recipe Overview
| Prep Time | 20 minutes |
|---|---|
| Cook Time | 10 minutes |
| Total Time | 30 minutes |
| Servings | 8-10 servings |
| Difficulty | Easy |
| Category | Dessert |
| Cuisine | American |
| Best For | Family meals, Potlucks, Comfort treat |
Ingredients
Gathering the right ingredients is the first step towards a perfect Nilla Wafer Banana Pudding. The beauty of this dessert lies in its straightforward components, each playing a vital role in the final flavor and texture.
| Ingredient | Quantity | Notes |
|---|---|---|
| Nilla Wafers | 1 box (about 11 oz) | Keep some whole for layering and some crushed for texture if desired. |
| Ripe Bananas | 3-4 large | Slightly overripe bananas add more sweetness and flavor. |
| Milk | 3 cups | Whole milk will yield the creamiest results. |
| Sugar | 3/4 cup | Adjust to your preferred sweetness level. |
| Cornstarch | 1/4 cup | For thickening the pudding. |
| Egg Yolks | 4 large | Adds richness and a custardy texture. |
| Butter | 2 tablespoons | Unsalted butter for extra richness. |
| Vanilla Extract | 2 teaspoons | Use good quality vanilla for the best flavor. |
| Whipped Topping or Meringue | 2 cups | Or homemade meringue, chilled. |
The stars of this pudding are, of course, the Nilla Wafers and ripe bananas. Nilla Wafers provide a delicate, crisp base that softens beautifully as it absorbs the creamy pudding, offering a wonderful chew. Ripe bananas lend a natural sweetness and a soft texture that complements the custard. Using whole milk and egg yolks ensures a rich, luxurious pudding consistency that is truly comforting.
Step-by-Step Instructions
Follow these simple steps to create your delicious homemade Nilla Wafer Banana Pudding.
Prepare the Pudding Base
- In a medium saucepan, whisk together the sugar and cornstarch until well combined. This prevents lumps.
- In a separate bowl, whisk the egg yolks until they are light in color. Gradually whisk in the milk to temper the yolks, then pour this mixture into the saucepan with the sugar and cornstarch.
- Place the saucepan over medium heat. Cook, stirring constantly with a whisk, until the pudding thickens and comes to a gentle boil. This usually takes about 8-10 minutes. Do not stop stirring, as it can scorch.
- Once thickened, remove the saucepan from the heat. Stir in the butter and vanilla extract until the butter is fully melted and incorporated.
- Pour the hot pudding into a clean bowl. Press a piece of plastic wrap directly onto the surface of the pudding to prevent a skin from forming. Let it cool slightly, about 20-30 minutes, stirring occasionally as it cools.
Assemble the Pudding
- Slice the ripe bananas into about 1/4-inch thick rounds.
- Begin layering your dessert dish or individual serving dishes. Start with a layer of Nilla Wafers at the bottom, breaking them to fit if necessary.
- Arrange a layer of banana slices over the Nilla Wafers. Make sure to cover the wafers evenly.
- Spoon a generous layer of the slightly cooled pudding over the bananas.
- Repeat the layers: Nilla Wafers, then bananas, then pudding. Continue until you have used up your ingredients, ending with a layer of pudding.
Chill and Serve
- Cover the pudding dish tightly with plastic wrap, pressing it gently onto the top layer of pudding to prevent a skin.
- Refrigerate for at least 4 hours, or preferably overnight. This allows the flavors to meld and the wafers to soften.
- Just before serving, top the pudding with your prepared whipped topping or meringue. You can spread it evenly or pipe decorative swirls.
- Garnish with a few extra Nilla Wafers or banana slices if desired. Serve chilled.
Granny Tips for Perfect Results
Here are a few of my favorite tips to make your Nilla Wafer Banana Pudding extra special:
- Use Ripe Bananas: The riper the bananas, the sweeter and more flavorful your pudding will be. Speckled skins are a good sign!
- Don’t Overcook the Pudding: Cook the pudding just until it thickens and starts to bubble. Overcooking can make it tough or scorch.
- Cool Pudding Properly: Pressing plastic wrap directly onto the surface of the cooked pudding is crucial to avoid that unwanted skin. Stirring it as it cools also helps achieve a silkier texture.
- Layer with Care: Ensure your wafer and banana layers are even. This not only looks nice but also ensures every bite gets a good mix of flavors and textures.
- Allow Ample Chilling Time: Patience is key! The longer the pudding chills, the more the flavors meld and the wafers soften into that perfect custardy texture. Overnight is usually best.
- For a Firmer Pudding: If you prefer a very firm pudding, you can slightly increase the cornstarch by a tablespoon or two.
- Taste and Adjust: Always taste your pudding before removing it from heat and adjust sweetness if needed.
Common Mistakes to Avoid
Even simple recipes can have pitfalls. Here are common mistakes to sidestep for the best banana pudding:
- Mistake: Not stirring the pudding constantly. This can lead to lumps in the pudding or scorching at the bottom of the pan, imparting a burnt flavor. Always stir, especially as it thickens and boils.
- Mistake: Adding bananas too early. Bananas can become mushy and brown if added too far in advance, especially if the pudding is still warm. Slice and layer them just before chilling.
- Mistake: Not chilling long enough. If you serve it too soon, the wafers will remain too crisp, and the flavors won’t have time to marry. Allow at least 4 hours for chilling.
- Mistake: Leaving the pudding uncovered while cooling. This allows a skin to form on top, which will result in a less smooth and appealing texture in your finished pudding. Always use plastic wrap pressed directly onto the surface.
- Mistake: Using unripe bananas. They won’t be sweet enough and will be harder, detracting from the creamy texture of the dessert. Wait for those sweet, speckled yellow bananas.
Variations and Substitutions
While this classic recipe is wonderful, you can easily adapt it to suit your preferences or what you have on hand.
| Variation or Ingredient | Substitution | Result |
|---|---|---|
| Nilla Wafers | Graham crackers, shortbread cookies, or even pound cake cubes | A different crunch or texture; graham crackers add a honeyed note. |
| Milk | Half-and-half or evaporated milk | A richer, creamier pudding. |
| Whipped Topping | Homemade meringue (baked or unbaked), or stabilized whipped cream | A more traditional or lighter topping. For baked meringue, ensure it’s fully set. |
| Vanilla Extract | Almond extract (use sparingly) | A subtle nutty flavor variation. |
| Sugar | Granulated sugar with a touch of brown sugar | A slightly deeper, caramel-like sweetness. |
| Layered Pudding | Crushed Nilla wafers mixed with some pudding | A more integrated texture rather than distinct layers. |
Serving Suggestions and Pairings
Nilla Wafer Banana Pudding is best served chilled. It’s a perfect ending to any meal, particularly Sunday dinners or family gatherings. It pairs wonderfully with a scoop of ice cream or a drizzle of caramel sauce. For a lighter option, consider serving it alongside a fresh fruit salad. It’s also a delightful treat on its own, perfect for a comforting snack any time of day.
This pudding can be served family-style in a large bowl, or portioned into individual ramekins or glasses for an elegant presentation. A few fresh banana slices or a sprinkle of crushed Nilla Wafers make a lovely garnish. It’s a crowd-pleasing dessert that rarely disappoints.
Storage and Reheating
| Method | Duration | Instructions |
|---|---|---|
| Refrigerator | 2-3 days | Store covered tightly with plastic wrap in the refrigerator. Add whipped topping/meringue just before serving, as it tends to weep or deflate over time. |
| Freezer | Not Recommended | The texture of the pudding and bananas can be negatively affected by freezing, becoming watery or mushy upon thawing. |
| Room Temperature | Max 2 hours | Due to the dairy and egg content, it should not be left at room temperature for extended periods. |
Nutritional Information
Approximate values will vary depending on ingredients, brands, and serving size.
| Nutrient | Amount per Serving |
|---|---|
| Calories | Approximately 350 kcal per serving |
| Carbohydrates | Approximately 50g per serving |
| Protein | Approximately 4g per serving |
| Fat | Approximately 15g per serving |
| Fiber | Approximately 2g per serving |
| Sugar | Approximately 30g per serving |
| Sodium | Approximately 150mg per serving |
Frequently Asked Questions
Can I make this recipe ahead of time?
Yes, this Nilla Wafer Banana Pudding is actually best made ahead of time. Allowing it to chill for at least 4 hours, or preferably overnight, lets the flavors meld beautifully and the wafers soften to the perfect texture. Just add the whipped topping or meringue right before serving.
Can I substitute one main ingredient?
You can substitute the Nilla Wafers with other firm cookies like graham crackers or shortbread. While bananas are central, if you need to, you could try ripe pears or peaches, but the classic flavor comes from bananas. For the pudding base, whole milk and egg yolks are best for richness, but half-and-half can be used for a creamier texture.
How do I know when the pudding is ready?
The pudding is ready when it thickens enough to coat the back of a spoon and holds its shape for a moment when you draw a line through it with your finger. It should also reach a gentle boil. If it seems too thin, let it simmer for another minute while stirring.
How should I store it?
Store Nilla Wafer Banana Pudding covered tightly with plastic wrap in the refrigerator. It can be kept for 2 to 3 days. For best results, add any whipped topping or meringue just before serving, as it can make the pudding too wet or deflate over time.
Is this recipe good for everyday use?
Absolutely! While it feels special, this banana pudding is simple enough for everyday enjoyment or a comforting dessert after a family meal. It’s a classic for a reason – accessible ingredients and straightforward preparation make it a reliable favorite.
Conclusion
Crafting your own Nilla Wafer Banana Pudding is a delightful journey into homemade comfort food. This easy recipe brings together simple ingredients to create a dessert that’s lusciously creamy, perfectly sweet, and wonderfully nostalgic. When you want a truly comforting treat that feels like a warm hug from grandma, this classic Nilla Wafer Banana Pudding is always a wonderful choice. Enjoy making and sharing this timeless favorite!
Print
Nilla Wafer Banana Pudding
- Total Time: 30
- Yield: 8-10 servings 1x
- Diet: Vegetarian
Description
A creamy, nostalgic dessert made with layers of Nilla wafers, ripe bananas, and homemade vanilla pudding. This easy and comforting banana pudding is perfect for family meals or potlucks and delivers a delightful balance of sweet, smooth, and crunchy textures.
Ingredients
1 box Nilla Wafers (about 11 oz)
3–4 large ripe bananas
3 cups milk (whole milk recommended)
3/4 cup sugar
1/4 cup cornstarch
1/4 tsp salt
1 tbsp vanilla extract
Instructions
In a medium saucepan, combine milk, sugar, cornstarch, and salt. Whisk constantly over medium heat until the mixture thickens and begins to bubble, about 10 minutes.
Remove from heat and stir in vanilla extract. Let the pudding cool slightly.
In a large bowl or serving dish, begin layering: add a layer of Nilla Wafers, followed by sliced bananas, and a generous portion of warm pudding. Repeat the layers, ending with a top layer of pudding.
Cover and refrigerate for at least 2 hours to allow the flavors to meld and the wafers to soften.
Garnish with additional sliced bananas or Nilla Wafers before serving.
Notes
Use slightly overripe bananas for a sweeter flavor.
You can adjust the amount of sugar to suit your taste.
For a quick shortcut, use pre-made pudding; follow package instructions.
Leftover pudding can be stored in the refrigerator for up to 3 days.
- Prep Time: 20
- Cook Time: 10
- Category: Desserts
- Method: Stovetop
- Cuisine: American
Nutrition
- Serving Size: 1 serving (1/10 of recipe)
- Calories: 240
- Sugar: 22g
- Sodium: 180mg
- Fat: 8g
- Saturated Fat: 4g
- Carbohydrates: 38g
- Fiber: 2g
- Protein: 2g
- Cholesterol: 5mg