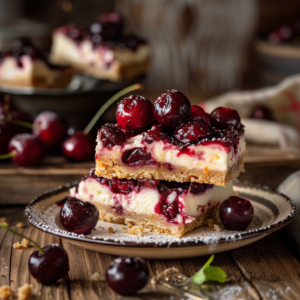
Discover the simple joy of making Cherry Cream Cheese Bars at home. These bars are a delightful combination of a buttery graham cracker crust, a rich and creamy cream cheese filling, and a sweet, slightly tart cherry topping. They’re incredibly easy to assemble, making them a perfect go-to dessert for busy bakers. Whether you’re hosting a gathering or just craving a sweet treat, these bars promise comfort and deliciousness with every bite.
Why This Recipe Works
This Cherry Cream Cheese Bars recipe strikes a wonderful balance between simple preparation and decadent flavor. The textures are a key part of its appeal: a crumbly, baked crust, a smooth and velvety cream cheese center, and a glistening cherry topping. It’s the kind of recipe that doesn’t require complicated techniques, making it approachable for beginners and a reliable favorite for experienced home cooks.
The ingredients are straightforward and readily available, meaning you can whip these up with a quick trip to the grocery store. The chilling time is essential for the bars to set properly, ensuring clean cuts and a pleasant mouthfeel. This is a perfect dessert for potlucks, picnics, or afternoon tea when you want something sweet, satisfying, and always appreciated.
Recipe Overview
| Prep Time | 20 minutes |
|---|---|
| Cook Time | 40 minutes |
| Total Time | 2 hours 45 minutes (including chilling time) |
| Servings | 12-16 bars |
| Difficulty | Easy |
| Category | Dessert |
| Cuisine | American |
| Best For | Desserts, Potlucks, Gatherings, Afternoon Tea |
Ingredients
Gather these simple ingredients to bring these delicious Cherry Cream Cheese Bars to life.
| Ingredient | Quantity | Notes |
|---|---|---|
| Graham cracker crumbs | 1 ½ cups | About 10-12 full crackers |
| Granulated sugar (for crust) | ¼ cup | |
| Unsalted butter, melted | ½ cup | |
| Cream cheese, softened | 16 ounces | Full fat recommended for best texture |
| Granulated sugar (for filling) | ½ cup | |
| Large egg | 1 | Room temperature |
| Vanilla extract | 1 teaspoon | |
| Cherry pie filling | 1 can (21 ounces) | Or your favorite fruit pie filling |
| Lemon juice | 1 tablespoon | Optional, for brightness |
| Whipped topping or fresh cherries | For garnish | Optional |
The star ingredients here are the cream cheese, which provides that signature rich and tangy base, and the sweet cherry pie filling that offers bursts of fruitiness. Using softened cream cheese is crucial for a smooth, lump-free filling. The graham cracker crust adds a subtle sweetness and a delightful crumbly texture that complements the creamy layer perfectly.
Step-by-Step Instructions
Follow these simple steps to create your own batch of Cherry Cream Cheese Bars.
Prepare the Pan and Crust
- Preheat your oven to 350°F (175°C).
- Line an 8×8 inch baking pan with parchment paper, allowing for an overhang on the sides for easy removal.
- In a medium bowl, combine the graham cracker crumbs and ¼ cup sugar. Pour in the melted butter and mix until all the crumbs are moistened.
- Press the crumb mixture firmly and evenly into the bottom of the prepared baking pan.
- Bake the crust for 8-10 minutes until lightly golden. Remove from oven and let it cool slightly.
Make the Cream Cheese Filling
- In a large bowl, beat the softened cream cheese with ½ cup sugar until smooth and creamy. An electric mixer is helpful here, but a whisk works too.
- Beat in the egg until just combined. Be careful not to overmix, as this can lead to cracking.
- Stir in the vanilla extract until blended.
Assemble and Bake
- Pour the cream cheese filling evenly over the slightly cooled crust. Spread it gently with a spatula.
- Spoon the cherry pie filling evenly over the cream cheese layer. If desired, gently swirl in the tablespoon of lemon juice for extra zing.
- Bake for 30-35 minutes. The edges should be set, and the center should be *almost* set. It will firm up more as it cools.
Cool and Chill
- Let the bars cool completely in the pan on a wire rack. This allows them to set properly.
- Once cooled to room temperature, cover the pan and refrigerate for at least 2-3 hours, or until the bars are firm.
- Use the parchment paper overhang to lift the entire block out of the pan. Cut into squares using a sharp knife.
Granny Tips for Perfect Results
Here are a few of my little secrets to ensure your Cherry Cream Cheese Bars turn out wonderfully every time:
- Softened Cream Cheese is Key: Make sure your cream cheese is truly softened to room temperature. This prevents lumps and ensures a silky smooth filling.
- Don’t Overmix the Filling: Overbeating the cream cheese mixture, especially after adding the egg, can incorporate too much air, leading to cracks in the bars. Mix just until combined.
- Cooling is Crucial: Patience is a virtue! Allowing the bars to cool completely and then chill thoroughly in the refrigerator is essential for them to set properly and achieve those perfect, clean slices.
- Even Distribution: Spread the cream cheese filling and the cherry topping evenly. This ensures that each bite is a harmonious blend of all the delicious layers.
- Slice with Ease: For the neatest cuts, use a large, sharp knife. Wiping the knife clean between cuts can also help.
- Baking Time Varies: Ovens can be temperamental. Keep an eye on the bars; they should be mostly set but still have a slight jiggle in the center.
Common Mistakes to Avoid
Even the simplest recipes can sometimes go astray. Here are a few common pitfalls to steer clear of when making Cherry Cream Cheese Bars:
- Mistake: Lumpy Cream Cheese Filling. This happens when the cream cheese isn’t properly softened. To fix, always ensure your cream cheese is at room temperature before beating it.
- Mistake: Cracked Filling. Overmixing the filling, especially after adding the egg, can cause excessive air bubbles that lead to cracking during baking or cooling. Mix the egg in gently until just incorporated.
- Mistake: Soggy Crust. Pressing the crust into a hot pan or not letting it cool slightly before adding the filling can result in a soggy bottom. Allow the crust to cool for at least 10-15 minutes.
- Mistake: Bars Won’t Cut Neatly. Rushing the chilling process is the usual culprit. The bars need ample time in the refrigerator to firm up completely.
- Mistake: The Top is Too Brown. If the cherry topping starts to look too dark before the center is set, you can loosely tent the pan with aluminum foil for the remainder of the baking time.
Variations and Substitutions
Feel free to customize your Cherry Cream Cheese Bars with these simple variations and substitutions.
| Variation or Ingredient | Substitution | Result |
|---|---|---|
| Graham Cracker Crust | Vanilla wafer crumbs, shortbread cookie crumbs, or crushed pretzels | A different, but equally delicious, base flavor and texture. |
| Cherry Pie Filling | Other fruit pie fillings (e.g., blueberry, raspberry, apple, peach) | Creates a whole new flavor profile, adapting the bars to different seasons or preferences. |
| Cream Cheese Filling | Use a dairy-free cream cheese alternative. Ensure it’s firm. | A dairy-free version of the classic bar. Texture might vary slightly. |
| Sweetness Level | Reduce sugar in the filling by ¼ cup for a less sweet bar. | A more tart dessert, letting the fruit flavor shine through more. |
| Added Zest | Add ½ teaspoon of lemon or orange zest to the cream cheese filling. | A brighter, more complex citrus note in the creamy layer. |
| Chocolate Lovers | Swirl in some chocolate ganache or mini chocolate chips into the cream cheese filling before adding the cherry topping. | A decadent chocolate-cherry combination. |
Serving Suggestions and Pairings
These Cherry Cream Cheese Bars are wonderfully versatile and can be served in several delightful ways.
Serve these bars chilled, straight from the refrigerator, for the best texture and easiest slicing. They are perfect for desserts after any meal, including brunch, lunch, or dinner. Garnish each square with a dollop of whipped topping, a maraschino cherry, or even a few fresh cherries when in season for an extra touch of elegance. They pair beautifully with a cup of warm coffee or tea, or even a simple glass of water.
For family gatherings, arrange them on a platter for guests to help themselves. Their individual square format makes them ideal for potlucks and picnics. If you’re looking for a lighter side, they can also be enjoyed as a sweet snack with a fresh salad.
Storage and Reheating
Proper storage will keep your Cherry Cream Cheese Bars tasting fresh and delicious.
| Method | Duration | Instructions |
|---|---|---|
| Refrigerator | 3-4 days | Store covered in the refrigerator. They are best enjoyed within a few days. |
| Freezer | 2-3 weeks | Wrap individual bars tightly in plastic wrap, then place in a freezer-safe container or bag. Thaw overnight in the refrigerator before serving. Note that the texture might change slightly after freezing. |
| Room Temperature | Not Recommended | Due to the cream cheese and egg, these bars should not be left at room temperature for more than 2 hours. |
If freezing, ensure the bars are well-chilled and firm before wrapping to prevent moisture loss.
Nutritional Information
Approximate values will vary depending on ingredients, brands, and serving size.
| Nutrient | Amount per Serving |
|---|---|
| Calories | Approximately 350-450 kcal |
| Carbohydrates | Approximately 40-50g |
| Protein | Approximately 4-6g |
| Fat | Approximately 20-30g |
| Fiber | Approximately 1-2g |
| Sugar | Approximately 25-35g |
| Sodium | Approximately 150-250mg |
Frequently Asked Questions
Can I make this recipe ahead of time?
Yes, Cherry Cream Cheese Bars are an excellent make-ahead dessert. In fact, they’re best when made at least a few hours in advance to allow them to chill and set properly in the refrigerator.
Can I substitute one main ingredient?
The most common substitution is the fruit pie filling. You can easily swap cherry for another favorite, like blueberry, raspberry, or even apple. While cream cheese is central to the filling, using a good quality dairy-free cream cheese alternative is possible for a dairy-free option.
How do I know when it is ready to come out of the oven?
The bars are ready when the edges of the cream cheese filling are set and slightly puffed, and the center is almost set but still has a slight jiggle. A toothpick inserted near the center should come out with moist crumbs, not wet batter.
How should I store leftovers?
Leftovers should be stored in an airtight container in the refrigerator for up to 3-4 days. Ensure they are well-chilled before serving for the best texture and to maintain freshness.
Is this recipe good for everyday comfort?
Absolutely, these Cherry Cream Cheese Bars are perfect for adding a touch of homemade sweetness to your everyday routine. They are simple to make and offer a comforting, classic dessert experience that everyone can enjoy. This recipe is meant for everyday comfort and is not a replacement for medical advice.
Conclusion
Whipping up these easy Cherry Cream Cheese Bars is a simple way to bring a bit of homemade charm and deliciousness to any occasion. The combination of the buttery crust, creamy filling, and sweet cherry topping is a classic for a reason. They’re straightforward to make, always a hit, and provide that perfect sweet finish you’re looking for. Enjoy this delightful, easy recipe as a comforting treat!
Print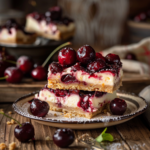
Easy Cherry Cream Cheese Bars
- Total Time: 165
- Yield: 12-16 bars 1x
- Diet: Vegetarian
Description
These Cherry Cream Cheese Bars combine a buttery graham cracker crust, creamy filling, and sweet-tart cherry topping. Easy to assemble and perfect for gatherings or afternoon tea, they offer a delightful texture and flavor balance. A no-fail dessert for bakers of all skill levels.
Ingredients
1 ½ cups graham cracker crumbs
¼ cup granulated sugar (for crust)
½ cup unsalted butter, melted
16 ounces cream cheese, softened
½ cup granulated sugar (for filling)
1 large egg
1 teaspoon vanilla extract
1 can (21 ounces) cherry pie filling
1 tablespoon lemon juice
Instructions
Preheat oven to 350°F (175°C). Line a 9×13-inch baking pan with parchment paper.
In a bowl, mix graham cracker crumbs, ¼ cup sugar, and melted butter until crumbly. Press into prepared pan and bake for 10 minutes. Cool slightly.
In a separate bowl, beat cream cheese, ½ cup sugar, egg, and vanilla until smooth. Spread over cooled crust. Chill 20 minutes to set.
Spread cherry pie filling over the cream cheese layer, then drizzle with lemon juice. Chill for 2 hours to set completely.
Cut into 12-16 bars and serve.
Notes
Use full-fat cream cheese for best texture. Substitute cherry filling with other fruit pie fillings if preferred. Chill at least 2 hours for clean cuts. Store in an airtight container in the refrigerator for up to 3 days.
- Prep Time: 20
- Cook Time: 40
- Category: Desserts
- Method: Baking
- Cuisine: American
Nutrition
- Serving Size: 1 bar
- Calories: 230
- Sugar: 15g
- Sodium: 120mg
- Fat: 9g
- Saturated Fat: 5g
- Carbohydrates: 26g
- Fiber: 1g
- Protein: 3g
- Cholesterol: 35mg