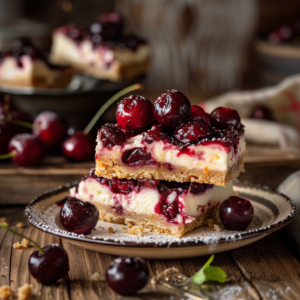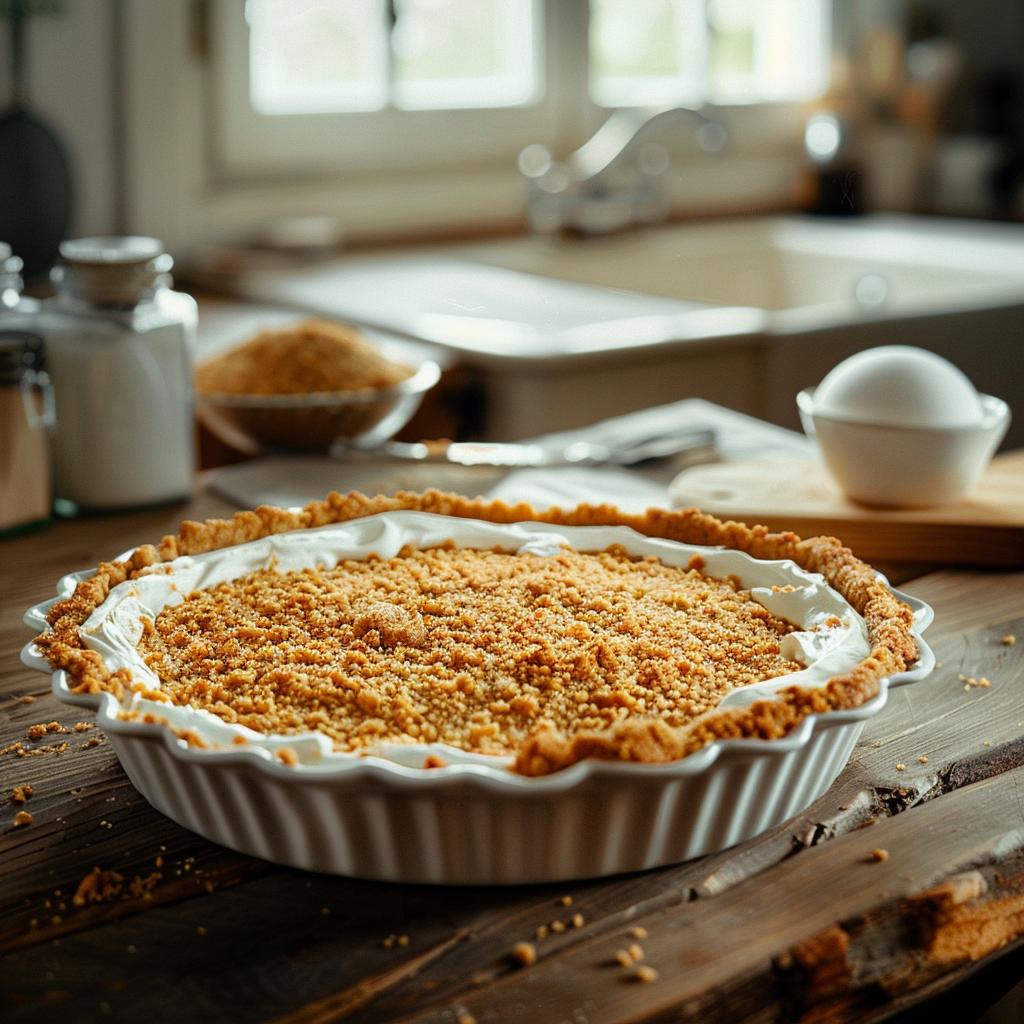
Creating a perfect graham cracker crust is a simple kitchen skill that elevates many desserts. This classic base is a cornerstone for cheesecakes, pies, bars, and even no-bake treats. Our easy recipe uses just a few common ingredients to yield a sweet, sturdy, and satisfying foundation. Whether you’re a seasoned baker or just starting, mastering this simple graham cracker crust will give you confidence and a delicious starting point for countless homemade creations. It’s the kind of foundational recipe Granny loves to share because it’s so versatile and always a crowd-pleaser.
Why This Recipe Works
This graham cracker crust recipe works because it achieves the ideal balance of being crumbly enough to be tender, yet cohesive enough to hold its shape. The magic happens with the simple combination of graham cracker crumbs, sugar for sweetness, and melted butter to bind it all together. When baked, the butter coats the crumbs, forming a delicious, slightly crisp layer. It’s a testament to how a few humble ingredients can create something truly special.
The ease of preparation is another reason this recipe is a favorite. You don’t need any fancy equipment or complicated techniques. Just a few minutes of mixing and pressing, and you’re ready to fill your crust. It’s a comforting process that’s perfect for involving little ones in the kitchen, making it a wonderful family-friendly recipe.
Recipe Overview
| Prep Time | 10 minutes |
|---|---|
| Cook Time | 8-10 minutes |
| Total Time | 18-20 minutes |
| Servings | 1 (9-inch) pie crust |
| Difficulty | Easy |
| Category | Dessert Base |
| Cuisine | American / Homemade |
| Best For | Cheesecakes, pies, bars, no-bake desserts |
Ingredients
The ingredients for this simple graham cracker crust are straightforward, focusing on pantry staples that come together beautifully.
| Ingredient | Quantity | Notes |
|---|---|---|
| Graham cracker crumbs | 1 ½ cups | About 10-12 full graham crackers, finely crushed |
| Granulated sugar | ¼ cup | Adjust to your sweetness preference |
| Melted butter | 6 tablespoons | Unsalted or salted, melted |
The graham cracker crumbs form the foundation of our crust, providing that distinct honey-sweet, slightly wheaty flavor. Using whole graham crackers and crushing them yourself often yields a better texture than pre-crushed crumbs. The granulated sugar adds sweetness and helps create a slightly crisp texture when baked. Finally, the melted butter acts as the binder, holding all the crumbs together and adding richness to the crust.
Step-by-Step Instructions
Follow these simple steps to create a perfect graham cracker crust.
Prepare the Baking Pan and Oven
- Preheat your oven to 350°F (175°C).
- Lightly grease a 9-inch pie plate or springform pan with cooking spray or a little extra butter, or leave ungreased if preferred.
Mix the Crust Ingredients
- Place graham crackers in a food processor and pulse until fine crumbs form. Alternatively, place them in a plastic bag and crush with a rolling pin or mallet. Measure out 1 ½ cups of crumbs.
- In a medium bowl, combine the graham cracker crumbs and granulated sugar. Stir them together thoroughly.
- Pour the melted butter over the crumb and sugar mixture. Stir with a fork or spatula until all the crumbs are evenly moistened. The mixture should resemble wet sand.
Form and Bake the Crust
- Transfer the crumb mixture to your prepared pie plate or springform pan.
- Using the bottom of a glass or a measuring cup, firmly press the crumbs evenly over the bottom and up the sides of the pan. Ensure there are no loose spots.
- Bake in the preheated oven for 8-10 minutes, or until the crust is lightly golden and fragrant.
- Remove from the oven and let it cool completely on a wire rack before filling. If making a no-bake dessert, you can often chill the crust in the refrigerator until firm without baking.
Granny Tips for Perfect Results
- Crumb Consistency Matters: For the best texture, aim for fine, consistent crumbs. Overly large pieces can lead to a crumbly crust that falls apart.
- Press Firmly: Don’t be shy when pressing the crumbs into the pan. A firm, even press is key to prevent the crust from crumbling after baking or chilling.
- Butter Distribution: Ensure the butter is evenly distributed throughout the crumbs. This helps all the particles bind together properly.
- Cool Completely: Always allow the crust to cool completely before filling, especially for cheesecakes that bake. A hot crust can affect the texture and setting of your filling.
- For No-Bake Delights: If using for a no-bake dessert, you can often skip the baking step and simply chill the crust in the refrigerator for about 10-15 minutes until firm.
- Adjust Sugar: Taste your graham crackers. Some are sweeter than others. Adjust the sugar in the crust to complement the sweetness of your chosen filling.
Common Mistakes to Avoid
- Mistake: Not enough butter. This results in a crust that is too dry and won’t hold together, crumbling easily. Ensure all crumbs are moistened; the mixture should resemble wet sand.
- Mistake: Pressing too lightly. A loosely packed crust will be fragile and difficult to slice cleanly. Pack the crumbs down firmly and evenly across the bottom and up the sides.
- Mistake: Using inconsistent crumb sizes. Large chunks can lead to an uneven texture and a crust that breaks apart. Pulse them thoroughly in a food processor or crush them evenly.
- Mistake: Over-baking. While a short bake helps set the crust, over-baking can make it too hard and dry, potentially burning the edges. Watch for a light golden color and fragrant aroma.
- Mistake: Filling a hot crust. This can affect the texture of delicate fillings, like cheesecakes, causing them to separate or cook unevenly. Always let the crust cool completely.
Variations and Substitutions
| Variation or Ingredient | Substitution | Result |
|---|---|---|
| Graham crackers | Digestive biscuits, vanilla wafers, or gingersnap cookies | A crispier crust with added spice (gingersnaps) or a lighter vanilla flavor. |
| Granulated sugar | Brown sugar (packed) | A richer, slightly caramelized flavor and a chewier texture. |
| Melted butter | Melted coconut oil (solid at room temp) or vegetable oil | A dairy-free option. Coconut oil may add a subtle flavor. Oil might result in a slightly less firm crust. |
| 1 ½ cups graham cracker crumbs | 1 ½ cups almond flour for gluten-free | A gluten-free crust option. May need slightly less binder or a brief bake to set. |
Serving Suggestions and Pairings
This versatile graham cracker crust is the perfect starting point for a multitude of delicious desserts. Serve it chilled or baked, depending on your chosen filling. It’s ideal as the base for classic cheesecakes, fruit tarts, chocolate cream pies, or lemon meringue pies. For no-bake treats like icebox cakes or layered bars, a chilled crust is perfect.
Consider pairing your finished dessert with a refreshing drink. A simple Healthy Mermaid Sunrise Mocktail Sugar-Free or a cool glass of water can be delightful accompaniments. For a comforting treat, you might also enjoy serving it alongside a warm cup of Ginger Tea for Nausea on the side.
Storage and Reheating
| Method | Duration | Instructions |
|---|---|---|
| Refrigerator (Unfilled Crust) | 1-2 days | Store a cooled, unbaked or baked crust in an airtight container or by covering the pie plate tightly with plastic wrap. |
| Refrigerator (Filled) | 3-4 days (depending on filling) | Store the fully assembled dessert covered in the refrigerator. Check specific filling guidelines for best freshness. |
| Freezer (Unfilled Crust) | 1 month | Wrap the cooled crust tightly in plastic wrap, then cover with aluminum foil or place in a freezer-safe bag. Thaw overnight in the refrigerator before filling. |
For filled desserts, freezing can sometimes affect the texture of the filling. It’s often best to freeze unbaked or baked crusts separately if possible.
Nutritional Information
Approximate values will vary depending on ingredients, brands, and serving size.
| Nutrient | Amount per Serving (approx. 1/8th of crust) |
|---|---|
| Calories | Approximately 150-180 kcal |
| Carbohydrates | Approximately 15-20g |
| Protein | Approximately 1-2g |
| Fat | Approximately 9-12g |
| Fiber | Approximately 1g |
| Sugar | Approximately 8-10g |
| Sodium | Approximately 70-90mg |
Frequently Asked Questions
Can I make this graham cracker crust recipe ahead of time?
Yes, you can absolutely make this graham cracker crust ahead of time. Store an unbaked or baked crust in an airtight container in the refrigerator for up to 2 days. For longer storage, wrap it well and freeze it for up to a month.
Can I substitute one main ingredient in this recipe?
Certainly. You can substitute the graham crackers with other cookies like vanilla wafers or gingersnaps for a different flavor profile. You can also swap granulated sugar for brown sugar for a deeper, molasses-like taste. For a dairy-free option, melted coconut oil can replace butter.
How do I know when the crust is ready?
If baking the crust, it is ready when it appears lightly golden brown around the edges and smells fragrant. It should feel slightly firm to the touch. For no-bake recipes, it’s ready when it’s firmly set after chilling in the refrigerator for at least 10-15 minutes.
How should I store a finished graham cracker crust pie?
Store a filled pie with a graham cracker crust covered tightly in the refrigerator. Most pies can be kept fresh for 3-4 days. If the crust is unfilled, store it in an airtight container in the fridge for up to 2 days.
Is this graham cracker crust recipe good for everyday use?
This recipe is perfect for any occasion, from special desserts to simple weeknight treats. Its ease and delicious results make it a go-to for many home bakers. While it’s a wonderful addition to your baking repertoire, remember this recipe is for everyday enjoyment and is not a replacement for medical advice.
Conclusion
Mastering this easy graham cracker crust recipe is a fundamental skill for any home baker. It provides a delicious, sturdy, and versatile base for a wide array of pies, cheesecakes, and bars. With just a few simple ingredients and minimal effort, you can create a fantastic foundation that will impress your family and friends. Give this classic graham cracker crust a try; you’ll find yourself reaching for it time and time again.
Print
The Best Graham Cracker Crust Recipe: Easy & Delicious
- Total Time: 20
- Yield: 1 (9-inch) pie crust 1x
- Diet: Vegetarian
Description
A simple yet indispensable graham cracker crust recipe that serves as a sweet, sturdy base for cheesecakes, pies, bars, and no-bake desserts. Made with pantry staples, this easy-to-make crust is perfect for bakers of all skill levels.
Ingredients
1 ½ cups graham cracker crumbs
¼ cup granulated sugar
6 tablespoons melted butter (unsalted or salted)
Instructions
Preheat oven to 350°F (180°C)
Combine graham cracker crumbs and granulated sugar in a bowl
Pour melted butter over the mixture and stir until evenly coated
Press the mixture firmly into the bottom and up the sides of a 9-inch pie dish or springform pan
Bake for 8–10 minutes until lightly golden
Cool completely before filling
Notes
For best texture, crush whole graham crackers instead of using pre-crushed crumbs
Adjust sugar to taste by adding 1–2 tablespoons
Optional: Add 1 teaspoon cinnamon or melted brown sugar for enhanced depth of flavor
Let crust cool completely before adding fillings to prevent melting
Store unfilled crust in the refrigerator for up to 2 days
- Prep Time: 10
- Cook Time: 10
- Category: Desserts
- Method: Baking
- Cuisine: American
Nutrition
- Serving Size: 1 crust (serves ~8–10)
- Calories: 135
- Sugar: 10g
- Sodium: 90mg
- Fat: 7g
- Saturated Fat: 4g
- Carbohydrates: 15g
- Fiber: 1g
- Protein: 2g
- Cholesterol: 10mg