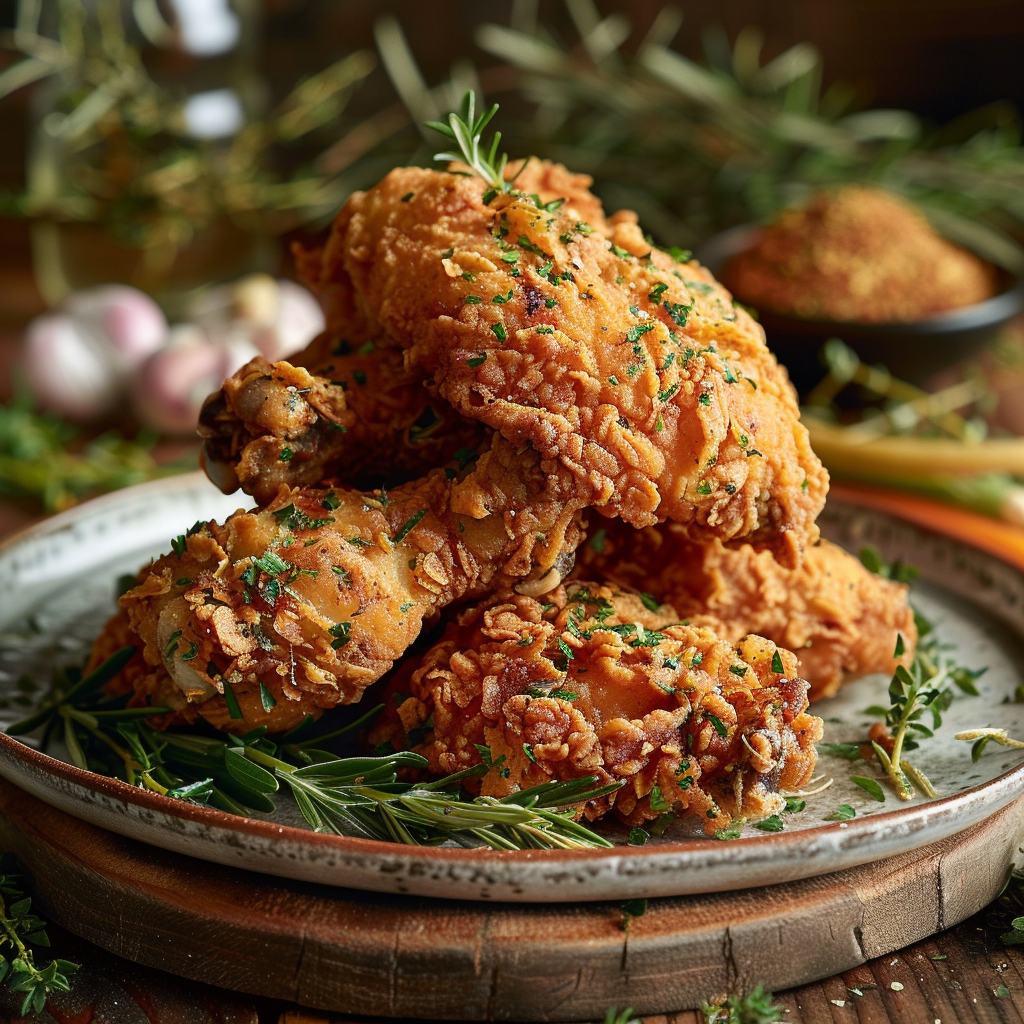
There’s nothing quite like a piece of perfectly fried chicken, golden brown and crispy on the outside, incredibly juicy and tender on the inside. This buttermilk fried chicken recipe is a true taste of home, offering that classic, comforting flavor we all adore. Generations have loved this simple yet phenomenal dish, and it’s surprisingly easy to achieve restaurant-quality results right in your own kitchen. Get ready to master the art of crispy, succulent fried chicken that the whole family will ask for again and again.
Why This Recipe Works
The magic behind this buttermilk fried chicken lies in two simple yet crucial steps: the buttermilk marinade and the careful frying process. Buttermilk’s natural acidity tenderizes the chicken beautifully while also adding a subtle tang that complements the savory flavors. It creates the perfect base for our seasoned flour coating, helping it adhere and develop that signature crunch.
We’ll focus on creating a perfectly seasoned dredge and maintaining the right oil temperature. This combination ensures that the chicken cooks through to juicy perfection without drying out, and the crust becomes irresistibly crispy and golden. It’s a straightforward method that yields deeply satisfying results, making it a reliable favorite for any occasion.
Recipe Overview
| Prep Time | 30 minutes (plus 4-hour or overnight marinating time) |
|---|---|
| Cook Time | 30-40 minutes |
| Total Time | Approximately 4 hours 30 minutes to 12 hours 40 minutes |
| Servings | 6-8 servings |
| Difficulty | Medium |
| Category | Main Dish |
| Cuisine | American, Grandma-style |
| Best For | Family Dinners, Potlucks, Comfort Food Cravings |
Ingredients
Gathering the right ingredients is the first step to achieving that perfect buttermilk fried chicken. The core components are simple, allowing the chicken and the brine to shine.
| Ingredient | Quantity | Notes |
|---|---|---|
| Chicken pieces (bone-in, skin-on) | 3-4 lbs | A mix of thighs, drumsticks, breasts, and wings works well. |
| Buttermilk | 4 cups | Whole milk buttermilk is best for richness and tenderness. |
| All-purpose flour | 3 cups | For the crispy coating. |
| Eggs | 2 large | To help the flour adhere. |
| Paprika | 2 tablespoons | For color and mild flavor. |
| Garlic powder | 2 tablespoons | For savory depth. |
| Salt | 2 tablespoons | Essential for flavor. Adjust to taste. |
| Black pepper | 1 tablespoon | Freshly ground is preferred. |
| Vegetable oil or canola oil | 3-4 cups | For frying. Enough to reach about 1.5 inches deep in your pan. |
The star ingredients here are, of course, the chicken and the buttermilk. The buttermilk is crucial for its tenderizing properties and adds a fantastic subtle tang to the final product. The blend of flour with paprika, garlic powder, salt, and pepper creates a flavorful crust that is both crispy and savory.
Step-by-Step Instructions
Follow these steps carefully to achieve wonderfully tender and crispy buttermilk fried chicken every time.
Marinate the Chicken
- Place the chicken pieces in a large resealable bag or a deep bowl.
- Pour the buttermilk over the chicken, ensuring all pieces are submerged.
- Seal the bag or cover the bowl and refrigerate for at least 4 hours, or preferably overnight, to allow the buttermilk to work its magic and tenderize the chicken.
Prepare the Dredging Station
- In a shallow dish or pie plate, whisk together the all-purpose flour, paprika, garlic powder, salt, and pepper until well combined. This is your seasoned flour dredge.
- In a separate shallow dish, whisk the two large eggs with about 2 tablespoons of water or milk until combined. This egg wash will help the flour adhere.
Bread the Chicken
- Remove the chicken pieces from the buttermilk, letting any excess drip off, but do not wipe them dry. The dampness helps the flour stick. Place the buttermilk-coated chicken into the seasoned flour mixture.
- Toss the chicken to coat thoroughly, pressing the flour onto the pieces to create a good crust. Ensure every surface is covered.
- Gently shake off any excess flour.
- Dip each floured chicken piece into the egg wash, coating it completely.
- Immediately return the chicken piece to the seasoned flour, tossing and pressing to ensure a thick, even coating. This double-dipping method creates an extra-crispy crust. Place the breaded chicken onto a wire rack set over a baking sheet and let it rest for about 10-15 minutes. This resting period helps the coating adhere and prevents it from falling off during frying.
Fry the Chicken
- Pour the vegetable oil into a heavy-bottomed pot or Dutch oven, ensuring it reaches a depth of about 1.5 inches. Heat the oil over medium-high heat until it reaches 350°F (175°C) on a deep-fry thermometer. Maintaining this temperature is key for perfectly cooked chicken.
- Carefully place a few pieces of chicken into the hot oil, skin-side down if applicable. Do not overcrowd the pot, as this will lower the oil temperature and result in soggy chicken. Fry in batches.
- Fry the chicken for about 6-8 minutes per side, turning occasionally with tongs, until golden brown and cooked through. The exact time will depend on the size and type of chicken pieces. Thighs and legs will typically take longer than breasts or wings.
- Use a thermometer to check the internal temperature. Chicken is safely cooked when it reaches 165°F (74°C).
- Once cooked, remove the chicken from the oil using tongs and place it on a clean wire rack set over a baking sheet. Allow excess oil to drip off.
- Repeat the frying process with the remaining chicken pieces, ensuring the oil temperature returns to 350°F (175°C) between batches.
Serve
- Let the fried chicken rest for a few minutes before serving. This allows the juices to redistribute, resulting in more tender chicken.
- Serve hot and enjoy your delicious homemade buttermilk fried chicken.
Granny Tips for Perfect Results
Here are a few of my tried-and-true tips for making the most wonderful buttermilk fried chicken.
- Use Bone-In, Skin-On Chicken: The bone and skin add extra flavor and moisture, contributing to a more succulent final product.
- Don’t Skip the Marinating Time: While 4 hours is good, overnight marinating in buttermilk yields the most tender chicken.
- Achieve the Right Dredge Texture: Press the flour firmly onto the chicken. You can even try a second dip in the flour after the egg wash for an extra-thick, craggy crust.
- Maintain Oil Temperature: Use a thermometer! If the oil is too cool, the chicken will be greasy. If it’s too hot, the outside will burn before the inside is cooked. Aim for a steady 350°F (175°C).
- Fry in Batches: Overcrowding the pan lowers the oil temperature significantly. Fry only 2-4 pieces at a time, depending on your pot size, to ensure consistent cooking and crispiness.
- Resting is Key: Letting the breaded chicken rest before frying helps the coating adhere, and letting the fried chicken rest briefly before serving allows the juices to settle.
Common Mistakes to Avoid
Even with a good recipe, a few common missteps can lead to less-than-perfect fried chicken.
- Mistake: Not Marinating Long Enough. The buttermilk needs time to tenderize the chicken. If you rush this step, your chicken might be tough. Fix: Allow at least 4 hours, and ideally overnight, for marinating.
- Mistake: Overcrowding the Frying Pan. Adding too much chicken at once drastically lowers the oil temperature. This leads to greasy, unevenly cooked chicken with a pale crust. Fix: Fry in batches, allowing each piece ample space and time to cook properly.
- Mistake: Incorrect Oil Temperature. This is crucial for crispy, not greasy, chicken. Too low and it absorbs oil, too high and it burns. Fix: Use a reliable thermometer and aim for a steady 350°F (175°C). Adjust heat as needed between batches.
- Mistake: Not Letting the Coating Set. Placing chicken directly into the oil after coating means the breading might fall off. Fix: Let the breaded chicken rest on a wire rack for 10-15 minutes to help the coating adhere before frying.
Variations and Substitutions
This classic recipe can be adapted to suit your preferences and pantry.
| Variation or Ingredient | Substitution | Result |
|---|---|---|
| Spicy Kick | Add cayenne pepper or hot sauce to the buttermilk marinade and/or the flour dredge. | Spicy, flavorful fried chicken. |
| Herbaceous Crust | Add dried herbs like thyme, rosemary, or sage to the flour mixture. | A more aromatic and complex crust. |
| Gluten-Free | Use a gluten-free all-purpose flour blend or a mix of rice flour and cornstarch for the dredge. | A gluten-free version of classic fried chicken. Ensure your other ingredients are also certified gluten-free. |
| Buttermilk Substitute | For every cup of buttermilk needed, mix 1 cup of milk with 1 tablespoon of lemon juice or white vinegar. Let it sit for 5-10 minutes until slightly thickened. | A close approximation for tenderness, though the flavor profile might be slightly different. |
| Lighter Coating | Skip the egg wash and go straight from buttermilk to flour. Or, use a thinner flour mixture. | A less craggy, potentially thinner crust. |
Serving Suggestions and Pairings
Buttermilk fried chicken is a centerpiece dish that pairs wonderfully with a variety of classic sides. It’s perfect for a hearty family dinner, a casual backyard barbecue, or a potluck gathering.
Serve it piping hot. It’s traditionally enjoyed with creamy mashed potatoes and gravy, coleslaw, or a simple green salad. For something a little different, try it with macaroni and cheese or cornbread. A refreshing drink like Low Carb Cucumber Agua Fresca: Refreshing drink can provide a lovely contrast to the richness of the chicken.
Storage and Reheating
Leftover fried chicken can be stored and reheated for a delicious meal later.
| Method | Duration | Instructions |
|---|---|---|
| Refrigerator | 3-4 days | Once completely cooled, store the chicken in an airtight container or wrap tightly in foil or plastic wrap. Place on a baking sheet in a single layer if possible for best results upon reheating. |
| Reheating (Oven) | – | For the crispiest results, reheat in a preheated oven at 375°F (190°C) for 10-15 minutes, or until heated through. You can place it on a wire rack over a baking sheet to help keep the bottom crispy. |
| Reheating (Air Fryer) | – | Reheat in an air fryer at 350°F (175°C) for 5-8 minutes, or until crispy and hot. |
Nutritional Information
Approximate values will vary depending on ingredients, brands, and serving size.
| Nutrient | Amount per Serving |
|---|---|
| Calories | Approximately 500-700 kcal |
| Protein | Approximately 30-40g |
| Fat | Approximately 30-50g |
| Carbohydrates | Approximately 20-30g |
| Fiber | Approximately 1-2g |
| Sugar | Approximately 1-2g |
| Sodium | Approximately 800-1200mg |
Frequently Asked Questions
Can I make this recipe ahead of time?
You can marinate the chicken in buttermilk overnight, which is actually recommended for the best tenderness. However, for the best crispy texture, it’s best to bread and fry the chicken shortly before serving. The breadcrumbs can become soggy if left on too long.
Can I substitute one main ingredient?
While buttermilk is key for tenderness and flavor, you can use a milk and lemon juice/vinegar mixture as a substitute if needed. For the chicken, use bone-in, skin-on pieces for the most classic result; boneless, skinless pieces will cook faster and may dry out more easily.
How do I know when it is ready?
The chicken is ready when it is golden brown and has an internal temperature of 165°F (74°C) when checked with a meat thermometer. The juices should run clear when pierced with a fork.
How should I store it?
Store leftover fried chicken in an airtight container in the refrigerator for up to 3-4 days. For the crispiest results when reheating, it’s best to use an oven or air fryer.
Is this recipe good for everyday use?
This buttermilk fried chicken is a wonderful comfort food and perfect for special family meals or gatherings. While delicious, it’s best enjoyed as part of a balanced diet rather than an everyday staple due to its preparation method and richness.
Conclusion
Mastering this buttermilk fried chicken recipe will bring a beloved classic to your home cooking repertoire. The tender, juicy chicken combined with a perfectly seasoned, crispy crust is an unparalleled comfort food experience. Embrace the simple steps and enjoy the wonderfully satisfying outcome of this traditional, grandma-style favorite, proving that incredible flavor doesn’t have to be complicated.
Print
The Juiciest Buttermilk Fried Chicken Recipe
- Total Time: 60
- Yield: 6-8 servings 1x
Description
Golden brown, crispy, and incredibly juicy buttermilk fried chicken with a perfect blend of buttermilk tenderness and seasoned flour crunch. This classic, family-friendly recipe delivers restaurant-quality comfort food using simple ingredients and a slow marinating process.
Ingredients
3–4 lbs chicken pieces (bone-in, skin-on, thighs, drumsticks, breasts, and/or wings)
4 cups buttermilk (whole milk preferred)
3 cups all-purpose flour
2 large eggs
2 tablespoons paprika
1 tablespoon garlic powder
1 tablespoon salt
1 teaspoon black pepper
Instructions
Pat chicken pieces dry with paper towels and place in a large container or resealable bag
Pour buttermilk over chicken to fully submerge; seal and refrigerate for 4 hours or overnight
In a separate bowl, whisk together flour, paprika, garlic powder, salt, and black pepper
Beat eggs in a second bowl
Remove chicken from buttermilk, letting excess drip off
Dredge chicken in flour mixture, then dip into beaten eggs, allow dripping to 2-3 seconds, then return to flour and press firmly to coat
Let chicken rest on a wire rack for 15-20 minutes at room temperature
Heat oil in a heavy oven-safe skillet or cast iron pot to 325°F (about 2-3 inches deep)
Fry chicken in batches, skin side down, for 6-8 minutes per side until deep golden and crispy (adjust heat as needed to maintain stable oil temperature)
Transfer to a serving dish and keep warm in an oven set to 200°F (or reheat before serving if preferred)
Repeat with remaining chicken
Notes
Use a thermometer to ensure oil temperature stays around 300-325°F
For extra crispiness, let chicken rest on wire racks instead of paper towels
Bone-in pieces retain moisture better than boneless
can be made halal/grandma-style by using non-dairy shortening as pan coating if preferred
- Prep Time: 30
- Cook Time: 30
- Category: Southern Recipes
- Method: Frying
- Cuisine: American, Grandma-style
Nutrition
- Serving Size: 1 piece (approx 4 oz)
- Calories: 470
- Sugar: 3g
- Sodium: 750mg
- Fat: 27g
- Saturated Fat: 8g
- Carbohydrates: 15g
- Fiber: 1g
- Protein: 28g
- Cholesterol: 180mg