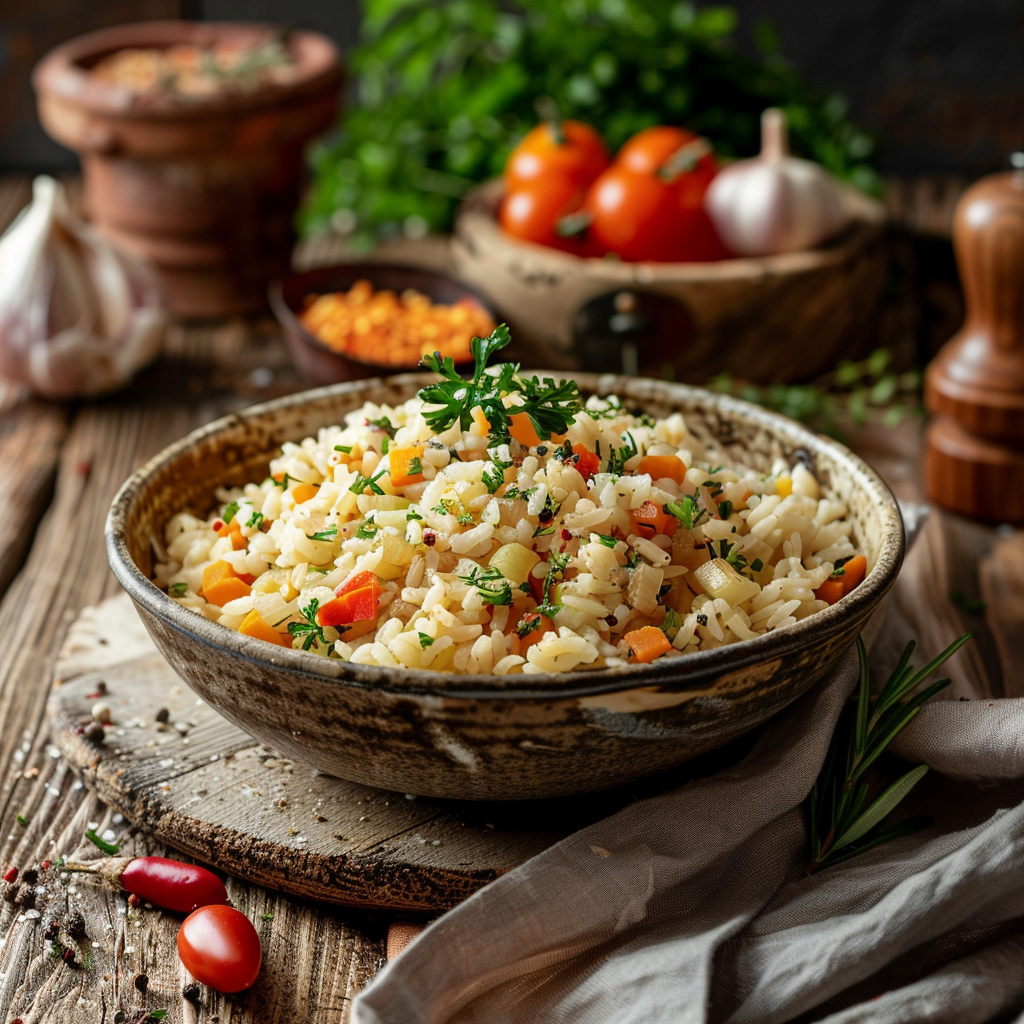
Rice pilaf is a wonderfully versatile and comforting dish that graces tables around the world. This simple recipe transforms plain rice into something special with its savory broth, aromatic seasonings, and tender vegetables. It’s the kind of old-fashioned side dish that pairs perfectly with almost any main course, bringing a humble elegance to weeknight dinners and special occasions alike. Whether you’re a beginner cook or looking for a reliable classic, this easy rice pilaf is sure to become a favorite in your kitchen.
Why This Recipe Works
This rice pilaf recipe is based on simple, wholesome ingredients that come together to create a deeply satisfying flavor and texture. The secret to its success lies in toasting the rice grains before simmering them in broth. This process enhances the nutty flavor of the rice and helps each grain remain separate and tender, rather than becoming mushy. Using a good quality broth, whether chicken or vegetable, infuses the rice with a savory depth that plain water simply can’t achieve.
The addition of finely diced onion and garlic provides a foundational aromatic base, while tender vegetables like carrots or mushrooms add a touch of sweetness and visual appeal. It’s a forgiving recipe that’s perfect for everyday comfort and adds a touch of homemade goodness to any meal. The resulting rice is fluffy, flavorful, and incredibly adaptable to various cuisines and main dishes.
Recipe Overview
| Prep Time | 15 minutes |
|---|---|
| Cook Time | 25-30 minutes |
| Total Time | 40-45 minutes |
| Servings | 6-8 |
| Difficulty | Easy |
| Category | Side Dish |
| Cuisine | Homemade |
| Best For | Weeknight Dinners, Special Occasions, Potlucks |
Ingredients
Gathering these simple ingredients is the first step to creating a delicious pot of rice pilaf.
| Ingredient | Quantity | Notes |
|---|---|---|
| Long-grain white rice (like Basmati or Jasmine) | 2 cups | Rinsed well |
| Butter or olive oil | 2 tablespoons | For sautéing |
| Yellow onion | 1 medium | Finely diced |
| Garlic | 3-4 cloves | Minced |
| Carrots or Mushrooms | 1 cup | Diced (optional) |
| Chicken or Vegetable Broth | 4 cups | Low-sodium is best to control saltiness |
| Herbs (e.g., dried parsley, thyme, or bay leaf) | 1 teaspoon dried, or 1 tablespoon fresh | Your favorite combination |
| Salt | To taste | |
| Black pepper | To taste | Freshly ground preferred |
The foundation of great rice pilaf is good quality long-grain rice, such as Basmati or Jasmine. These varieties have a pleasant aroma and texture that holds up well to the cooking process. Rinsing the rice is crucial to remove excess starch, which prevents it from becoming clumpy. Fresh aromatics like onion and garlic, gently sautéed in butter or olive oil, build layers of savory flavor. While optional, tender vegetables like finely diced carrots or mushrooms add a nutritional boost and delightful texture.
Step-by-Step Instructions
Follow these simple steps to create a perfect pot of homemade rice pilaf.
Prepare the Rice and Aromatics
- Rinse the rice thoroughly under cool running water until the water runs clear. Drain very well in a fine-mesh sieve.
- Melt the butter or heat the olive oil in a medium saucepan or Dutch oven over medium heat.
- Add the finely diced onion and cook until softened and translucent, about 5-7 minutes.
- Add the minced garlic and diced carrots or mushrooms (if using) and cook for another 2-3 minutes until fragrant and slightly softened.
Toast and Simmer the Rice
- Add the drained rice to the saucepan with the aromatics. Stir well to coat the rice grains and toast them for about 2-3 minutes. This toasting step is key to developing a nutty flavor and ensuring fluffy grains.
- Pour in the chicken or vegetable broth and add the dried herbs (if using). Season with salt and pepper to taste, keeping in mind that broths can vary in saltiness.
- Bring the liquid to a boil over medium-high heat.
- Once boiling, immediately reduce the heat to low, cover the saucepan tightly with a lid, and simmer for 18-20 minutes, or until most of the liquid has been absorbed and the rice is tender. Do not lift the lid during this time, as it will release steam needed for cooking.
Rest and Serve
- Remove the saucepan from the heat and let it stand, covered, for 5-10 minutes. This resting period allows the steam to redistribute, resulting in perfectly fluffy rice.
- Fluff the rice pilaf gently with a fork. Stir in fresh herbs if you are using them now.
- Taste and adjust seasoning if needed before serving.
Granny Tips for Perfect Results
- Use the Right Rice: Long-grain white rice like Basmati or Jasmine works best, as medium or short-grain rice can become gummy.
- Don’t Skip Rinsing: Rinsing removes excess starch that can make your pilaf sticky. Make sure to drain it very well.
- Toast the Grains: A few minutes of toasting the rice in the pan with the sautéed aromatics unlocks a wonderful nutty depth of flavor.
- Proper Liquid Ratio: The general ratio is 1 part rice to 2 parts liquid, but follow your broth and rice package recommendations if they differ. Using chicken or vegetable broth instead of water makes all the difference.
- Gentle Simmering is Key: Once boiling, a very low, gentle simmer is crucial for tender, perfectly cooked rice without scorching the bottom.
- Let it Rest: The 5-10 minute rest after cooking is non-negotiable for fluffy, separated grains. Resist the urge to uncover it too soon!
- Season Wisely: Taste your broth before adding salt. Broths can be salty, so adjust seasoning accordingly.
Common Mistakes to Avoid
- Mistake: Not rinsing the rice. This can lead to a sticky, clumpy pilaf due to excess starch. Always rinse until the water runs clear, and drain well.
- Mistake: Lifting the lid during simmering. Releasing steam will disrupt the cooking process and can result in unevenly cooked or undercooked rice. Keep the lid on tightly.
- Mistake: Overcooking or undercooking. Pay attention to the cooking time and listen for when the liquid is absorbed. A quick rest helps finish the cooking perfectly.
- Mistake: Using the wrong type of rice. Arborio or sushi rice will result in a much starchier, creamier texture unsuitable for a classic pilaf. Stick to long-grain.
- Mistake: Not toasting the rice. This simple step adds a delicious nutty flavor that is characteristic of good pilaf. Don’t skip browning the grains for a couple of minutes.
Variations and Substitutions
| Variation or Ingredient | Substitution | Result |
|---|---|---|
| Broth type | Water | Less depth of flavor, more neutral rice. Season well with salt and herbs. |
| Protein addition | Diced cooked chicken or shrimp, or cooked lentils | A more complete meal, served warm. Ensure additions are cooked through. |
| Aromatics | Shallots instead of onion | A milder, slightly sweeter onion flavor. |
| Vegetables | Peas, corn, diced bell peppers | Adds color, texture, and nutrients. Add frozen peas or corn in the last 5 minutes of simmering. |
| Herbs | Fresh herbs like parsley, chives, or cilantro | Add fresh herbs at the very end for a burst of bright flavor and color. |
| Lemon Zest | Zest of 1/2 lemon | Adds a bright, fresh note, especially nice with chicken dishes. Stir in at the end. |
Serving Suggestions and Pairings
This classic rice pilaf is incredibly versatile and makes a perfect accompaniment to a wide range of main dishes. Serve it warm, allowing its comforting aroma to fill the room. It’s an excellent choice for family dinners, holidays, or whenever you want a simple yet elegant side.
Pair this rice pilaf with roasted chicken, grilled fish, pork tenderloin, or lamb chops. It also works beautifully alongside vegetable stews or hearty bean dishes. For a lighter meal, consider serving it with a fresh green salad, like an Easy Italian Antipasto Salad, or a refreshing Pineapple Cucumber Salad. A sprinkle of fresh parsley or chives just before serving adds a lovely touch of color and freshness.
Storage and Reheating
| Method | Duration | Instructions |
|---|---|---|
| Refrigerator | 3-4 days | Store in an airtight container once cooled to room temperature. |
| Freezer | Up to 1 month | For best quality, freeze in an airtight container or freezer bag. Thaw in the refrigerator overnight before reheating. |
| Reheating | N/A | Gently reheat on the stovetop over low heat with a splash of water or broth to prevent drying out. Alternatively, microwave in a covered dish until heated through, stirring halfway. |
Allow the cooked rice pilaf to cool completely before storing it in the refrigerator. Avoid leaving it at room temperature for more than two hours. When reheating, a little extra moisture can revive its fluffy texture.
Nutritional Information
Approximate values will vary depending on ingredients, brands, and serving size.
| Nutrient | Amount per Serving (approx. 1/8th of recipe) |
|---|---|
| Calories | Approximately 180-220 |
| Carbohydrates | Approximately 35-45g |
| Protein | Approximately 3-5g |
| Fat | Approximately 3-6g |
| Fiber | Approximately 1-2g |
| Sugar | Approximately 1-2g |
| Sodium | Approximately 200-400mg (depending on broth) |
Frequently Asked Questions
Can I make this recipe ahead of time?
Yes, rice pilaf can be made ahead of time. Prepare it as directed and allow it to cool completely before storing it in an airtight container in the refrigerator for up to 3-4 days. Reheat gently on the stovetop or in the microwave.
Can I substitute one main ingredient?
You can certainly substitute the main vegetables, such as using diced celery or bell peppers instead of carrots or mushrooms. For a vegetarian option, always use vegetable broth. While other types of rice can be used, long-grain white rice like Basmati or Jasmine yields the best pilaf texture.
How do I know when it is ready?
The rice pilaf is ready when most of the liquid has been absorbed, and the rice grains are tender. You can check by gently tasting a grain after the resting period or by carefully lifting the lid to see if there’s still visible liquid pooling at the bottom.
How should I store it?
Store cooled rice pilaf in an airtight container in the refrigerator for up to 3-4 days. It can also be frozen for longer storage. Ensure the container is properly sealed to prevent the rice from drying out.
Is this recipe good for everyday use?
Absolutely! This easy rice pilaf recipe is designed for simple, everyday enjoyment. It’s a comforting, adaptable side dish that fits seamlessly into regular meal rotations and is simple enough for even beginner cooks to master.
Conclusion
This classic rice pilaf recipe offers a simple yet profoundly satisfying way to elevate your side dish game. Its fluffy texture, savory flavor, and comforting nature make it a timeless addition to any meal. Whether you’re looking for an easy weeknight solution or a crowd-pleasing option for gatherings, this homemade dish is sure to impress. Enjoy the warmth and deliciousness of this simple, old-fashioned rice pilaf!
Print
Classic Rice Pilaf
- Total Time: 45
- Yield: 6–8 servings 1x
- Diet: Vegetarian (if using vegetable broth)
Description
A comforting, versatile side dish with savory broth, toasted rice, and tender vegetables. This easy recipe delivers fluffy, flavorful grains perfect for weeknight meals or special occasions.
Ingredients
2 cups long-grain white rice (e.g., Basmati or Jasmine), rinsed
2 tablespoons butter or olive oil
1 medium yellow onion, finely diced
3–4 garlic cloves, minced
1 cup carrots or mushrooms, diced (optional)
4 cups low-sodium chicken or vegetable broth
1 teaspoon dried parsley or thyme
1 bay leaf
Instructions
Preheat a large skillet or Dutch oven over medium heat. Add butter or oil and sauté onion until tender, about 5 minutes.
Stir in garlic and rice, toasting for 2–3 minutes until rice is fragrant and slightly golden.
Add carrots or mushrooms (if using) and cook for 2 minutes.
Pour in broth, season with herbs and bay leaf, then bring to a boil.
Reduce heat to low, cover, and simmer for 15–20 minutes until liquid is absorbed and rice is tender.
Remove from heat, fluff with a fork, and let rest for 5 minutes before serving.
Notes
Rinse rice thoroughly to remove excess starch for fluffy results
For a richer flavor, use homemade broth
Storage: Cool completely, then refrigerate for up to 4 days or freeze for 2 months
- Prep Time: 15
- Cook Time: 30
- Category: Side Dishes
- Method: Simmering
- Cuisine: Homemade
Nutrition
- Serving Size: 1 cup
- Calories: 180
- Sugar: 0.5g
- Sodium: 250mg
- Fat: 5g
- Saturated Fat: 2g
- Carbohydrates: 25g
- Fiber: 1g
- Protein: 2g
- Cholesterol: 5mg