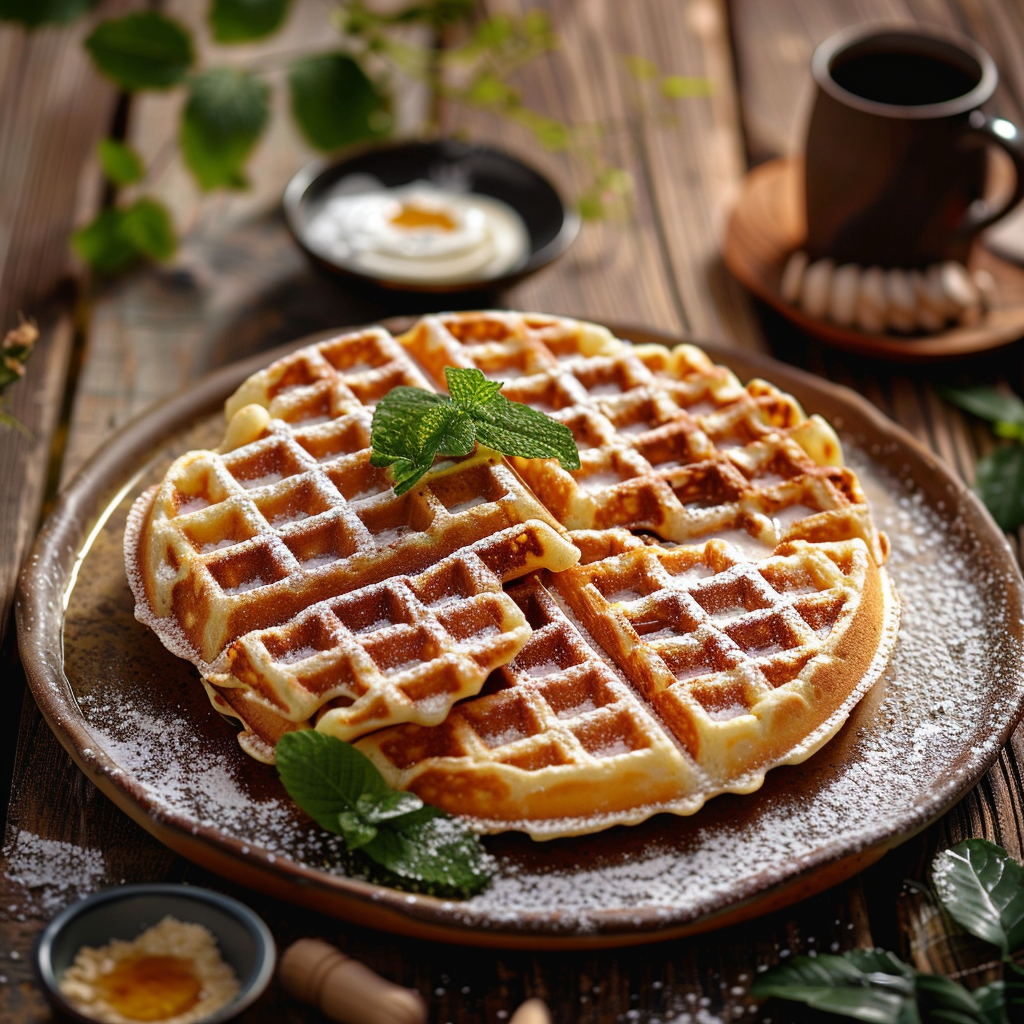
There’s nothing quite like a warm, fluffy stack of homemade buttermilk waffles to start the day. This easy, old-fashioned recipe delivers perfectly golden waffles with a tender crumb and a delightful tang from the buttermilk. It’s simple enough for any morning and special enough for weekend brunch. Get ready to fill your kitchen with that comforting aroma and enjoy a breakfast classic the whole family will adore.
Why This Recipe Works
This buttermilk waffle recipe is a favorite because it strikes a beautiful balance between simplicity and delicious results. The buttermilk tenderizes the flour, creating an exceptionally soft texture, while its natural acidity reacts with the baking powder for incredible fluffiness. Using melted butter ensures a tender crumb and adds richness without being heavy. It’s a straightforward method that consistently yields delightful waffles, making it a go-to for any occasion.
The magic truly happens when you combine the wet and dry ingredients just enough to bring them together. Overmixing toughens the batter, leading to flat, dense waffles. This recipe respects that principle, guiding you to mix until *just* combined, which is key to achieving those gorgeous, airy interiors and crispy exteriors we all love. It’s the kind of recipe that feels like a warm hug from grandma, practical and delicious.
Recipe Overview
| Prep Time | 10 minutes |
|---|---|
| Cook Time | 15-20 minutes (for multiple waffles) |
| Total Time | 25-30 minutes |
| Servings | 6-8 waffles |
| Difficulty | Easy |
| Category | Breakfast |
| Cuisine | American |
| Best For | Breakfast, Brunch, Family Meals |
Ingredients
These simple ingredients work together to create wonderfully tender and fluffy buttermilk waffles.
| Ingredient | Quantity | Notes |
|---|---|---|
| All-purpose flour | 2 cups | Spoon and leveled |
| Granulated sugar | 2 tablespoons | For a touch of sweetness |
| Baking powder | 2 teaspoons | Helps create a light texture |
| Salt | 1/2 teaspoon | Enhances flavors |
| Eggs | 2 large | Room temperature is best |
| Buttermilk | 2 cups | Or milk with 2 tbsp lemon juice/vinegar, let sit 5 min |
| Butter | 1/2 cup (1 stick) | Melted and slightly cooled |
| Vanilla extract | 1 teaspoon | For flavor |
The star of this recipe is undoubtedly the buttermilk. Its slight acidity reacts with the baking powder to give the waffles their signature lift and tender texture, while also adding a subtle, pleasant tang. Eggs provide structure and richness, and melted butter contributes to a moist, tender crumb. Ensuring your butter is slightly cooled before adding it prevents it from scrambling the eggs.
Step-by-Step Instructions
Follow these simple steps to create perfect buttermilk waffles from scratch.
Prepare the Batter
- In a large bowl, whisk together the all-purpose flour, granulated sugar, baking powder, and salt.
- In a separate medium bowl, whisk together the eggs, buttermilk, melted butter, and vanilla extract until well combined.
- Pour the wet ingredients into the dry ingredients. Whisk gently until just combined. A few small lumps are perfectly fine; do not overmix.
Cook the Waffles
- Preheat your waffle iron according to the manufacturer’s instructions. Lightly grease it if necessary.
- Pour about 1/2 to 3/4 cup of batter onto the hot waffle iron, spreading it slightly to cover the surface evenly. The amount of batter will depend on your waffle iron’s size.
- Cook for 3-5 minutes, or until the waffle is golden brown and crisp, and steam stops escaping from the iron.
- Carefully remove the waffle using a fork or spatula and place it on a wire rack to keep it crisp while you cook the remaining batter.
- Repeat with the remaining batter, greasing the waffle iron as needed between waffles.
Serve
- Serve your buttermilk waffles immediately with your favorite toppings.
Granny Tips for Perfect Results
Here are a few little tricks I’ve learned over the years to make your buttermilk waffles absolutely wonderful.
- Don’t Overmix: This is the most crucial tip! Mix the batter until just combined. A few lumps are perfectly okay and will actually make for fluffier waffles.
- Keep Waffles Crisp: As you cook them, place the finished waffles on a wire rack in a single layer. Avoid stacking them, as this can make them steam and lose their crispiness. Placing them with a bit of space around them also helps.
- Proper Waffle Iron Temperature: Ensure your waffle iron is fully preheated. If it’s not hot enough, the waffles will stick and won’t get golden brown and crispy.
- Use Room Temperature Ingredients: Eggs and buttermilk at room temperature incorporate more smoothly into the batter, leading to a more uniform texture.
- Butter Tip: Melt your butter and let it cool for a minute or two before adding it to the wet ingredients. This prevents it from cooking the eggs.
- Adjust Sweetness: If you prefer sweeter waffles, you can add another tablespoon of sugar to the dry ingredients. Taste the cooked batter (if you feel comfortable) before cooking the first waffle to check sweetness.
- Consistent Batter: If your batter seems too thick, add an extra tablespoon or two of buttermilk. If it seems too thin, add a tablespoon of flour. Aim for a consistency that pours easily but isn’t watery.
Common Mistakes to Avoid
Even simple recipes can have a few pitfalls. Here’s how to steer clear of common mistakes.
- Mistake: Overmixing the batter. This develops the gluten too much, resulting in tough, flat waffles. Mix only until the ingredients are just combined, and embrace any small lumps.
- Mistake: Not preheating the waffle iron sufficiently. A cold waffle iron leads to sticking and uneven cooking. Always ensure it’s fully heated according to its instructions before adding batter.
- Mistake: Greasing the iron too much. While some irons need greasing, too much oil or butter can make the waffles greasy and prevent them from crisping up properly. Use just a light coating if needed.
- Mistake: Opening the waffle iron too soon. Resist the urge to peek! Opening the iron before the waffle is ready can cause it to break apart. Cook until the steaming subsides, indicating it’s firm enough to remove.
- Mistake: Stacking waffles directly after cooking. As mentioned, stacking traps steam and makes them soggy. Use a wire rack or tent them loosely with foil while cooking the next batch.
Variations and Substitutions
You can easily adapt this basic recipe to suit different tastes and dietary needs.
| Variation or Ingredient | Substitution | Result |
|---|---|---|
| Buttermilk | Non-dairy milk (almond, soy, oat) mixed with 2 tbsp apple cider vinegar or lemon juice, let sit 5 min. | Creates dairy-free waffles with a similar tang. |
| Buttermilk | Regular milk (whole or 2%) | The waffles will be slightly less tender and won’t have the characteristic tang, but still delicious. |
| Granulated Sugar | Maple syrup or honey (reduce liquid slightly if using liquid sweetener) | Adds a different type of sweetness and a slightly chewier texture. |
| Vanilla Extract | Almond extract, orange extract, or lemon zest | Adds a different flavor profile. Use about 1/2 tsp for almond or orange extract, and 1 tsp for lemon zest. |
| Classic Waffles | Use regular milk instead of buttermilk and omit any added vinegar/lemon juice. | This will result in a standard, slightly less tender waffle. |
Serving Suggestions and Pairings
Buttermilk waffles are wonderfully versatile and pair well with a variety of toppings and sides.
Serve your waffles warm right off the iron for the best texture. Classic toppings include pure maple syrup, butter, fresh berries (strawberries, blueberries, raspberries), whipped cream, or a dusting of powdered sugar. For a heartier breakfast or brunch, consider serving them alongside crispy bacon or breakfast sausage. A side of fresh fruit salad is also a refreshing accompaniment.
If you’re looking for a delightful drink to complement your waffles, consider a refreshing Low Carb Cucumber Agua Fresca: Refreshing drink, offering a clean, crisp contrast to the rich waffles. Alternatively, a warm mug of Ginger Tea for Nausea: with 5 Powerful Benefits can offer a soothing start to the day.
Storage and Reheating
Leftover waffles can be stored and reheated for a quick breakfast later on.
| Method | Duration | Instructions |
|---|---|---|
| Refrigerator | 2-3 days | Place cooled waffles in an airtight container or wrap them tightly in plastic wrap. Stack with parchment paper in between to prevent sticking. |
| Freezer | 1-2 months | Place cooled waffles on a baking sheet and freeze until solid, about 1-2 hours. Transfer to a freezer bag or airtight container, separating layers with parchment paper. |
Reheating: The best way to reheat waffles is in a toaster, toaster oven, or conventional oven at around 350°F (175°C) until warm and crisp. Microwaving will make them soft and chewy, which some people enjoy, but they won’t be crispy.
Nutritional Information
Approximate values will vary depending on ingredients, brands, and serving size.
| Nutrient | Amount per Serving |
|---|---|
| Calories | Approximately 300-350 |
| Carbohydrates | Approximately 40-45g |
| Protein | Approximately 6-8g |
| Fat | Approximately 10-14g |
| Fiber | Approximately 1-2g |
| Sugar | Approximately 8-10g |
| Sodium | Approximately 300-350mg |
Frequently Asked Questions
Can I make this recipe ahead of time?
Yes, you can make the waffle batter a few hours ahead and store it in the refrigerator. However, the waffles themselves are best enjoyed fresh. Leftover cooked waffles can be stored in the refrigerator for up to 3 days and reheated.
Can I substitute one main ingredient?
The most common substitution is for buttermilk. If you don’t have buttermilk, you can easily make a substitute by mixing 2 cups of regular milk with 2 tablespoons of lemon juice or white vinegar and letting it sit for about 5-10 minutes. This will provide a similar tang and tenderizing effect.
How do I know when it is ready?
For the batter, you know it’s ready when it’s just combined with a few lumps. For the waffles being cooked, they are ready when they are golden brown and crisp, and when the steaming from the waffle iron has significantly reduced. Trust your senses and the indicator lights on your waffle iron.
How should I store it?
Leftover cooked waffles should be cooled completely and stored in an airtight container in the refrigerator for up to 3 days, or in a freezer-safe bag in the freezer for up to 2 months. It’s best to place parchment paper between the waffles to prevent them from sticking together.
Is this recipe good for everyday use?
Absolutely! This buttermilk waffle recipe is simple enough for a quick weekday breakfast or a delightful treat for a weekend brunch. It uses common pantry staples and comes together quickly, making it a reliable choice for satisfying your waffle craving any day of the week. This recipe is meant for everyday comfort and is not a replacement for medical advice.
Conclusion
These homemade buttermilk waffles are a true testament to simple, comforting cooking. With their fluffy texture and delicately tangy flavor, they’re sure to become a breakfast favorite. This easy recipe proves that delicious, classic breakfasts are achievable any day of the week.
Enjoy creating these wonderful buttermilk waffles in your own kitchen!
Print
Buttermilk Waffles
- Total Time: 30
- Yield: 8 waffles 1x
- Diet: Vegetarian
Description
Warm, fluffy homemade waffles with a tangy buttermilk base. Perfectly crisp on the outside and tender within, these easy waffles are ideal for weekday breakfasts or weekend brunch. Serve with maple syrup or fresh fruit for a comforting treat.
Ingredients
2 cups all-purpose flour
2 tablespoons granulated sugar
2 teaspoons baking powder
1/2 teaspoon salt
2 large eggs (room temperature)
2 cups buttermilk (or 2 cups milk + 2 tablespoons lemon juice/white vinegar)
1/2 cup (1 stick) butter (melted and slightly cooled)
Instructions
Preheat waffle iron to desired temperature according to manufacturer instructions
In a large bowl, whisk together flour, sugar, baking powder, and salt
In another bowl, beat eggs, then whisk in buttermilk and melted butter
Gently fold wet ingredients into dry ingredients until just combined—do not overmix
Pour batter onto hot waffle iron and cook until golden and crisp, 3–4 minutes per batch
Notes
For buttermilk substitute, let 2 cups milk with 2 tbsp lemon juice or vinegar sit for 5 minutes
Overmixing develops gluten and leads to dense waffles
Store leftovers in an airtight container at room temperature for up to 2 days or freeze for 2 months
- Prep Time: 10
- Cook Time: 20
- Category: Breakfast
- Method: Grilling
- Cuisine: American
Nutrition
- Serving Size: 1 waffle
- Calories: 280
- Sugar: 4g
- Sodium: 300mg
- Fat: 11g
- Saturated Fat: 7g
- Carbohydrates: 32g
- Fiber: 1g
- Protein: 6g
- Cholesterol: 75mg