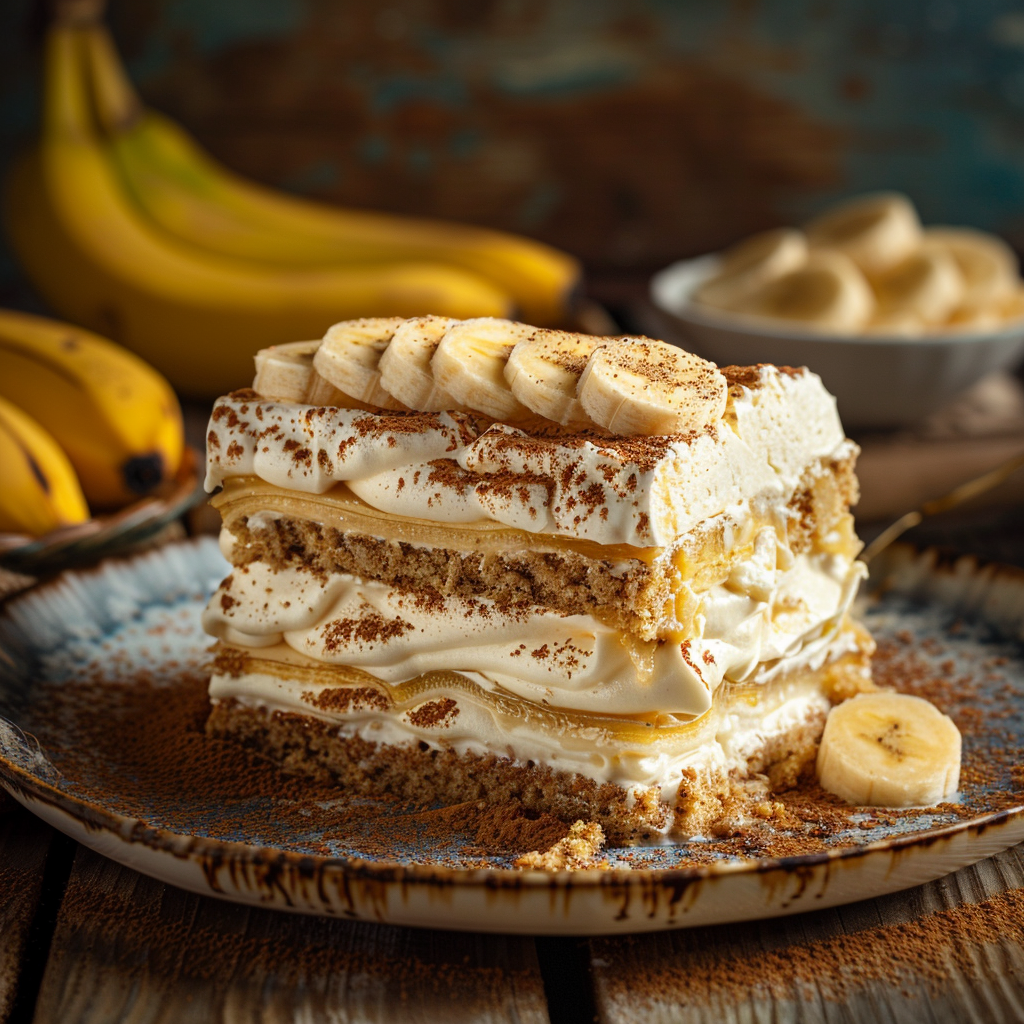
There’s something wonderfully comforting about an old-fashioned Banana Icebox Cake. This classic dessert brings together simple ingredients into a delightful, no-bake treat that’s perfect for any occasion. If you’re looking for an easy recipe that tastes like a hug from grandma, this Banana Icebox Cake is it. Its creamy texture and sweet banana flavor make it a family favorite that’s surprisingly simple to assemble, even on a busy weeknight.
Why This Recipe Works
This Banana Icebox Cake is a testament to how a few humble ingredients can create something truly special. The magic lies in the layers: soft Nilla wafers soaked just enough to become cake-like, rich vanilla pudding, and sweet, ripe bananas, all topped with a cloud of whipped cream. It’s a no-bake wonder that relies on chilling to bring all the flavors together, creating a harmonious bite every time.
The simplicity of this recipe makes it ideal for beginners or for those moments when you need a crowd-pleasing dessert without a fuss. It’s the kind of dessert that evokes warm memories and brings smiles to faces. The texture is wonderfully soft and creamy, avoiding any fuss with ovens or complicated techniques, making it a reliable go-to for gatherings or a simple family treat.
Recipe Overview
| Prep Time | 20 minutes |
|---|---|
| Cook Time | 0 minutes (chilling time required) |
| Total Time | 20 minutes + chilling time |
| Servings | 8-10 servings |
| Difficulty | Easy |
| Category | Dessert |
| Cuisine | American, Grandma-style |
| Best For | Family gatherings, potlucks, weeknight treats |
Ingredients
Gathering the ingredients for this Banana Icebox Cake is a breeze, as most are pantry staples. Each ingredient plays a key role in creating that signature creamy, fruity, and slightly crunchy texture.
| Ingredient | Quantity | Notes |
|---|---|---|
| Nilla Wafers | 1 box (about 11 oz) | Can use more or less depending on pan size and desired wafer layer thickness. |
| Milk | 3 cups | Whole milk is recommended for the creamiest pudding. |
| Vanilla Pudding Mix | 1 (3.4 oz) package | Instant vanilla pudding mix. Follow package directions for milk quantity or use 3 cups as specified. |
| Ripe Bananas | 3-4 medium | Choose bananas that are ripe but not overly mushy for the best flavor. |
| Vanilla Extract | 1 teaspoon | Enhances the overall flavor profile. |
| Whipped Topping or Meringue | 2 cups (or one 8 oz tub) | Cool Whip or homemade meringue can be used. |
The star ingredients here are, of course, the ripe bananas which bring natural sweetness and a wonderful fruity flavor. The Nilla wafers are crucial for creating the cake-like texture once they soften. For the pudding, using instant mix cuts down on time, but ensure you have enough milk for it to set properly. If you prefer a homemade pudding, feel free to substitute with your favorite recipe, ensuring it’s thick enough to hold its structure.
Step-by-Step Instructions
Follow these simple steps to create your delicious Banana Icebox Cake.
Prepare the Pudding and Bananas
- In a medium bowl, whisk together the instant vanilla pudding mix and 3 cups of milk according to package directions until smooth and beginnings to thicken. Stir in the vanilla extract. Set aside.
- Peel and thinly slice the ripe bananas. Aim for slices that are about 1/4 inch thick.
Assemble the Icebox Cake
- Spread a thin layer of the prepared vanilla pudding on the bottom of a 9×13 inch baking dish or a similar-sized serving dish. This helps the first layer of wafers adhere.
- Arrange a single layer of Nilla wafers over the pudding. Break wafers to fit if necessary, ensuring a mostly solid layer.
- Spread about half of the remaining vanilla pudding evenly over the Nilla wafers.
- Arrange half of the sliced bananas in an even layer over the pudding.
- Repeat the layers: another layer of Nilla wafers, the remaining pudding, and the remaining sliced bananas.
- Top the final layer of bananas with the whipped topping or meringue, spreading it evenly to cover the entire cake.
Chill and Serve
- Cover the dish tightly with plastic wrap or a lid.
- Refrigerate the Banana Icebox Cake for at least 4 hours, or preferably overnight. This chilling time is essential for the wafers to soften and meld with the pudding and bananas, allowing the flavors to develop.
- Before serving, you can garnish with a few extra banana slices or a sprinkle of crushed Nilla wafers if desired.
Granny Tips for Perfect Results
Here are a few extra tips from my kitchen to yours for the best Banana Icebox Cake:
- Use Ripe Bananas: The riper the bananas, the sweeter and more flavorful they will be. Look for bananas with plenty of brown spots.
- Don’t Skip the Chill Time: This is crucial. Rushing the chilling process means you’ll have crunchy wafers instead of a soft, cake-like texture. A minimum of 4 hours is necessary, but overnight is best.
- Adjust Pudding Consistency: If your pudding seems too thin after mixing, add a tablespoon or two more of milk until desired consistency is reached, but be careful not to make it too runny. If it’s too thick, whisk in a little more milk.
- Creamy Layers are Key: Ensure your pudding and whipped topping layers are spread evenly. This creates a balanced bite with every spoonful.
- Proper Wafer Placement: Try to get a good cover with the Nilla wafers. If there are gaps, the pudding might seep through too much, altering the texture.
- Gentle Handling: When assembling, handle the wafer and banana layers gently to maintain neatness, especially if you are intending to serve it at a special occasion.
Common Mistakes to Avoid
Even simple recipes can have a few pitfalls. Here are some common mistakes to watch out for with your Banana Icebox Cake:
- Mistake: Using Underripe Bananas. This leads to a less sweet and less flavorful cake. Fix: Always use ripe bananas with plenty of brown spots for optimal sweetness and flavor.
- Mistake: Not Chilling Long Enough. The result is a crunchy wafer dessert, not a soft icebox cake. Fix: Patience is key! Allow at least 4 hours, but ideally overnight, for the cake to fully set and soften.
- Mistake: Over-Mixing the Pudding. Over-mixing can sometimes make instant pudding too thin. Fix: Follow the package directions closely for mixing. If it seems too thin, let it sit a few minutes longer; it often thickens as it stands.
- Mistake: Using Stale Nilla Wafers. Stale wafers can impact the texture and freshness. Fix: Ensure your Nilla wafers are fresh from a sealed package.
- Mistake: Cutting Bananas Too Thickly. Thick banana slices can slide around and make the cake unstable. Fix: Slice bananas about 1/4 inch thick for a better distribution and stability.
Variations and Substitutions
While this recipe is wonderful as is, here are some ideas for how to customize your Banana Icebox Cake:
| Variation or Ingredient | Substitution | Result |
|---|---|---|
| Nilla Wafers | Graham crackers or shortbread cookies | A slightly different flavor profile and texture; graham crackers add a honey-like sweetness. Make sure to crush them if using as a base layer. |
| Vanilla Pudding | Banana cream pudding mix or cheesecake flavored pudding mix | Enhances or complements the banana flavor for a richer, more nuanced taste. |
| Whipped Topping | Homemade sweetened whipped cream or Italian meringue | A more delicate, fresh topping; homemade whipped cream needs to be kept chilled. |
| Extra Flavor | Add a tablespoon of rum extract or a pinch of cinnamon to the pudding | Adds a warm, subtle complexity to the overall flavor. (Rum extract is non-alcoholic). |
| Make it Richer | Add a layer of sliced strawberries or raspberries | Introduces a burst of tartness and fruitiness that complements the banana. |
| Individual Portions | Layer ingredients in individual cups or small jars | Makes for easy single servings and elegant presentation. |
Serving Suggestions and Pairings
This Banana Icebox Cake is best served chilled. It’s the perfect dessert after a comforting meal or as a sweet treat with a cup of tea.
If you enjoy simple, refreshing beverages alongside your desserts, consider pairing this cake with a warm cup of Ginger Tea for Nausea, which offers a gentle, warming contrast. It’s also lovely with a glass of cold milk or a light, unsweetened beverage like the Low Carb Cucumber Agua Fresca: Refreshing drink for a wonderfully refreshing experience.
For a more elaborate spread, it pairs well with light fruit salads or simple cookies. You can also serve it as part of a brunch spread or a dessert buffet. Garnish with a swirl of extra whipped cream, a few fresh banana slices, or a dusting of cinnamon for an added touch of elegance.
Storage and Reheating
Proper storage is key to enjoying your Banana Icebox Cake at its best.
| Method | Duration | Instructions |
|---|---|---|
| Refrigerator | 3-4 days | Cover the cake tightly with plastic wrap or a lid. Store in the refrigerator. The wafers will continue to soften and flavors will meld. |
| Freezer | Up to 1 month (texture may change) | Wrap the entire cake very well in plastic wrap and then aluminum foil. Thaw in the refrigerator for several hours or overnight before serving. The texture of the whipped topping and wafers may be slightly altered upon thawing. |
This cake is best enjoyed within the first 2-3 days as the wafers can become quite soft over time. It is not recommended to reheat this dessert; it is designed to be served cold.
Nutritional Information
Approximate values will vary depending on ingredients, brands, and serving size.
| Nutrient | Amount per Serving |
|---|---|
| Calories | Approximately 300-350 kcal |
| Carbohydrates | Approximately 45-55g |
| Protein | Approximately 3-5g |
| Fat | Approximately 12-18g |
| Fiber | Approximately 1-2g |
| Sugar | Approximately 25-35g (natural from bananas and added sugars from pudding/whipped topping) |
| Sodium | Approximately 150-250mg |
Frequently Asked Questions
Can I make this recipe ahead of time?
Yes, this Banana Icebox Cake is designed to be made ahead. In fact, it’s best when chilled for at least 4 hours, or preferably overnight, to allow the flavors to meld and the Nilla wafers to soften into a cake-like texture. This makes it a perfect dessert for entertaining.
Can I substitute one main ingredient?
Certainly! You can substitute Nilla wafers with graham crackers or shortbread cookies for a different crunchy layer. For the pudding, banana cream or cheesecake flavors work wonderfully. Instead of pre-made whipped topping, fresh homemade whipped cream can be used, just be sure to sweeten it to your liking.
How do I know when it is ready?
The cake is ready when it has chilled for the recommended time (at least 4 hours, ideally overnight) and the Nilla wafers have softened considerably, giving the dessert a uniform, soft, and sliceable texture. You can gently press the top; it should yield slightly but hold its shape. The whipped topping should be firm.
How should I store it?
Store your Banana Icebox Cake covered tightly with plastic wrap or a lid in the refrigerator. It will keep well for 3-4 days. The wafers will continue to soften over time, so it’s best consumed within that window for the ideal texture.
Is this recipe good for everyday use?
While delicious, this Banana Icebox Cake is often considered a special treat due to its sweetness and creamy layers. However, its simplicity makes it accessible for any occasion you want to make a little more special, whether it’s a family dinner, a birthday, or just a weekend indulgence. This recipe is meant for everyday comfort and is not a replacement for medical advice.
Conclusion
This easy Banana Icebox Cake is a delightful way to enjoy a classic, homemade dessert. With its simple assembly and comforting flavor profile, it’s sure to become a new favorite. The combination of soft wafers, creamy pudding, and sweet bananas makes it a dessert that appeals to everyone. Bring a taste of old-fashioned goodness to your table with this wonderful Banana Icebox Cake.
Print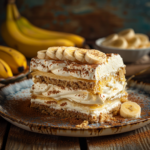
Easy Banana Icebox Cake: A Delicious Old-Fashioned Treat
- Total Time: 20
- Yield: 8-10 servings
- Diet: Vegetarian
Description
A no-bake classic dessert with layers of Nilla wafers soaked in milk, creamy vanilla pudding, ripe bananas, and whipped cream. Evoking warm memories and perfect for family gatherings.
Ingredients
Nilla Wafers, 1 box (about 11 oz)
Milk, 3 cups (whole milk recommended)
Vanilla Pudding Mix, 1 (3.4 oz) package
Ripe Bananas, 3-4 medium
Vanilla Extract, 1 teaspoon (use non-alcoholic alternative if needed)
Whipped Cream, 1 cup (prepared or store-bought)
Instructions
Line a 9×5-inch loaf pan or 9×9-inch square pan with plastic wrap.
Soak 1 layer of Nilla wafers in milk until softened, then press into the bottom of the pan.
In a large bowl, whisk pudding mix, milk, and 1 teaspoon vanilla extract until thickened (follow package instructions if different).
Spread half the pudding over the soaked wafers.
Layer 2-3 sliced bananas over the pudding.
Repeat: add another layer of soaked wafers, remaining pudding, and bananas.
Top with a final layer of Nilla wafers soaked in milk. Spread whipped cream evenly over the top.
Chill for 4-6 hours or until firm before slicing into portions.
Notes
Chilling is crucial to firm the layers. Use alcohol-free vanilla extract for halal compliance. Adjust wafer layers based on pan size. Store leftover in the fridge, covered, for up to 2 days.
- Prep Time: 20
- Category: Desserts
- Method: No-bake
- Cuisine: American
Nutrition
- Serving Size: 1 slice
- Calories: 130
- Sugar: 15g
- Sodium: 170mg
- Fat: 6g
- Saturated Fat: 4g
- Carbohydrates: 20g
- Fiber: 1g
- Protein: 3g
- Cholesterol: 20mg