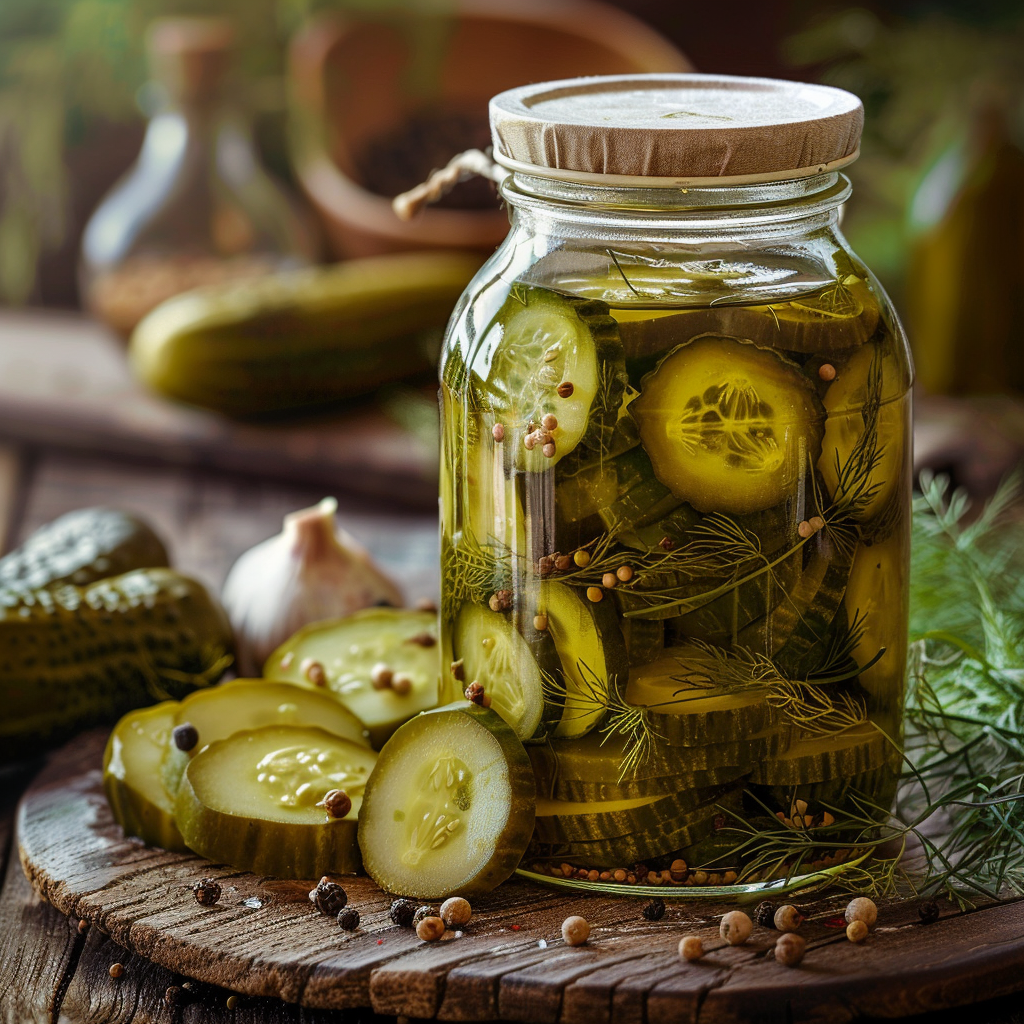
There’s nothing quite like the bright, crisp crunch of homemade dill refrigerator pickles. This easy recipe for dill refrigerator pickles puts that delightful flavor right at your fingertips, using simple ingredients you likely already have in your pantry. Forget the long canning process; these pickles are made in a flash and stored right in the fridge, ready to add a zesty pop to any meal. They are perfect for those who love a good old-fashioned pickle with that satisfying tang and fresh dill aroma. Get ready to enjoy the best pickles you’ve ever made from your own kitchen!
Why This Recipe Works
This recipe for dill refrigerator pickles is a winner because it’s wonderfully simple and delivers exceptional flavor without complicated steps. The magic comes from the quick brine–a balance of vinegar, water, salt, and sugar–that infuses the cucumbers with a perfect tangy, slightly sweet, and refreshing taste. Fresh dill and garlic add that classic pickle profile, making each bite a little burst of joy. It’s the kind of recipe that feels like a little kitchen victory, yielding a delicious result with minimal fuss.
Refrigerator pickles are fantastic because they require no special equipment or extensive simmering. You simply prepare your brine, pack your jars with fresh ingredients, and let time and the refrigerator do the rest. This method preserves the cucumber’s crisp texture, which can sometimes be lost in traditional canning. They are incredibly versatile, making them a perfect side for sandwiches, burgers, or even just a satisfying snack straight from the jar.
Recipe Overview
| Prep Time | 20 minutes |
|---|---|
| Cook Time | 5 minutes (for brine) |
| Total Time | 20 minutes active time, 24+ hours chilling |
| Servings | About 4 cups of pickles |
| Difficulty | Easy |
| Category | Side Dish / Condiment |
| Cuisine | American / Grandma-style |
| Best For | Snacks, sandwiches, burgers, charcuterie boards |
Ingredients
Gather these simple components for your delicious batch of homemade dill refrigerator pickles.
| Ingredient | Quantity | Notes |
|---|---|---|
| Cucumbers | 2 pounds | Kirby or Persian cucumbers work best; washed and sliced or whole |
| White Vinegar | 2 cups | 5% acidity |
| Water | 1 cup | Filtered water is preferable |
| Salt | 2 tablespoons | Pickling salt or kosher salt (not iodized) |
| Sugar | 2 tablespoons | Granulated sugar |
| Fresh Dill | 4-6 sprigs | Or 2 tablespoons fresh dill, chopped |
| Garlic | 4-6 cloves | Peeled and smashed or sliced |
| Red Pepper Flakes | 1/2 teaspoon | Optional, for a touch of heat |
The star of this show, of course, is the cucumber, and using fresh, firm ones is key to a good pickle. The brine is a careful balance; white vinegar provides the essential tang, while salt ensures preservation and flavor. Sugar tempers the acidity and adds a touch of sweetness that many folks love in their pickles. Fresh dill is non-negotiable for that classic pickle flavor, and garlic cloves add a warm, aromatic depth.
Step-by-Step Instructions
Follow these straightforward steps to create your own batch of perfect dill refrigerator pickles.
Prepare the Jars and Cucumbers
- Wash your cucumbers thoroughly under cool running water to remove any dirt.
- Prepare your cucumbers: you can slice them into 1/4-inch thick rounds, cut them into spears, or leave small ones whole.
- Have two clean jars ready (quart or pint-sized work well) that can hold at least 4 cups total. Ensure they have tight-fitting lids.
Make the Quick Brine
- In a medium saucepan, combine the white vinegar, water, salt, and sugar.
- Heat the mixture over medium heat, stirring constantly, until the salt and sugar are completely dissolved. Do not let it boil.
- Remove the saucepan from the heat once everything is dissolved.
Assemble the Pickles
- Divide the fresh dill sprigs and smashed garlic cloves evenly between the prepared jars.
- If using, add half of the red pepper flakes to each jar.
- Pack the prepared cucumber slices or spears tightly into the jars, leaving about 1/2 inch of headspace at the top.
- Carefully pour the warm brine over the cucumbers in each jar, making sure they are fully submerged.
- Tap the jars gently on the counter to release any trapped air bubbles. Add a little more brine if needed to cover the cucumbers.
Chill and Enjoy
- Wipe the rims of the jars clean and secure the lids tightly.
- Let the jars cool on the counter for about an hour.
- Transfer the jars to the refrigerator. Wait at least 24 hours before enjoying your dill refrigerator pickles for the best flavor development, though longer is even better.
Granny Tips for Perfect Results
Here are a few little secrets from my kitchen to help make your dill refrigerator pickles absolutely delightful.
- Use the Right Cucumbers: Kirby or Persian cucumbers are best because they have fewer seeds and are firmer, leading to a crispier pickle.
- Don’t Skip the Brine Heating: Heating the brine ensures the salt and sugar dissolve completely, creating a smooth, even flavor.
- Pack Them Tightly: Tightly packing the cucumbers ensures they stay submerged in the brine and pickle evenly.
- Patience is a Virtue: While you can taste them after 24 hours, these pickles truly develop their best flavor after 2–3 days in the refrigerator.
- Fresh Dill is Best: While dried dill can be used, fresh dill imparts a brighter, more authentic flavor to your refrigerator pickles.
- Taste as You Go (for the Brine): If you like your pickles a bit sweeter or tangier, you can slightly adjust the sugar and vinegar ratios in the brine.
Common Mistakes to Avoid
Prevent these common pitfalls to ensure your dill refrigerator pickles turn out perfectly crisp and flavorful every time.
- Mistake: Using Soft or Old Cucumbers. These will result in mushy pickles. Always choose firm, fresh cucumbers for the best crispness.
- Mistake: Not Dissolving the Salt and Sugar. Undissolved grains can create an inconsistent flavor and texture. Stir the brine thoroughly over heat until fully dissolved before adding to the jars.
- Mistake: Overtop the Jars or Not Covering Cucumbers. Cucumbers not fully submerged will not pickle properly and can spoil. Ensure they are completely covered by brine, adding more if necessary.
- Mistake: Storing at Room Temperature. Refrigerator pickles must stay chilled to prevent spoilage and maintain their crispness. They are not shelf-stable like canned pickles.
- Mistake: Using Iodized Salt. The iodine in regular table salt can sometimes cause cloudiness in the brine and impart a metallic taste. Stick to pickling salt or kosher salt.
Variations and Substitutions
Feel free to customize this easy dill refrigerator pickle recipe to suit your taste preferences.
| Variation or Ingredient | Substitution | Result |
|---|---|---|
| Sweetness | Increase sugar to 3-4 tablespoons | Sweeter pickles, like bread and butter style |
| Extra Spice | Add 1-2 dried chili peppers or more red pepper flakes | Hotter, spicier pickles |
| Garlic Flavor | Roast garlic cloves before adding, or use garlic powder (1/2 tsp) | Milder, sweeter garlic notes or a more intense garlic punch |
| Herb Blend | Add a few sprigs of fresh parsley, dill seeds, or mustard seeds | More complex herby flavor profile |
| Kind of Vinegar | Apple cider vinegar or a white wine vinegar | Slightly different tang, apple cider vinegar adds a fruitier note |
Serving Suggestions and Pairings
These homemade dill refrigerator pickles are wonderfully adaptable and make a fantastic addition to many meals.
Serve them chilled straight from the jar as a refreshing snack. They are the perfect accompaniment to sandwiches, like a classic ham and cheese or a turkey club. For barbecues and cookouts, place a bowl of these pickles alongside burgers, hot dogs, or grilled chicken. They also make a bright, crunchy addition to a charcuterie board or a plate of pulled pork. For something lighter, a Fresh Dill Pickle Salad Recipe would be a delicious way to use them too!
Storage and Reheating
Proper storage is essential for maintaining the quality and safety of your refrigerator pickles.
| Method | Duration | Instructions |
|---|---|---|
| Refrigerator | 3-4 weeks | Store in airtight jars. Ensure pickles remain submerged in brine. Stir before serving. |
| Freezer | Not Recommended | Freezing can damage the texture and make pickles mushy. |
Nutritional Information
Approximate values will vary depending on ingredients, brands, and serving size.
| Nutrient | Amount per Serving (approx. 1/4 cup) |
|---|---|
| Calories | ~30-40 calories |
| Carbohydrates | ~8-10g |
| Protein | ~0.5g |
| Fat | ~0.1g |
| Fiber | ~0.5g |
| Sugar | ~5-7g |
| Sodium | ~300-400mg |
Frequently Asked Questions
Can I make this recipe ahead of time?
Yes, you can definitely make these dill refrigerator pickles ahead of time. In fact, they taste even better when they’ve had a few days to pickle in the refrigerator, allowing the flavors to meld beautifully.
Can I substitute one main ingredient?
You can certainly experiment with substitutions, like using apple cider vinegar for a different tang or adding other spices. However, for the classic dill pickle flavor, fresh dill and the specified salt and sugar balance are quite important.
How do I know when it is ready to eat?
Your dill refrigerator pickles are ready to eat after at least 24 hours in the refrigerator. You’ll notice they have softened slightly from their raw state and have absorbed the tangy brine. The longer they sit, the more developed the flavor will be.
How should I store them?
Store your finished dill refrigerator pickles in airtight jars in the refrigerator. They should remain submerged in the brine to keep them fresh and crisp. Consume them within 3-4 weeks for the best quality.
Is this recipe good for everyday use?
Absolutely! This recipe is perfect for everyday comfort and enjoyment. Having a jar of homemade pickles in the fridge means you always have a zesty, crunchy element ready to liven up your meals or satisfy a craving. This recipe is meant for everyday comfort and is not a replacement for medical advice.
Conclusion
Making your own dill refrigerator pickles at home is a simple joy that yields wonderfully crisp and flavorful results. This easy recipe for dill refrigerator pickles is a testament to how straightforward deliciousness can be, using common ingredients to create a treat that elevates any meal. They are perfect for picnics, lunches, or just a satisfying snack. Embrace the charm of homemade goodness with this delightful pickle recipe, and enjoy the fresh taste all week long!
Print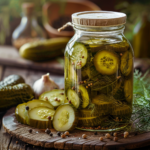
Easy Dill Refrigerator Pickles: A Refreshing Homemade Treat
- Total Time: 20
- Yield: About 80 spears or 4 cups 1x
- Diet: Vegetarian
Description
Crisp, tangy homemade dill pickles made in minutes! These quick refrigerator pickles use a simple brine of vinegar, sugar, and dill for a zesty snack or sandwich topper. Fresh and easy to customize!
Ingredients
2 pounds cucumbers (Kirby or Persian, washed and sliced or whole)
2 cups white vinegar (5% acidity)
1 cup water (filtered)
2 tablespoons salt (pickling or kosher)
1 tablespoon sugar
4–5 garlic cloves (peeled, slivered or minced)
1/4 cup fresh dill (plus extra for garnish)
1/2 teaspoon black peppercorns
Instructions
Combine vinegar, water, salt, and sugar in a saucepan. Bring to a boil, stirring until salt and sugar dissolve.
Pack cucumbers, garlic, dill, and peppercorns into clean pint jars.
Pour hot brine into jars, leaving 1/2-inch headspace.
Seal jars and let cool to room temperature.
Refrigerate for 24 hours before enjoying (pickles improve in flavor over 3-7 days).
Notes
Use firm, fresh cucumbers for best crispness
Avoid iodized table salt to prevent cloudiness
Taste brine before adding; adjust sweetness by adding more sugar if desired
Store in fridge for up to 2 months
For extra tang, use 3 cups vinegar instead of 2
- Prep Time: 20
- Cook Time: 5
- Category: Side Dishes
- Method: Refrigeration
- Cuisine: American
Nutrition
- Serving Size: 1 spear
- Calories: 12
- Sugar: 0.1g
- Sodium: 30mg
- Fat: 0.1g
- Saturated Fat: 0g
- Carbohydrates: 1.8g
- Fiber: 0.2g
- Protein: 0.1g
- Cholesterol: 0mg