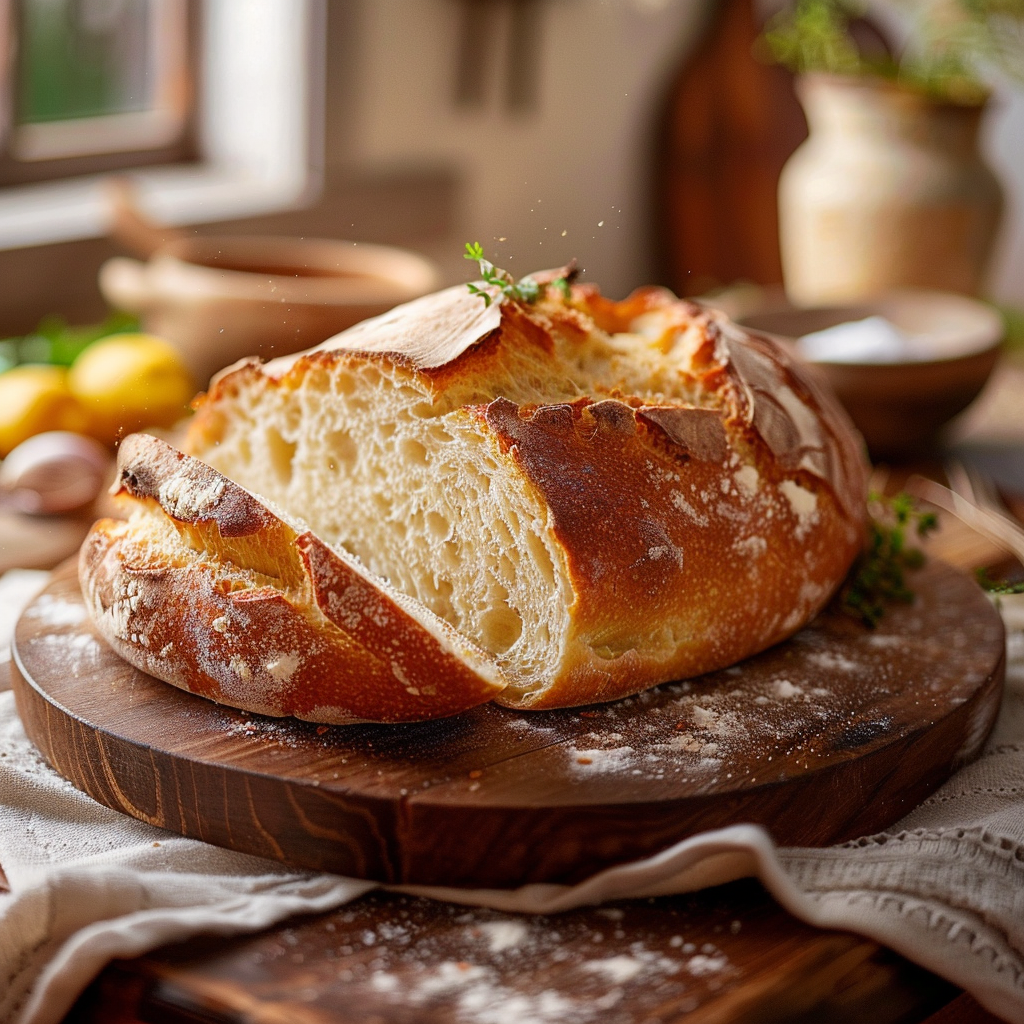
There’s something truly special about the aroma of freshly baked bread filling your home. This no-knead white bread recipe brings that comforting experience right to your kitchen, with a delightful simplicity that even the newest bakers can master. Forget the exhausting process of kneading; this method relies on time and a bit of patience to develop a wonderful texture. The result is a beautifully golden, crusty loaf with a soft, airy crumb, perfect for sandwiches, toast, or simply slathering with butter. It’s the kind of old-fashioned baking that warms the heart and satisfies the soul.
Why This Recipe Works
This no-knead white bread recipe works by leveraging the power of time to develop the gluten in the dough. Instead of physical kneading, a long, slow rise allows the flour to fully hydrate and the yeast to create the necessary structure and air pockets. This hydration process also helps to break down starches and proteins, leading to a more tender crumb. It’s a hands-off approach that requires just a bit of mixing and then letting the dough do all the hard work.
The magic truly happens when you bake the dough in a hot, preheated Dutch oven or heavy pot with a lid. This creates a steamy environment during the initial baking phase, which is crucial for developing a wonderfully crisp, golden crust. As the steam escapes, the crust sets, leaving you with that satisfying crackle and chewy perfection. It’s the kind of reliable, simple recipe that makes you feel like a seasoned baker, even if you’re just starting out.
Recipe Overview
| Prep Time | 15 minutes + 12-18 hours rising |
|---|---|
| Cook Time | 30-35 minutes |
| Total Time | 13 hours 45 minutes – 19 hours 45 minutes |
| Servings | 8-10 slices |
| Difficulty | Easy |
| Category | Bread |
| Cuisine | American Comfort Food |
| Best For | Sandwiches, toast, side bread |
Ingredients
The beauty of this bread lies in its simple, pantry-staple ingredients, making it accessible for any home baker. Each component plays a crucial role in achieving that perfect loaf.
| Ingredient | Quantity | Notes |
|---|---|---|
| All-purpose flour | 3 cups (375g) | Plus more for dusting |
| Instant yeast | 1 teaspoon | Also called rapid-rise or quick-rise yeast |
| Salt | 1 teaspoon | Fine sea salt or table salt |
| Warm water or milk | 1 ½ cups (360ml) | About 105-115°F (40-46°C) |
| Granulated sugar | 1 teaspoon | Helps activate the yeast |
| Butter or olive oil | 1 tablespoon | For greasing the bowl and optionally for serving |
The flour provides the structure, while the instant yeast is what makes the dough rise and creates that light texture. Salt is essential for flavor and helps control yeast activity. Warm liquid is key to waking up the yeast and creating a dough that’s easy to work with. A touch of sugar feeds the yeast and contributes to browning. A little bit of fat, either butter or oil, adds tenderness and richness to the finished loaf.
Step-by-Step Instructions
Follow these simple steps to create your delicious no-knead white bread.
Prepare the Dough
- In a large mixing bowl, whisk together the flour, instant yeast, and salt. Make sure they are well combined.
- In a separate liquid measuring cup, stir the sugar into the warm water or milk until dissolved. Let it sit for a minute to ensure it’s not too hot.
- Pour the wet ingredients into the dry ingredients.
- Stir with a wooden spoon or rubber spatula until just combined and no dry streaks of flour remain. The dough will be shaggy and sticky – that’s exactly what you want.
First Rise
- Lightly grease the inside of the bowl with butter or oil, or use a clean bowl.
- Turn the dough over in the bowl so the top is also lightly greased.
- Cover the bowl tightly with plastic wrap or a damp kitchen towel.
- Let the dough rise in a warm place for 12 to 18 hours. The dough should more than double in size and become bubbly.
Shape and Second Rise
- Generously flour a clean work surface and your hands.
- Gently scrape the risen dough onto the floured surface. It will be very puffy and airy.
- Fold the dough over itself a few times, gently tucking in the edges to form a rough ball or loaf shape. Avoid overworking it.
- Place the shaped dough onto a piece of parchment paper, seam-side down.
- Lightly dust the top of the dough with flour, then loosely cover it with plastic wrap or a clean kitchen towel.
- Let it rest for another 1 to 2 hours, or until it has noticeably puffed up again.
Bake the Bread
- About 30 minutes before the second rise is complete, place a Dutch oven or a heavy oven-safe pot with a tight-fitting lid into the oven. Preheat the oven to 450°F (230°C). It’s crucial that the pot is fully preheated.
- Once the dough has finished its second rise and the oven is preheated, carefully remove the hot Dutch oven from the oven. Remove the lid.
- Using the parchment paper as handles, carefully lower the dough into the hot Dutch oven. Be cautious as it is extremely hot.
- Place the lid back on the Dutch oven.
- Bake with the lid on for 30 minutes.
- After 30 minutes, carefully remove the lid. The bread should be pale and puffed.
- Continue to bake uncovered for another 5-10 minutes, or until the crust is a deep golden brown and sounds hollow when tapped.
- Carefully lift the bread out of the Dutch oven using the parchment paper and place it on a wire rack to cool completely. This is very important to prevent the bottom from becoming soggy.
Granny Tips for Perfect Results
Here are a few of my tried-and-true tips to help you achieve the best loaf every time.
- Use the right flour: While all-purpose flour works wonderfully, bread flour can offer a slightly chewier texture due to its higher protein content. Stick with All-Purpose for this easy version.
- Water temperature is key: Too cold, and the yeast won’t activate. Too hot, and you’ll kill it. Aim for lukewarm, like a comfortable bath.
- Don’t overmix or over-handle: The shaggy dough in the first step is correct. Resist the urge to knead or overwork the dough during shaping, as this can result in a tougher bread.
- Let it rise where it’s warm: Find a cozy spot for the dough to rise. An oven with just the light on, or on top of your refrigerator, can be ideal.
- Preheat that pot: A screaming hot Dutch oven is essential for a beautiful, crispy crust. Don’t skimp on this preheating time; it makes all the difference.
- Cool completely: Patience is a virtue when it comes to bread! Let the bread cool on a wire rack for at least an hour before slicing to allow the crumb to set properly.
Common Mistakes to Avoid
Even with this simple recipe, a few common pitfalls can lead to less-than-ideal results. Knowing them can help you avoid disappointment.
- Mistake: Using cold or tap water. Fix: Always use warm water (around 105-115°F or 40-46°C) to ensure the yeast activates properly.
- Mistake: Not letting the dough rise long enough. Fix: Trust the process and the time. The dough needs 12-18 hours for the first rise to develop properly, even if it doesn’t look like it’s doing much at first. Look for it to more than double in size and get bubbly.
- Mistake: Overworking the dough when shaping. Fix: Be gentle! The dough has done its work. A few gentle folds to create structure is all it needs. Too much handling will make the bread dense.
- Mistake: Not preheating the Dutch oven thoroughly. Fix: Ensure your Dutch oven is in the oven for the full 30 minutes of preheating at 450°F (230°C). A hot pot is key for crust development.
- Mistake: Slicing the bread too soon. Fix: Resist the temptation! Letting the bread cool completely on a wire rack is crucial for the texture and crumb structure to set. Cutting into hot bread can lead to a gummy interior.
Variations and Substitutions
While this recipe is wonderful as is, you can easily adapt it to suit your preferences.
| Variation or Ingredient | Substitution | Result |
|---|---|---|
| For a richer dough | Use whole milk instead of water | A slightly richer crumb and tender crust |
| For added flavor | Add 1-2 tablespoons of olive oil to the dough | A touch more tenderness and a hint of flavor |
| Herb Bread | Mix 1-2 tablespoons of dried herbs (rosemary, thyme, or Italian seasoning) into the dry ingredients | A fragrant, savory loaf perfect for dipping |
| Whole Wheat Blend | Replace 1 cup of all-purpose flour with whole wheat flour | A heartier, nuttier flavor and denser texture |
| Gluten-Free (Advanced) | Requires a specialized gluten-free flour blend designed for bread, and possibly xanthan gum. Follow specific GF no-knead recipes. | Requires significant recipe adjustment, this recipe is not directly convertible. |
Serving Suggestions and Pairings
This no-knead white bread is incredibly versatile and a comforting addition to any meal. Its warm, slightly crusty exterior and soft interior are delightful on their own or as a base for other dishes.
Serve it warm, freshly sliced, with a generous spread of butter, or use it for the ultimate grilled cheese sandwich. It makes a fantastic accompaniment to soups, stews, and hearty pasta dishes, perfect for dipping up every last bit. For breakfast, it’s wonderful toasted and topped with jam, honey, or a smear of cream cheese. Consider it the perfect bread for family dinners, picnics, or simply enjoying a quiet moment with a good cup of Ginger Tea for Nausea if you’re feeling a bit under the weather.
Storage and Reheating
Proper storage will help keep your homemade bread fresh and delicious.
| Method | Duration | Instructions |
|---|---|---|
| Room Temperature | 2-3 days | Store in a bread box, paper bag, or loosely wrapped in a clean kitchen towel to maintain crust freshness. Avoid plastic wrap, which can make the crust soggy. |
| Refrigerator | Up to 1 week | While this slows spoilage, refrigeration can dry out bread. Store as above, then refresh briefly in the oven or toaster before serving. |
| Freezer | Up to 3 months | Allow the bread to cool completely. Wrap the entire loaf or individual slices tightly in plastic wrap, then in aluminum foil or a freezer bag. Thaw at room temperature or reheat slices directly from frozen. |
Nutritional Information
Approximate values will vary depending on ingredients, brands, and serving size.
| Nutrient | Amount per Serving |
|---|---|
| Calories | Approximately 180 kcal |
| Carbohydrates | Approximately 35g |
| Protein | Approximately 6g |
| Fat | Approximately 3g |
| Fiber | Approximately 1.5g |
| Sugar | Approximately 2.5g |
| Sodium | Approximately 250mg |
Frequently Asked Questions
Can I make this recipe ahead of time?
Yes, the dough is designed for a long, slow fermentation. You can let the dough rise for the initial 12-18 hours, then refrigerate it for up to 3 days. When ready to bake, let it come to room temperature for about an hour before proceeding with shaping and the second rise.
Can I substitute one main ingredient?
For this specific recipe, sticking to the recommended flour (all-purpose) and yeast (instant) is best for consistent results. Water can be substituted with milk for a richer loaf. Adjustments to flour type can affect the texture and rise significantly.
How do I know when it is ready?
The dough is ready for its first rise after 12-18 hours when it has doubled or tripled in size and is visibly bubbly and full of air. The bread is ready to come out of the oven when the crust is a deep golden brown and it sounds hollow when you tap the bottom.
How should I store it?
Store cooled bread at room temperature in a paper bag or bread box for up to 3 days. For longer storage, the freezer is your best option. Always ensure the bread is completely cool before storing to prevent mold.
Is this recipe good for everyday use?
Absolutely! This no-knead white bread is wonderfully simple, making it perfect for everyday enjoyment. Whether you’re making sandwiches for lunch or need a comforting side for dinner, this recipe is a delightful addition to your weekly baking routine. This recipe is for everyday comfort and is not a replacement for medical advice.
Conclusion
Embracing the world of homemade bread baking has never been easier than with this effortless no-knead white bread recipe. It proves that delicious, crusty bread doesn’t require difficult techniques, just a little patience and quality ingredients. You’ll love the simplicity and the incredibly rewarding outcome of a warm, fragrant loaf baked right in your own kitchen. Give it a try and bring a touch of old-fashioned comfort to your table.
Print
Effortless No-Knead White Bread: A Grandma-Style Recipe
- Total Time: 75
- Yield: 8-10 slices 1x
- Diet: Vegetarian
Description
A soft, crusty loaf with a golden finish, made without kneading. Perfect for sandwiches, toast, or butter-slathered enjoyment. This hands-off method uses hydration and time for a tender, airy crumb.
Ingredients
3 cups (375g) all-purpose flour
1 teaspoon instant yeast
1 teaspoon salt
1½ cups (360ml) warm water or milk (105-115°F/40-46°C)
Additional flour for dusting
Instructions
Combine flour, yeast, and salt in a large bowl.
Stir in warm water or milk until a shaggy dough forms.
Cover and let ferment at room temperature for 12-18 hours.
Turn dough onto a floured surface, shape into a ball, and let rest 30 minutes.
Preheat oven to 450°F (230°C) with a Dutch oven or heavy pot with lid inside.
Carefully transfer dough to the preheated pot, cover, and bake 30 minutes.
Uncover and bake 5-10 minutes more until golden brown.
Let cool completely before slicing.
Notes
Use warm water or milk to activate yeast.
If milk is unavailable, substitute with non-dairy plant-based milk (calcium-fortified recommended).
Baked bread stores in a sealed container for up to 3 days.
For a softer crust, freeze slices and toast fresh.
- Prep Time: 15
- Cook Time: 35
- Category: Bread & Baking
- Method: Baking
- Cuisine: American Comfort Food
Nutrition
- Serving Size: 1 slice
- Calories: 85
- Sugar: 0g
- Sodium: 70mg
- Fat: 1g
- Saturated Fat: 0g
- Carbohydrates: 19g
- Fiber: 1g
- Protein: 3g
- Cholesterol: 0mg