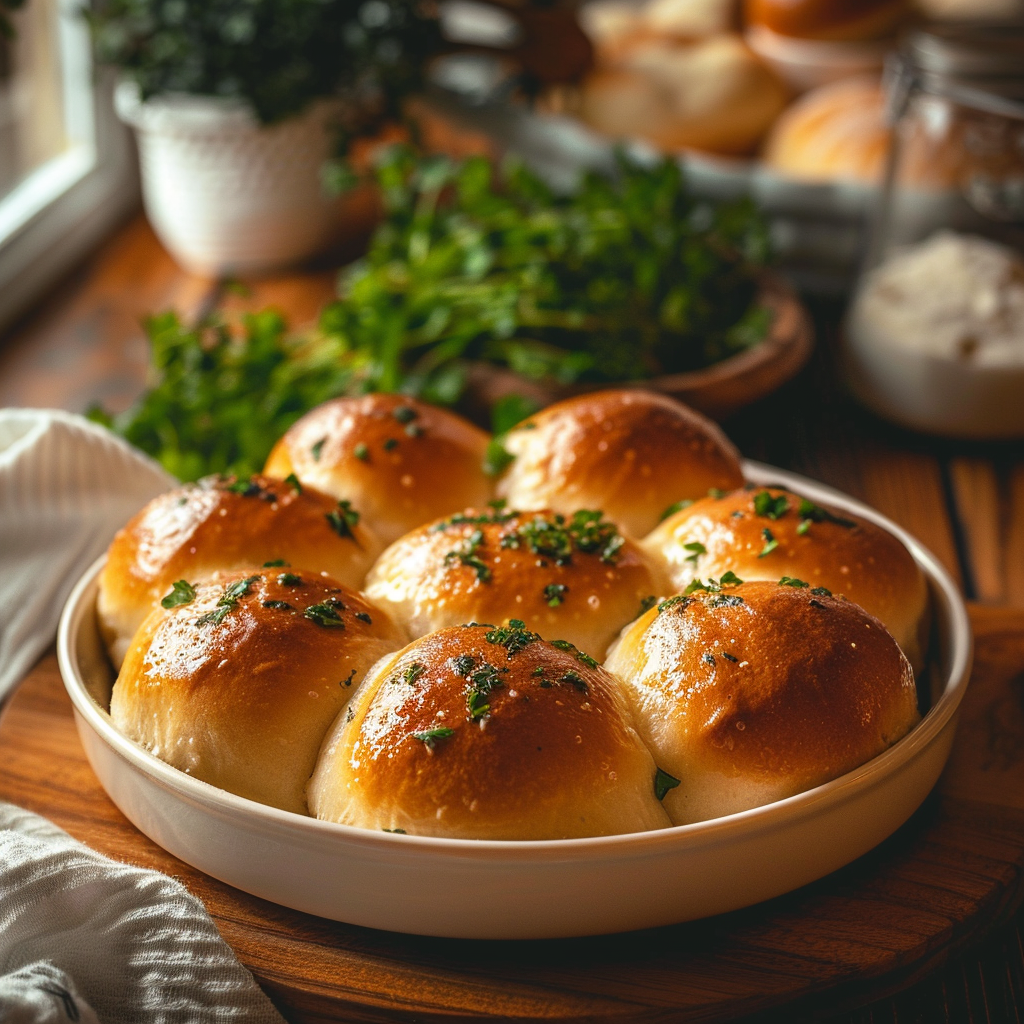
There’s nothing quite like the aroma and taste of warm, fluffy homemade dinner rolls fresh from the oven. This easy, old-fashioned recipe for dinner rolls delivers a soft, tender crumb that’s perfect for soaking up gravy, buttering generously, or simply enjoying on its own. They are a comforting staple, bringing a touch of grandma’s kitchen to any meal. Whether you’re a beginner baker or looking for a reliable go-to recipe, these homemade dinner rolls are sure to become a family favorite.
Why This Recipe Works
This recipe works because it relies on simple, classic techniques that have been perfected over generations. We use warm milk to awaken the yeast, butter for richness and tenderness, and just the right amount of sugar to feed the yeast and ensure a lovely golden-brown crust. The key to their fluffiness is proper kneading and allowing the dough ample time to rise, creating those airy pockets we all love. They are wonderfully simple to make, proving that delicious bread doesn’t need to be complicated.
The texture achieved with this recipe is wonderfully soft and slightly chewy, making them a joy to eat. They offer a comforting embrace for any meal, making even a simple weeknight dinner feel special. This is the kind of recipe I like to keep simple because every ingredient has a job, and the results are consistently delightful. They are a truly satisfying comfort food made with common pantry staples.
Recipe Overview
| Prep Time | 30 minutes |
|---|---|
| Cook Time | 20-25 minutes |
| Total Time | Approximately 2-3 hours (including rising) |
| Servings | 12 rolls |
| Difficulty | Easy |
| Category | Side Dish |
| Cuisine | American |
| Best For | Family dinners, holidays, comfort food meals |
Ingredients
These simple ingredients come together to create incredibly delicious homemade dinner rolls without any fuss.
| Ingredient | Quantity | Notes |
|---|---|---|
| All-purpose flour | 3 cups, plus more for dusting | Sifted for extra lightness |
| Active dry yeast | 2 \u00bc teaspoons (1 packet) | Ensure it’s fresh |
| Milk | 1 cup | Warmed to about 110°F (43°C) |
| Butter | \u00bc cup (4 tablespoons) | Unsalted, softened |
| Granulated sugar | \u00bc cup | For feeding the yeast and a touch of sweetness |
| Eggs | 1 large | Room temperature |
| Salt | 1 teaspoon | Fine sea salt recommended |
| Egg wash (optional) | 1 egg beaten with 1 tablespoon milk or water | For a golden sheen |
The star ingredients here are the yeast, which gives our rolls their signature lift, and the combination of milk and butter, which ensures a wonderfully tender and rich crumb. Using active dry yeast means we need to “proof” it first to ensure it’s alive and ready to work its magic. Room temperature eggs and softened butter incorporate more smoothly into the dough, leading to a better texture.
Step-by-Step Instructions
Follow these simple steps to create your own batch of soft, fluffy homemade dinner rolls.
Activate the Yeast
- In a large mixing bowl, combine the warm milk (not hot!) and granulated sugar. Sprinkle the active dry yeast over the top.
- Let it sit for 5 to 10 minutes until it becomes foamy. This process, called proofing, confirms your yeast is active and ready to use.
Make the Dough
- To the foamy yeast mixture, add the softened butter, the room temperature egg, and the salt. Whisk gently to combine.
- Gradually add the sifted all-purpose flour, about one cup at a time, mixing until a shaggy dough forms. You might not need all the flour, or you might need a little more, depending on humidity.
- Turn the dough out onto a lightly floured surface. Knead the dough for 8-10 minutes until it becomes smooth, elastic, and no longer sticky. If it’s too sticky, add a tablespoon of flour at a time; if too dry, add a teaspoon of water.
First Rise
- Lightly grease a clean bowl with a bit of oil or cooking spray. Place the kneaded dough into the bowl, turning it once to coat the surface.
- Cover the bowl tightly with plastic wrap or a clean kitchen towel. Let the dough rise in a warm place for about 1 to 1.5 hours, or until it has doubled in size.
Shape the Rolls
- Gently punch down the risen dough to release the air.
- Turn the dough out onto a lightly floured surface. Divide the dough into 12 equal portions for standard rolls.
- Shape each portion into a smooth ball by tucking the edges underneath. Place the shaped rolls into a greased 9×13 inch baking pan, leaving a little space between them for expansion.
Second Rise and Baking
- Cover the pan again with plastic wrap or a kitchen towel. Let the rolls rise in a warm place for another 30-45 minutes, or until they are visibly puffed up and nearly touching each other.
- Preheat your oven to 375\u00b0F (190\u00b0C).
- If desired, brush the tops of the rolls with an egg wash for a beautiful golden-brown finish.
- Bake for 20-25 minutes, or until the rolls are golden brown on top and sound hollow when tapped lightly on the bottom.
- Remove the rolls from the oven and brush with melted butter immediately for extra softness and flavor.
Granny Tips for Perfect Results
- Use a thermometer for your milk: Aim for around 105-115\u00b0F (40-46\u00b0C) for activating yeast. Too hot kills it, too cool makes it sluggish.
- Don’t skip the rise times: Patience is key here. Allowing the dough to double in size during both rises develops flavor and creates that essential fluffy texture.
- Proper kneading is crucial: Kneading develops the gluten structure, which traps the air produced by the yeast, leading to light and airy rolls.
- Measure flour correctly: Spoon flour into your measuring cup and level it off with a straight edge rather than scooping directly from the bag. Too much flour can make your rolls dense.
- Warm rising spot: Find a cozy place for your dough to rise, like a slightly warm oven (turned off!) or near a gentle heat source.
- Brush with butter after baking: This adds a lovely sheen and keeps the rolls incredibly soft and moist.
Common Mistakes to Avoid
- Mistake: Using water that’s too hot for the yeast. This kills the yeast, preventing the dough from rising at all. Always check the temperature of your liquid carefully.
- Mistake: Not kneading enough or kneading too much. Under-kneading results in tough rolls, while over-kneading can make them tough too. Aim for that smooth, elastic texture as described in the directions.
- Mistake: Skipping the second rise. This makes the rolls dense rather than light and fluffy. The second rise allows the dough to expand further before baking.
- Mistake: Baking at the wrong temperature. An oven that’s too cool will dry out the rolls, while one that’s too hot will burn them before they cook through. Ensure your oven is properly preheated.
Variations and Substitutions
| Variation or Ingredient | Substitution | Result |
|---|---|---|
| Dairy-Free Rolls | Use plant-based milk (like almond or oat milk) and a dairy-free butter alternative. | Maintains softness and flavor but is suitable for dairy-free diets. |
| Herbs or Garlic | Knead \u00bc cup of finely chopped fresh herbs (like rosemary or chives) or 1 teaspoon of garlic powder into the dough. | Adds an savory flavor perfect for accompanying meals. |
| Slightly Sweeter Rolls | Increase the sugar to \u00bc cup plus 2 tablespoons. | A touch more sweetness, enjoyable on their own or with butter. |
| Whole Wheat Rolls | Substitute up to 1 cup of all-purpose flour with whole wheat flour. You may need a little extra liquid. | A slightly nuttier flavor and denser texture. |
| Make-Ahead Rolls | After shaping, place rolls on baking sheet or in pan, cover loosely, and refrigerate overnight. Let them sit at room temperature for 30 minutes before baking. | Convenient for busy schedules; still deliciously fresh. |
Serving Suggestions and Pairings
These homemade dinner rolls are incredibly versatile and are best served warm, fresh from the oven. They make a wonderful addition to any dinner table, from casual weeknight meals to special holiday feasts.
Serve them alongside hearty stews, comforting soups, or roasted meats. A smear of butter, perhaps infused with herbs, is always a welcome accompaniment. They are also fantastic for making mini sandwiches or for enjoying with a side salad. Consider pairing them with a refreshing Low Carb Cucumber Agua Fresca: Refreshing drink for a balanced meal.
Storage and Reheating
| Method | Duration | Instructions |
|---|---|---|
| Refrigerator | 3-4 days | Store cooled rolls in an airtight container or resealable bag. |
| Freezer | 2-3 months | Wrap cooled rolls tightly in plastic wrap, then in foil or a freezer bag. |
| Reheating | N/A | To reheat, wrap frozen rolls in foil and bake at 350°F (175°C) for 15-20 minutes, or microwave individual rolls for 15-20 seconds until warm. You can also briefly warm refrigerator-stored rolls in the oven or microwave. |
Nutritional Information
Approximate values will vary depending on ingredients, brands, and serving size.
| Nutrient | Amount per Serving |
|---|---|
| Calories | Approximately 200 kcal |
| Carbohydrates | Approximately 30g |
| Protein | Approximately 5g |
| Fat | Approximately 7g |
| Fiber | Approximately 1g |
| Sugar | Approximately 4g |
| Sodium | Approximately 200mg |
Frequently Asked Questions
Can I make these homemade dinner rolls ahead of time?
Yes, you can certainly make these rolls ahead of time. You can shape them and refrigerate them overnight to bake fresh in the morning, or bake them completely and reheat them before serving. Ensure they are stored properly to maintain freshness.
Can I substitute one main ingredient in this recipe?
While many substitutions can work, changing the core ingredients like flour or yeast can significantly alter the outcome. For instance, substituting whole wheat flour for some all-purpose flour will change the texture slightly. It’s best to stick to the recipe for the most reliable results, or consult the variations section for safe swaps.
How do I know when my homemade dinner rolls are ready?
Your rolls are ready when they are golden brown on top and sound hollow when you lightly tap the bottom of one. They should also be nicely puffed up and have nearly doubled in size after the second rise.
How should I store leftover bread rolls?
Store cooled rolls in an airtight container at room temperature for up to 3-4 days. For longer storage, wrap them well and freeze them for up to 2-3 months. Reheat gently before serving to enjoy them warm and soft again.
Are these homemade dinner rolls good for everyday use?
Absolutely! These homemade dinner rolls are designed for everyday comfort and enjoyment. They are simple enough for a weeknight meal but special enough to impress guests. They are a nourishing addition to any table and a wonderful example of simple, satisfying homemade cooking.
Conclusion
Whipping up a batch of fluffy homemade dinner rolls is a rewarding experience that fills your home with a wonderful aroma and brings delicious comfort to your table. This easy, old-fashioned recipe ensures soft, tender rolls every time, perfect for any occasion. Give them a try and discover how simple it is to bake these delightful bread rolls from scratch. Enjoy sharing these warm, comforting bread rolls with your loved ones!
Print
Fluffy Homemade Dinner Rolls: An Easy Old-Fashioned Recipe
- Total Time: 180
- Yield: 12 rolls 1x
- Diet: Vegetarian
Description
These soft and tender homemade dinner rolls are the perfect addition to any meal. With a golden-brown crust and fluffy interior, they’re ideal for soaking up butter or sauce, bringing a comforting touch to your table.
Ingredients
3 cups all-purpose flour, sifted
2 1/4 teaspoons active dry yeast
1 cup milk, warmed to 110°F (43°C)
1/4 cup unsalted butter, softened
1/4 cup granulated sugar
1 large egg, at room temperature
1/2 teaspoon salt
1/2 teaspoon vanilla extract (optional)
Additional flour, for dusting
Instructions
Preheat your oven to 375°F (190°C) and lightly grease a baking sheet or oven-safe dish.
Sprinkle the yeast over the warm milk and let it sit for 5–10 minutes until frothy.
In a large mixing bowl, whisk together the sifted flour and salt.
In a separate bowl, cream the softened butter, sugar, and egg until smooth.
Add the milk-yeast mixture and vanilla extract to the butter-sugar-egg mixture, stirring until well combined.
Gradually add the dry ingredients to the wet ingredients, stirring until a soft dough forms.
Knead the dough on a lightly floured surface for about 5–7 minutes, until smooth and elastic.
Place the dough in a lightly greased bowl, cover with a clean kitchen towel, and let it rise in a warm place for 1 hour or until doubled in size.
Once risen, punch down the dough and divide it into 12 equal portions. Shape each into a ball and place them on the prepared baking sheet, spaced about 2 inches apart.
Cover the rolls again and let them rise for another 30–45 minutes, or until puffy.
Bake for 18–22 minutes, or until golden brown and sounds hollow when tapped.
Allow the rolls to cool slightly before serving.
Notes
Ensure your yeast is active and the milk is at the right temperature to activate it. You can keep the rolls in an airtight container for up to 2 days. They reheated in a 300°F oven for 5–10 minutes for a soft, fresh taste again.
- Prep Time: 30
- Cook Time: 20
- Category: Bread & Baking
- Method: Baking
- Cuisine: American
Nutrition
- Serving Size: 1 roll
- Calories: 180
- Sugar: 4g
- Sodium: 300mg
- Fat: 7g
- Saturated Fat: 4g
- Carbohydrates: 25g
- Fiber: 1g
- Protein: 4g
- Cholesterol: 30mg