These Honey Garlic Chicken Skewers are a wonderfully simple and delicious homemade meal that brings together tender chicken and a sweet, savory glaze. Perfect for busy weeknights or weekend gatherings, this recipe is designed to be easy to follow, using ingredients you likely have on hand. The combination of honey and garlic creates a classic flavor profile that’s always a hit with family and friends. Get ready to enjoy a comforting, flavorful dish that feels special without being complicated.
Why This Recipe Works
This Honey Garlic Chicken Skewers recipe truly shines because of its balance of sweet and savory notes, creating a glaze that perfectly coats each piece of chicken. The simplicity of preparation means you can get a flavorful meal on the table without spending hours in the kitchen. It’s the kind of recipe that’s forgiving and adaptable, making it a reliable choice for cooks of all levels.
The skewers themselves are not just for presentation; they help the chicken cook evenly and make for easy handling and serving, which is always a bonus for family meals. The char from the grill or oven adds a lovely depth of flavor that complements the sticky honey garlic sauce. It’s a dish that’s traditionally enjoyed and easy to make your own.
Recipe Overview
| Prep Time | 20 minutes |
|---|---|
| Cook Time | 12-15 minutes |
| Total Time | 32-35 minutes |
| Servings | 4-6 |
| Difficulty | Easy |
| Category | Main Dish |
| Cuisine | Homemade |
| Best For | Weeknight Dinners, Cookouts, Family Meals |
Ingredients
Gathering these simple ingredients is the first step to creating delicious Honey Garlic Chicken Skewers.
| Ingredient | Quantity | Notes |
|---|---|---|
| Boneless, skinless chicken breast or thighs | 1.5 lbs | Cut into 1-inch cubes |
| Bell peppers | 2 large | Mixed colors, cut into 1-inch pieces |
| Red onion | 1 large | Cut into 1-inch pieces |
| Pineapple chunks (optional) | 1 cup | Fresh or canned, drained |
| Olive oil | 2 tablespoons | For the glaze |
| Honey | 1/2 cup | For the glaze |
| Garlic | 4 cloves | Minced, for the glaze |
| Soy sauce or Tamari | 1/4 cup | Low sodium preferred |
| Rice vinegar or Apple cider vinegar | 1 tablespoon | For tanginess |
| Sesame oil | 1 teaspoon | Optional, for extra flavor |
| Cornstarch (optional) | 1 teaspoon | Mixed with 1 tablespoon water, for thickening the glaze |
| Salt and black pepper | To taste | For seasoning chicken |
| Wooden or metal skewers | As needed | Soak wooden skewers in water for 30 mins before use |
The star ingredients here are the chicken and the homemade honey garlic glaze. Using chicken breasts will result in a leaner outcome, while chicken thighs offer more moisture and richness. The glaze, a simple reduction of honey, garlic, and soy sauce, is what brings everything together. If you find pineapple too sweet, feel free to omit it. For a touch of brightness, a splash of rice vinegar cuts through the sweetness of the honey.
Step-by-Step Instructions
Follow these easy steps to whip up a batch of irresistible Honey Garlic Chicken Skewers.
Prepare the Skewers and Marinade
- If using wooden skewers, soak them in water for at least 30 minutes to prevent burning.
- Cut the chicken breasts or thighs into uniform 1-inch cubes. Season them generously with salt and black pepper.
- Cut the bell peppers and red onion into similar 1-inch pieces. If using pineapple, cut it into bite-sized chunks.
Make the Honey Garlic Glaze
- In a small saucepan, combine olive oil, honey, minced garlic, soy sauce ( or tamari), rice vinegar (or apple cider vinegar), and sesame oil (if using).
- Heat the mixture over medium heat, stirring occasionally, until it just begins to simmer. Let it bubble gently for about 2-3 minutes.
- If you prefer a thicker glaze, whisk together cornstarch and 1 tablespoon of water in a small bowl to create a slurry. Pour this into the simmering glaze, stirring constantly until it thickens slightly. Remove from heat and set aside.
Assemble the Skewers
- Thread the seasoned chicken cubes onto the prepared skewers, alternating with pieces of bell pepper, red onion, and pineapple chunks (if using). Don’t pack the ingredients too tightly, allowing heat to circulate around them.
Cook the Skewers
- For Grilling: Preheat your grill to medium-high heat. Lightly oil the grill grates to prevent sticking. Place the skewers on the hot grill and cook for about 10-12 minutes, turning frequently.
- For Baking: Preheat your oven to 400°F (200°C). Line a baking sheet with parchment paper or foil. Arrange the skewers on the prepared baking sheet. Bake for 12-15 minutes.
- During the last 3-5 minutes of cooking (whether grilling or baking), generously brush the skewers with the prepared honey garlic glaze on all sides. Continue cooking until the chicken is cooked through and the glaze is slightly caramelized.
Serve
- Remove the skewers from the grill or oven. Let them rest for a minute or two before serving.
Granny Tips for Perfect Results
Here are a few little tricks from my kitchen to ensure your Honey Garlic Chicken Skewers turn out just right every time.
- Uniform Cuts Matter: Make sure your chicken and vegetables are cut into similar-sized pieces. This ensures they cook evenly, so no piece is overcooked while another is still raw.
- Don’t Skip Soaking: If you’re using wooden skewers, soaking them is crucial for preventing them from catching fire on the grill or in the oven.
- Glaze Wisely: Apply the final glaze in the last few minutes of cooking. This helps it thicken and caramelize without burning, otherwise, the sugars can become bitter.
- Tend to the Heat: Whether grilling or baking, keep an eye on your skewers. Turn them regularly for even cooking and to get that beautiful caramelized effect from the glaze.
- Adjust Sweetness: Taste your glaze before you use it. If you prefer it sweeter, add a touch more honey. If you want it tangier, a little more vinegar can be added.
- Don’t Overcrowd: When assembling skewers, leave a small space between ingredients. This allows the heat to reach all sides for better cooking and browning.
Common Mistakes to Avoid
Even with a simple recipe, a few common missteps can keep your Honey Garlic Chicken Skewers from reaching their full potential.
- Mistake: Using unsoaked wooden skewers. This can lead to skewers catching fire, ruining your meal and potentially causing a hazard. Fix: Always soak wooden skewers for at least 30 minutes.
- Mistake: Overcooking the chicken. Dry, tough chicken is no fun. Fix: Keep an eye on the cooking time and remove skewers as soon as the chicken is cooked through.
- Mistake: Burning the glaze. Applying the glaze too early and cooking it at high heat can cause the sugars to burn. Fix: Add the glaze during the last few minutes of cooking.
- Mistake: Unevenly cut ingredients. This results in some pieces being cooked while others are still raw. Fix: Ensure all chicken and vegetables are cut into uniform, bite-sized pieces.
- Mistake: Not letting the glaze thicken. A thin glaze won’t coat the skewers nicely. Fix: Use the optional cornstarch slurry or simply let the glaze simmer a little longer to naturally thicken.
Variations and Substitutions
Feel free to customize these Honey Garlic Chicken Skewers with these easy variations and substitutions.
| Variation or Ingredient | Substitution | Result |
|---|---|---|
| Chicken | Shrimp or Tofu | Adjust cooking time accordingly; tofu will need to be firm and pressed. |
| Honey | Maple Syrup or Agave Nectar | Adds a slightly different sweet profile but works beautifully. |
| Soy Sauce | Coconut Aminos | Provides a similar umami flavor, great for those avoiding soy or looking for lower sodium. |
| Bell Peppers/Onion | Zucchini, cherry tomatoes, mushrooms, or broccoli florets | Adds a different vegetable profile and color. Adjust cooking time based on vegetable density. |
| Sesame Oil | A pinch of ginger powder or a little extra garlic | Enhances the aromatic notes of the glaze. |
| Gluten-Free | Use Tamari instead of soy sauce and ensure your cornstarch is gluten-free. | Makes the recipe suitable for those with gluten sensitivities. |
Serving Suggestions and Pairings
These Honey Garlic Chicken Skewers are wonderfully versatile and can be served in many ways.
Serve them hot off the grill or out of the oven for the best flavor and texture. They are fantastic as a main course alongside a fluffy bed of rice, a simple Korean Cucumber Salad, or steamed green beans. For a more complete meal, pair them with a fresh Easy Italian Antipasto Salad. They also make a delightful addition to a casual cookout or a potluck, especially when served with other grilled items or a side of your favorite coleslaw.
Garnish with toasted sesame seeds and chopped fresh green onions for an extra touch of freshness and visual appeal.
Storage and Reheating
Proper storage will help maintain the deliciousness of your leftover skewers.
| Method | Duration | Instructions |
|---|---|---|
| Refrigerator | 3-4 days | Store completely cooled skewers in an airtight container. |
| Freezer | 1-2 months | Freeze cooked skewers in a single layer on a baking sheet until solid, then transfer to a freezer-safe bag or container. Thaw overnight in the refrigerator before reheating. |
Reheating: To reheat, place skewers in a preheated oven at 350°F (175°C) for about 10-15 minutes, or until heated through. You can also reheat them gently in a skillet over medium-low heat. For a quicker reheat, microwave for 1-2 minutes, but be aware the glaze might not caramelize as nicely.
Nutritional Information
Approximate values will vary depending on ingredients, brands, and serving size.
| Nutrient | Amount per Serving |
|---|---|
| Calories | Approximately 350-450 kcal |
| Protein | Approximately 25-30g |
| Fat | Approximately 15-20g |
| Carbohydrates | Approximately 25-35g |
| Fiber | Approximately 2-4g |
| Sugar | Approximately 18-25g |
| Sodium | Approximately 500-800mg (can be lower with low-sodium soy sauce) |
Frequently Asked Questions
Can I make these skewers ahead of time?
Yes, you can certainly assemble the skewers ahead of time. Store them covered in the refrigerator for up to 24 hours before cooking. This allows the flavors to meld slightly. Cook them according to the directions when you’re ready to serve.
Can I substitute the chicken with another protein?
Absolutely! This recipe works wonderfully with shrimp, firm tofu, or even pork tenderloin. Just be sure to adjust the cooking time as different proteins cook at different rates. Shrimp cooks very quickly, while tofu may benefit from a quick pan-fry before skewering to get a nice crust.
How do I know when the chicken is cooked through?
The safest way to tell if the chicken is cooked through is by using a meat thermometer. It should register an internal temperature of 165°F (74°C). Visually, the chicken should no longer be pink inside and the juices should run clear.
How should I store leftovers?
Leftover Honey Garlic Chicken Skewers can be stored in an airtight container in the refrigerator for up to 3-4 days. Ensure they are completely cooled before sealing the container. Reheat them gently to enjoy them again.
Are these skewers good for a simple homemade meal?
Yes, these skewers are perfect for a simple homemade meal. They are easy to prepare, require minimal cleanup, and are generally well-loved by both kids and adults, making them ideal for everyday family dinners or casual get-togethers.
Conclusion
These Honey Garlic Chicken Skewers offer a delightful combination of sweet, savory, and tangy flavors, making them a standout homemade meal. They are simple to prepare, adaptable, and perfect for any occasion, from a quick weeknight dinner to a backyard barbecue. Enjoying these delicious skewers is a comforting experience that brings a touch of homemade goodness to your table.
Print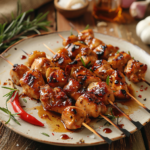
Honey Garlic Chicken Skewers: Easy & Delicious Homemade Meal
- Total Time: 35
- Yield: 4-6 servings 1x
Description
Tender chicken and a sweet, savory glaze for a family-friendly main dish. Skewers cook in 12-15 minutes for an easy, flavorful meal.
Ingredients
1.5 lbs boneless, skinless chicken breast or thighs, cut into 1-inch cubes
2 large bell peppers, mixed colors, cut into 1-inch pieces
1 large red onion, cut into 1-inch pieces
1 cup pineapple chunks (fresh or canned, drained), optional
2 tablespoons olive oil
1/2 cup honey
4 cloves garlic, minced
1/4 cup soy sauce or tamari (low sodium preferred)
2 tablespoons rice vinegar (optional)
Instructions
Preheat oven to 375°F (190°C). Alternatively, prepare a grill.
In a bowl, whisk together olive oil, honey, garlic, soy sauce, and rice vinegar (if using). Reserve 1/4 cup of the glaze for basting.
Thread chicken, bell peppers, onions, and pineapple onto skewers, alternating for even spacing.
Place skewers on a baking sheet lined with parchment paper. Pour remaining glaze over the skewers, ensuring they are coated.
Bake for 12-15 minutes, turning once and basting with reserved glaze, until chicken is cooked through and golden. For a charred finish, you can finish under the broiler for 1-2 minutes or grill over medium heat.
Let skewers rest briefly before serving.
Notes
For a gluten-free option, use tamari instead of soy sauce.
Marinating the chicken in the glaze for 15-30 minutes enhances flavor, but it’s not required.
If using wooden skewers, soak them in water for 30 minutes before threading to prevent burning.
- Prep Time: 20
- Cook Time: 15
- Category: BBQ & Cookout
- Method: Grilling and Baking
- Cuisine: Homemade
Nutrition
- Serving Size: 4 skewers
- Calories: 350
- Sugar: 25g
- Sodium: 240mg
- Fat: 30g
- Saturated Fat: 10g
- Carbohydrates: 50g
- Fiber: 5g
- Protein: 25g
- Cholesterol: 85mg