There’s something undeniably comforting about warm, freshly baked garlic breadsticks. This easy homemade recipe delivers that perfect combination of garlicky, buttery, cheesy goodness that pairs wonderfully with almost any meal. Whether you’re serving them alongside pasta, soup, or enjoying them as a snack, these delicious breadsticks are sure to become a family favorite. Get ready to impress everyone with this simple, old-fashioned recipe that tastes just like grandma used to make, featuring a delightful chew and a crispy crust.
Why This Recipe Works
This recipe for garlic breadsticks truly works because it focuses on simple, good-quality ingredients and a straightforward process. The key is in the generous amount of garlic and butter, which creates a wonderfully savory coating. Baking them until golden brown ensures a perfect texture, with a soft interior and just the right amount of crisp on the outside.
It’s the kind of recipe that feels both special and achievable, even for beginner bakers. The aroma alone as they bake is enough to make your kitchen feel warm and inviting. Plus, they are incredibly versatile, making them a go-to side dish for busy weeknights or relaxed weekend dinners.
Recipe Overview
| Prep Time | 15 minutes |
|---|---|
| Cook Time | 12-15 minutes |
| Total Time | 27-30 minutes |
| Servings | 8-10 breadsticks |
| Difficulty | Easy |
| Category | Side Dish |
| Cuisine | American, Grandma-style |
| Best For | Family meals, pasta dinners, soups, snacks |
Ingredients
Gathering your ingredients is the first step to creating these irresistible garlic breadsticks.
| Ingredient | Quantity | Notes |
|---|---|---|
| Italian bread or baguette | 1 loaf | About 16-20 inches long |
| Unsalted butter | 1/2 cup (1 stick) | Softened |
| Fresh garlic | 3-4 cloves | Minced very finely or pressed |
| Fresh parsley | 2 tablespoons | Finely chopped |
| Grated Parmesan cheese | 1/4 cup | Plus more for topping |
| Salt | 1/4 teaspoon | Optional, to taste |
| Black pepper | Pinch | Optional, to taste |
| Shredded mozzarella cheese | 1/2 cup | Optional, for a cheesy garlic breadstick |
The magic of these breadsticks comes from the simple combination of softened butter, fresh garlic, and bright parsley. Using softened butter ensures it mixes easily into a spreadable paste, allowing for even coating. Fresh garlic provides the most pungent flavor, so don’t be tempted to use garlic powder here if you can help it. Fresh parsley adds a lovely hint of freshness and color.
Step-by-Step Instructions
Follow these simple steps to create your perfect batch of homemade garlic breadsticks.
Prepare the Bread and Oven
- Preheat your oven to 375°F (190°C).
- Line a baking sheet with parchment paper or aluminum foil for easy cleanup.
- Slice the Italian bread or baguette lengthwise into two halves, or into individual breadsticks if you prefer them smaller. If slicing into individual breadsticks, aim for pieces about 4-6 inches long.
Make the Garlic Butter Mixture
- In a medium bowl, combine the softened butter, minced garlic, chopped fresh parsley, grated Parmesan cheese, salt, and pepper.
- Stir everything together until it forms a smooth, well-combined mixture. Taste and adjust seasoning if needed.
Assemble the Breadsticks
- Generously spread the garlic butter mixture evenly over the cut surfaces of the bread halves or individual breadsticks. Make sure to get into all the nooks and crannies.
- If you are making cheesy garlic breadsticks, sprinkle the shredded mozzarella cheese evenly over the garlic butter mixture on each piece.
- If you sliced the loaf into halves, you can either place them cut-side up or place them back together like a sandwich before slicing into breadsticks. For individual breadsticks, ensure they are spaced out on the prepared baking sheet.
Bake and Serve
- Place the baking sheet in the preheated oven.
- Bake for 12-15 minutes, or until the breadsticks are golden brown and the cheese (if used) is melted and bubbly. Keep an eye on them to prevent burning, as oven temperatures can vary.
- Remove from the oven and let cool slightly on the baking sheet for a minute or two before serving.
Granny Tips for Perfect Results
Here are a few of my favorite tips to make sure your garlic breadsticks turn out just right every time.
- Use Fresh Garlic: Freshly minced or pressed garlic offers a much more robust and authentic flavor than garlic powder. It makes a noticeable difference in the final taste.
- Soften the Butter Properly: Ensure your butter is truly softened, not melted. This allows it to spread easily and coat the bread evenly, creating a beautiful golden crust.
- Don’t Over-Bake: Watch your breadsticks closely during the last few minutes of baking. They can go from perfectly golden to burnt very quickly.
- Fresh Parsley is Key: While dried parsley can be used in a pinch, fresh parsley adds a vibrant color and a brighter, fresher flavor that truly elevates these breadsticks.
- Adjust Garlic to Your Liking: If you love garlic, feel free to add an extra clove or two to the butter mixture. If you’re sensitive to garlic, start with two cloves and add more if you think it needs it.
- Serve Warm: Garlic breadsticks are best enjoyed fresh and warm from the oven. The butter is at its most flavorful when melted and the bread is at its crispiest.
Common Mistakes to Avoid
Even simple recipes can have a few pitfalls. Here are some common mistakes to watch out for when making garlic breadsticks.
- Mistake: Using melted butter. Melted butter will soak into the bread too quickly and make it soggy, rather than creating a delicious crust. Instead, ensure your butter is softened to room temperature so it can be spread easily.
- Mistake: Using garlic powder. While convenient, garlic powder doesn’t offer the same depth of flavor as fresh garlic. For the best taste, always opt for fresh garlic. If you must use powder, use about 1 teaspoon and adjust to your preference.
- Mistake: Burning the breadsticks. Ovens can be tricky, and breadsticks bake quickly. Keep a close eye on them during the last few minutes of baking and remove them as soon as they are golden brown to avoid a burnt taste.
- Mistake: Not using enough butter and garlic. These breadsticks rely on a generous amount of the garlic butter mixture for their signature flavor and texture. Don’t be shy when spreading it onto the bread.
Variations and Substitutions
You can easily adapt this garlic breadstick recipe to suit your preferences or what you have on hand.
| Variation or Ingredient | Substitution | Result |
|---|---|---|
| Baguette/Italian Bread | Ciabatta, French bread, or even store-bought breadsticks | Slightly different textures and crusts, but still delicious. |
| Butter | Olive oil (use about 2/3 the amount of butter) or a dairy-free butter alternative | A slightly different flavor profile, and a dairy-free option. Olive oil will create a crispier, less rich breadstick. |
| Fresh Parsley | Dried parsley (use 1 teaspoon) | Less vibrant flavor and appearance, but still adds herbaceous notes. |
| Parmesan Cheese | Pecorino Romano or nutritional yeast (for dairy-free) | Different salty and nutty notes. Nutritional yeast offers a cheesy flavor without dairy. |
| Cheesy Garlic Breadsticks | Add shredded mozzarella, cheddar, or a blend of Italian cheeses | A wonderfully gooey and rich breadstick, perfect for pizza night. |
| Spicy Garlic Breadsticks | Add a pinch of red pepper flakes to the butter mixture | A gentle kick of heat to complement the garlic and butter. |
Serving Suggestions and Pairings
These delicious homemade garlic breadsticks are incredibly versatile and pair well with a variety of meals.
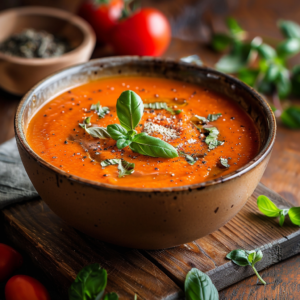
Serve them warm, straight from the oven, alongside your favorite pasta dishes, hearty soups, or a fresh salad. They are also a wonderful addition to a barbecue spread or a simple appetizer before dinner. For a truly Italian-inspired meal, pair them with a marinara sauce for dipping. A sprinkle of extra Parmesan and fresh parsley just before serving adds a final touch of elegance. They are especially delightful when served with a comforting bowl of soup, such as a creamy tomato or a hearty lentil variety.
Storage and Reheating
Proper storage will help keep your garlic breadsticks fresh and delicious.
| Method | Duration | Instructions |
|---|---|---|
| Room Temperature | 1-2 days | Store in an airtight container or a resealable bag. They will lose some of their crispness over time. |
| Refrigerator | 3-4 days | Store in an airtight container. Note that refrigeration can make them more dense. |
| Freezer | Up to 1 month | Wrap tightly in plastic wrap, then place in a freezer-safe bag or container. Thaw overnight in the refrigerator. |
To reheat, arrange the breadsticks on a baking sheet and warm in a preheated oven at 350°F (175°C) for 5-10 minutes, or until heated through and slightly re-crisped. You can also briefly toast them in a toaster oven or a skillet over medium heat.
Nutritional Information
Approximate values will vary depending on ingredients, brands, and serving size.
| Nutrient | Amount per Serving |
|---|---|
| Calories | Approximately 150-200 kcal |
| Carbohydrates | Approximately 15-20g |
| Protein | Approximately 4-6g |
| Fat | Approximately 8-12g |
| Fiber | Approximately 1-2g |
| Sugar | Approximately 2-3g |
| Sodium | Approximately 200-300mg |
Frequently Asked Questions
Can I make this recipe ahead of time?
You can prepare the garlic butter mixture and store it in the refrigerator for up to 3 days. You can also assemble the breadsticks ahead of time and refrigerate them, but they are best baked fresh for optimal crispness. If baking ahead, reheat them in the oven to revive their texture.
Can I substitute one main ingredient?
Yes, you can substitute the butter with olive oil for a lighter taste, or use a dairy-free butter alternative if needed. While fresh garlic is recommended, you can use garlic powder in a pinch (about 1 teaspoon per clove of garlic). For herbs, other fresh herbs like chives or a mix of Italian herbs can work.
How do I know when it is ready?
The garlic breadsticks are ready when they are a beautiful golden brown color, and the edges are slightly crispy. If you’ve added cheese, it should be melted and lightly bubbling. They should feel firm to the touch on the outside.
How should I store it?
Store cooled garlic breadsticks in an airtight container or a resealable bag at room temperature for 1-2 days, or in the refrigerator for up to 4 days. Store in the freezer, tightly wrapped, for up to one month. Reheat in the oven for best results.
Is this recipe good for everyday use?
Absolutely! This recipe is designed to be simple and satisfying, making it a perfect choice for an easy side dish any day of the week. It’s a comforting and familiar recipe that the whole family will adore, and it’s budget-friendly too.
Conclusion
Making your own garlic breadsticks is a wonderfully rewarding experience, and this easy recipe makes it accessible for everyone. The incredible aroma and delicious taste of these homemade garlic breadsticks are sure to become a staple in your kitchen. Enjoy the simple pleasure of this classic comfort food, perfect for any meal. These easy garlic breadsticks are a simple recipe that brings joy to the table.
Print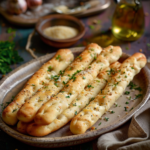
The Best Garlic Breadsticks Recipe: Easy & Delicious Homemade Treat
- Total Time: 30
- Yield: 8-10 breadsticks 1x
- Diet: Vegetarian
Description
Warm, garlicky, and golden-brown, these homemade garlic breadsticks deliver a perfect balance of crunchy and chewy textures with savory cheese and herbs. Ideal for pairing with pasta, soups, or enjoying as a snack.
Ingredients
1 loaf Italian bread or baguette (16–20 inches long)
1/2 cup (1 stick) unsalted butter, softened
3–4 cloves fresh garlic, minced very finely or pressed
2 tablespoons fresh parsley, finely chopped
1/4 cup grated Parmesan cheese (plus more for topping)
1/4 teaspoon salt, optional
Pinch black pepper, optional
1/2 cup shredded mozzarella cheese, optional
Instructions
Preheat oven to 375°F (190°C)
Cut the loaf of bread into 1-inch rounds or strips, depending on your desired shape
In a small bowl, mix softened butter, minced garlic, chopped parsley, and grated Parmesan cheese
Brush the garlic butter mixture generously onto each bread piece
Optionally, sprinkle mozzarella cheese on top for extra cheesiness
Arrange the breadsticks on a baking sheet lined with parchment paper
Bake for 12-15 minutes, or until golden and crisp on the outside
Taste and adjust seasoning with a pinch of salt and pepper if needed
Serve warm
Notes
Breadsticks can be made ahead and reheated in the oven for a few minutes. Try adding red pepper flakes for a bit of heat. Use a good quality Italian bread for the best texture.
- Prep Time: 15
- Cook Time: 15
- Category: Bread & Baking
- Method: Baking
- Cuisine: American, Grandma-style
Nutrition
- Serving Size: 1 breadstick
- Calories: 140
- Sugar: 1g
- Sodium: 280mg
- Fat: 8g
- Saturated Fat: 5g
- Carbohydrates: 13g
- Fiber: 1g
- Protein: 4g
- Cholesterol: 20mg