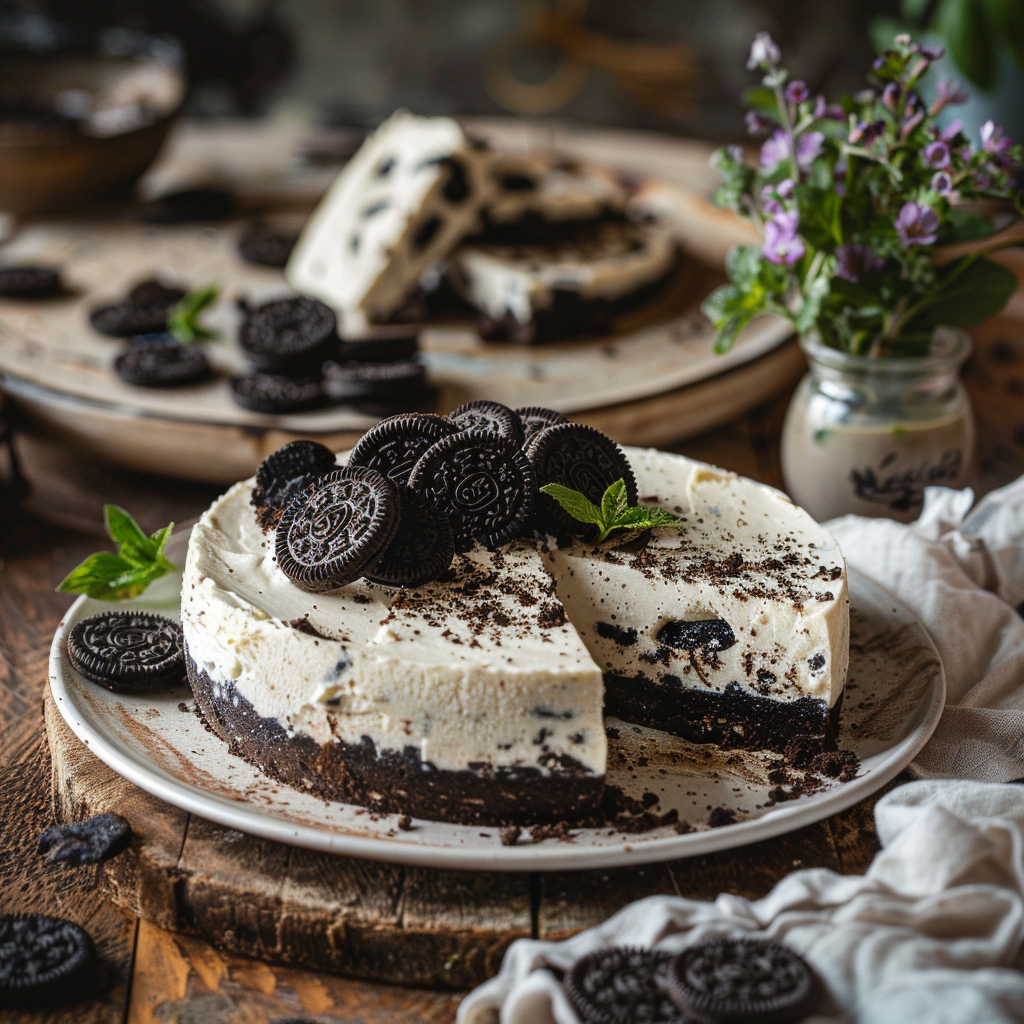
Whipping up a delightful No-Bake Oreo Cheesecake is one of those simple kitchen joys that brings smiles to everyone’s faces. This recipe is a comforting classic, perfect for when you crave something sweet but don’t want the fuss of baking. It’s incredibly easy to assemble, uses readily available ingredients, and results in a creamy, dreamy dessert that tastes like it came straight from grandma’s kitchen. Get ready to impress your family and friends with this straightforward, decadent treat that’s perfect for any occasion.
Why This Recipe Works
This no-bake cheesecake truly shines because of its simplicity and irresistible texture. We’re layering crushed Oreo cookies with a rich, creamy filling that sets up beautifully in the refrigerator, eliminating the need for an oven. The combination of cream cheese, whipped topping, and pudding creates a light yet decadent texture that contrasts wonderfully with the cookie crust. It’s the kind of recipe I love to keep simple because every ingredient has a job, ensuring a perfect dessert every time without the guesswork.
It’s fantastic for busy households, beginner bakers, or anyone who wants a foolproof dessert that always delivers. Whether it’s a last-minute craving or a planned gathering, this no-bake Oreo cheesecake is a reliable choice that feels both special and comforting. Its versatility also means you can easily adapt it with your favorite toppings or mix-ins.
Recipe Overview
| Prep Time | 20 minutes |
|---|---|
| Cook Time | 15 minutes (for melting butter) |
| Total Time | 4 hours (chilling time) |
| Servings | 10-12 servings |
| Difficulty | Easy |
| Category | Dessert |
| Cuisine | American, Grandma-style |
| Best For | Parties, Potlucks, Family Dinners, Special Occasions, Cravings |
Ingredients
Gathering the ingredients for this no-bake Oreo cheesecake is straightforward, ensuring you can get started without a special trip to the store.
| Ingredient | Quantity | Notes |
|---|---|---|
| Oreo Cookies | 36 cookies (about 3 cups crushed) | Plus extra for garnish |
| Butter | 6 tablespoons | Unsalted, melted |
| Cream Cheese | 2 (8-ounce) packages | Full-fat, softened |
| Powdered Sugar | 1 cup | Sifted |
| Whipped Topping | 1 (8-ounce) container | Thawed (like Cool Whip), or homemade sweetened whipped cream |
| Oreo Cookies | 1 cup | Crushed, for filling |
| Vanilla Extract | 1 teaspoon | |
| Milk | 1/2 cup | Cold, for pudding |
| Instant Vanilla Pudding Mix | 1 (3.4-ounce) package |
The core of this cheesecake lies in its simple yet effective components. The Oreo cookies provide a crunchy, chocolatey base and delightful chunks within the filling. Make sure your cream cheese is softened to room temperature; this is crucial for achieving a smooth, lump-free filling. The instant pudding mix thickens the filling beautifully while adding a classic vanilla flavor that complements the Oreos perfectly. Using thawed whipped topping helps create an airy, creamy texture that sets up without baking.
Step-by-Step Instructions
Follow these simple steps to create your delicious no-bake Oreo cheesecake.
Prepare the Crust
- Crush the 36 Oreo cookies into fine crumbs. You can do this in a food processor or by placing them in a zip-top bag and crushing them with a rolling pin.
- In a medium bowl, combine the Oreo crumbs with the melted butter. Stir until the crumbs are evenly moistened.
- Press the mixture firmly into the bottom and slightly up the sides of a 9-inch pie plate or springform pan. A flat-bottomed glass or measuring cup works well for this.
- Place the crust in the refrigerator to chill while you prepare the filling.
Make the Cheesecake Filling
- In a large bowl, beat the softened cream cheese with an electric mixer until it’s smooth and creamy.
- Gradually beat in the sifted powdered sugar until well combined and smooth.
- Stir in the vanilla extract and the crushed 1 cup of Oreo cookies for the filling.
- In a separate medium bowl, whisk together the cold milk and the instant vanilla pudding mix. Let it sit for about 5 minutes until it starts to thicken.
- Gently fold the thickened pudding into the cream cheese mixture until just combined. Be careful not to overmix.
- Fold in the thawed whipped topping until the filling is smooth and uniform in color.
Assemble and Chill
- Spoon the cheesecake filling evenly over the chilled Oreo crust.
- Smooth the top with a spatula.
- Garnish the top with additional crushed Oreo cookies or whole Oreos, if desired.
- Cover the cheesecake loosely with plastic wrap or foil.
- Refrigerate for at least 4 hours, or until firm. Overnight chilling yields the best results.
Granny Tips for Perfect Results
Here are a few little secrets to ensure your No-Bake Oreo Cheesecake turns out perfectly every time.
- Softened Cream Cheese is Key: Always ensure your cream cheese is at room temperature. Cold cream cheese will result in a lumpy filling, no matter how much you beat it.
- Don’t Over-Crush the Oreos for the Crust: You want some texture in the crust, not a fine powder. A few slightly larger pieces add a nice bite.
- Chill Time is Crucial: Resist the urge to serve it too soon. Proper chilling allows the cheesecake to firm up and the flavors to meld. A minimum of 4 hours is recommended, but overnight is even better.
- Gentle Folding: When combining the whipped topping and pudding mixture with the cream cheese, fold gently. This helps maintain the airy texture and prevents a dense filling.
- Measure Your Pudding Mix Accurately: Instant pudding mix is designed to thicken specific liquid amounts. Using too much or too little can affect how well your cheesecake sets.
- Room Temperature Stabilizes: If using homemade whipped cream instead of a topping, ensure it’s well-stiffened. This contributes to the overall structure of the no-bake cheesecake.
Common Mistakes to Avoid
Even simple recipes can have a few pitfalls. Here are some common mistakes to watch out for with this no-bake Oreo cheesecake.
- Mistake: Using cold cream cheese. This is the most common reason for a lumpy cheesecake filling. Ensure cream cheese is fully softened to room temperature for a smooth texture.
- Mistake: Not chilling long enough. A no-bake cheesecake relies on chilling to set. If you don’t let it chill for the recommended time (at least 4 hours), it may be too soft and won’t hold its shape when sliced.
- Mistake: Overmixing the filling after adding whipped topping. Overmixing can deflate the whipped topping, leading to a denser, less fluffy filling. Fold ingredients together until just combined.
- Mistake: Using regular pudding mix instead of instant. Regular pudding requires stovetop cooking and contains gelatin, which is not what we need for this no-bake method. Always use instant pudding mix for a quick-setting filling.
- Mistake: Pressing the crust too lightly. A loosely pressed crust can crumble when you try to serve the cheesecake. Press it down firmly and evenly to create a solid base.
Variations and Substitutions
This no-bake Oreo cheesecake is wonderful as is, but it’s also a fantastic canvas for your own creative twists.
| Variation or Ingredient | Substitution | Result |
|---|---|---|
| Oreo Crust | Chocolate graham crackers or chocolate wafer cookies | A slightly different but still delicious chocolate base. Adjust butter accordingly. |
| Vanilla Pudding | Chocolate or cheesecake flavored instant pudding mix | A deeper chocolate flavor or an even more intensely cheesecake-like filling. |
| Dairy-Free | Use dairy-free cream cheese, dairy-free butter, and a dairy-free whipped topping (like coconut cream-based). Use Oreos certified dairy-free. | A delicious dairy-free alternative that’s just as decadent. |
| Extra Oreo Goodness | Fold in chopped Oreos into the cream cheese mixture as well as the crust. | More cookie flavor and texture throughout the entire dessert. |
| Fruity Twist | Add a layer of fruit preserves (like raspberry or strawberry) over the crust before adding the filling, or swirl some into the filling. | A delightful contrast of fruity sweetness with the chocolate and cream. |
Serving Suggestions and Pairings
This No-Bake Oreo Cheesecake is best served chilled, straight from the refrigerator. Its rich, creamy texture makes it a perfect late-night treat or a star dessert for any gathering. It pairs wonderfully with a glass of cold milk. For a slightly more grown-up feel, it’s also lovely alongside a simple cup of coffee or a soothing cup of Ginger Tea for Nausea, offering a refreshing contrast to the sweetness. You can also serve it as part of a dessert buffet, perhaps alongside fresh berries or a light salad like Easy Retinol Carrot Salad for a balanced meal experience.
Garnish just before serving with extra crushed Oreos, chocolate shavings, a dollop of whipped cream, or even a few fresh raspberries for a pop of color.
Storage and Reheating
Proper storage keeps this no-bake cheesecake delicious for days.
| Method | Duration | Instructions |
|---|---|---|
| Refrigerator | 3-4 days | Cover cheesecake tightly with plastic wrap or aluminum foil. Store in the refrigerator. For best results, consume within the first 2 days for optimal texture. |
| Freezer | Up to 1 month | Wrap the entire cheesecake (or individual slices) tightly in plastic wrap and then in aluminum foil. Thaw in the refrigerator overnight before serving. Texture may be slightly softer after freezing. |
This cheesecake is not meant to be reheated. It is best enjoyed chilled directly from the refrigerator.
Nutritional Information
Approximate values will vary depending on ingredients, brands, and serving size.
| Nutrient | Amount per Serving |
|---|---|
| Calories | Approximately 350-400 kcal |
| Carbohydrates | Approximately 35-40g |
| Protein | Approximately 4-6g |
| Fat | Approximately 20-25g |
| Fiber | Approximately 1-2g |
| Sugar | Approximately 25-30g |
| Sodium | Approximately 150-200mg |
Frequently Asked Questions
Can I make this recipe ahead of time?
Yes, absolutely! This no-bake Oreo cheesecake is perfect for making ahead. In fact, it needs to chill for at least 4 hours to set properly, so making it the day before is ideal. This allows the flavors to meld and the texture to become perfectly firm.
Can I substitute one main ingredient?
You can substitute the Oreos with other chocolate cookies like chocolate wafers or chocolate graham crackers for the crust, but be mindful of the butter ratio. For the filling, you can experiment with different flavors of instant pudding mix, but avoid using cook-and-serve pudding as it requires heating and a different setting process.
How do I know when it is ready?
The cheesecake is ready when the filling is firm to the touch. When you gently press the center, it should feel stable and not give way easily. The edges should also look set, and the whole dessert should hold its shape when sliced. Chilling for the recommended time is the best way to ensure it’s ready.
How should I store it?
Store your No-Bake Oreo Cheesecake in the refrigerator, covered tightly with plastic wrap or foil, for up to 3-4 days. For longer storage, it can be frozen for up to a month, though the texture might change slightly upon thawing.
Is this recipe good for everyday use?
While incredibly delicious, this no-bake Oreo cheesecake is best enjoyed as a treat rather than an everyday food due to its richness and sugar content. It’s perfect for special occasions, family gatherings, or when you need a comforting dessert. This recipe is for everyday comfort and is not a replacement for medical advice.
Conclusion
This No-Bake Oreo Cheesecake is a winning recipe for anyone seeking a simple, no-fuss, yet incredibly delicious dessert. Its creamy texture, rich chocolate flavor, and easy assembly make it a family favorite. Whether you’re a seasoned baker or just starting, this grandma-style treat is sure to be a hit. Enjoy creating this easy and comforting No-Bake Oreo Cheesecake and share the joy it brings!
Print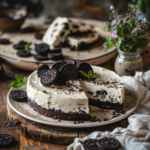
No-Bake Oreo Cheesecake
- Total Time: 255
- Yield: 10-12 servings 1x
- Diet: Vegetarian
Description
A creamy, no-bake dessert with a crunchy Oreo crust and dreamy cheesecake filling. Perfect for any occasion, this easy grandma-style recipe requires no oven and delivers a comforting, decadent treat.
Ingredients
36 Oreo cookies (about 3 cups crushed)
6 tablespoons unsalted butter, melted
2 (8-ounce) packages full-fat cream cheese, softened
1 cup powdered sugar, sifted
1 (8-ounce) container whipped topping, thawed (like Cool Whip)
1 (3.4-ounce) package instant vanilla pudding mix
Extra Oreo cookies for garnish (optional)
Instructions
Crush Oreo cookies in a food processor or ziplock bag until fine crumbs form.
Melt butter and mix into Oreo crumbs until fully combined.
Press the mixture into the bottom of a 9-inch springform pan, smoothing the top.
In a large bowl, beat cream cheese and powdered sugar until smooth.
Fold in thawed whipped topping and vanilla pudding mix until fully combined.
Pour the filling into the prepared crust and smooth the surface.
Chill for 4 hours or until firm.
Top with crushed Oreo cookies or sprinkles (optional) before serving.
Notes
Use a springform pan for easy slicing. For a richer flavor, replace half the Oreo crumbs with cocoa powder. Customizable with toppings like strawberries or chocolate shavings. Store in refrigerator up to 2 days.
- Prep Time: 20
- Cook Time: 15
- Category: Desserts
- Method: No-Bake
- Cuisine: American
Nutrition
- Serving Size: 1 serving
- Calories: 250
- Sugar: 18g
- Sodium: 150mg
- Fat: 14g
- Saturated Fat: 8g
- Carbohydrates: 25g
- Fiber: 1g
- Protein: 4g
- Cholesterol: 35mg