There’s something truly special about homemade vanilla ice cream. Made with simple, wholesome ingredients, this old-fashioned recipe brings a delightful creamy sweetness that store-bought versions often can’t match. It’s an easy recipe, perfect for beginners and seasoned cooks alike, offering a taste of pure, comforting goodness that your whole family will adore. This grandma-style classic is perfect for any occasion, from a simple weeknight treat to a celebratory dessert, promising moments of pure joy with every scoop.
Why This Recipe Works
This old-fashioned vanilla ice cream recipe works because it relies on the magic of simple, quality ingredients and a classic custard base. The combination of heavy cream and whole milk creates a rich, satisfying texture, while real vanilla extract provides that distinctive, comforting aroma and taste. Using egg yolks in the custard base helps to thicken and emulsify the mixture, resulting in an incredibly smooth and creamy ice cream that melts luxuriously on the tongue. It’s a straightforward process that yields a truly superior frozen treat.
It’s a wonderfully versatile recipe that forms the perfect base for countless other desserts. Imagine a scoop of this rich vanilla ice cream alongside a warm slice of apple pie, drizzled with chocolate sauce, or blended into a thick milkshake. Its pure, classic flavor profile makes it an ideal accompaniment to almost any sweet creation, proving why it’s been a beloved comfort food for generations.
Recipe Overview
| Prep Time | 20 minutes |
|---|---|
| Cook Time | 15-20 minutes |
| Total Time | 20 minutes (plus chilling and churning time) |
| Servings | About 6-8 servings |
| Difficulty | Easy to Medium |
| Category | Dessert |
| Cuisine | American, Grandma-style |
| Best For | Desserts, sweet treats, family gatherings |
Ingredients
Gathering these few simple ingredients is the first step to creating truly delicious homemade vanilla ice cream.
| Ingredient | Quantity | Notes |
|---|---|---|
| Heavy cream | 2 cups | Full fat is best for richness |
| Whole milk | 1 cup | Provides a lighter texture |
| Granulated sugar | 3/4 cup | Adjust to taste |
| Large egg yolks | 5 | For a smooth, creamy custard |
| Vanilla extract | 2 teaspoons | Use pure vanilla extract for best flavor |
| Salt | Pinch | Enhances sweetness |
The key to this luscious vanilla ice cream lies in the balance of dairy. Heavy cream lends that unmistakable richness, while whole milk prevents it from becoming too heavy, ensuring a perfectly creamy consistency. Sweetness comes from granulated sugar, which not only adds flavor but also helps lower the freezing point, contributing to a smoother texture. The egg yolks are crucial for creating a custard base that is smooth, stable, and velvety. Finally, pure vanilla extract is what gives this classic its signature comforting flavor.
Step-by-Step Instructions
Follow these simple steps to create your own batch of heavenly homemade vanilla ice cream.
Prepare the Dairy and Sugar Mixture
- In a medium saucepan, combine the heavy cream, whole milk, and 1/4 cup of the granulated sugar.
- Heat the mixture over medium heat, stirring occasionally, until it is warm and steamy but not boiling. Remove from heat.
Temper the Egg Yolks
- In a separate medium bowl, whisk together the egg yolks, the remaining 1/2 cup of granulated sugar, and a pinch of salt until well combined and slightly lighter in color.
- Slowly ladle about 1/2 cup of the warm cream mixture into the egg yolk mixture while whisking constantly. This process, called tempering, gently heats the yolks without scrambling them.
- Gradually whisk in another 1/2 cup of the warm cream mixture into the egg yolks, still whisking constantly.
Cook the Custard Base
- Pour the tempered egg yolk mixture back into the saucepan with the remaining warm cream mixture.
- Cook over low to medium-low heat, stirring constantly with a wooden spoon or heatproof spatula, until the custard thickens enough to coat the back of the spoon. Do not let it boil, as this can cause the eggs to scramble. This usually takes about 5-10 minutes.
- Remove the saucepan from the heat immediately.
Strain and Chill the Base
- Pour the custard base through a fine-mesh sieve into a clean bowl. This helps ensure an ultra-smooth ice cream by catching any small bits of cooked egg or other impurities.
- Stir in the pure vanilla extract.
- Cover the surface of the custard directly with plastic wrap to prevent a skin from forming.
- Chill the custard base thoroughly in the refrigerator for at least 4 hours, or preferably overnight. The colder the base, the better it will churn.
Churn the Ice Cream
- Once the base is completely chilled, churn it in your ice cream maker according to the manufacturer’s instructions.
- The ice cream will have a soft-serve consistency when churning is complete.
Harden the Ice Cream
- Transfer the churned ice cream to an airtight freezer-safe container.
- Press a piece of parchment paper or plastic wrap directly onto the surface of the ice cream to prevent ice crystals from forming.
- Freeze for at least 2-4 hours, or until firm and scoopable.
Granny Tips for Perfect Results
Here are a few little secrets from my kitchen to yours for making the very best vanilla ice cream:
- Chill Everything: Ensure your ice cream maker bowl (if it’s the freezer kind), the custard base, and even your serving bowl are thoroughly chilled. Cold ingredients churn faster and create smaller ice crystals, leading to smoother ice cream.
- Don’t Scramble the Eggs: The most important part of making a good custard base is tempering the eggs correctly and not letting the mixture boil. Gentle, consistent heat is key. If you see it starting to bubble, pull it off the heat immediately.
- Strain for Smoothness: Always strain your custard base. It’s a simple step that makes a big difference in achieving that luxurious, velvety texture everyone loves.
- Patience with Chilling: Don’t rush the chilling process. A deeply chilled base churns more efficiently and leads to a creamier result. Overnight is truly best if you can manage it.
- Flavor Boost: For an even deeper vanilla flavor, consider adding a vanilla bean (split and scraped) to the cream and milk mixture before heating, then straining out the bean pod along with the seeds after it’s steeped.
- Salt is Your Friend: That pinch of salt might seem insignificant, but it does wonders for enhancing the sweetness and overall flavor of the ice cream without making it taste salty.
Common Mistakes to Avoid
Even the simplest recipes can have a few pitfalls. Here’s how to steer clear of them for perfect vanilla ice cream every time:
- Mistake: Over-boiling the custard. This can lead to scrambled eggs, resulting in a grainy ice cream. Cook the custard gently over low heat, stirring constantly, and watch for it to coat the back of a spoon.
- Mistake: Not chilling the base thoroughly. A warm base will melt your ice cream maker’s churned ice cream too quickly, or it won’t freeze properly, leading to a watery or icy texture. Chill it for at least 4 hours, preferably overnight.
- Mistake: Adding alcohol to a cold base before churning. While alcohol lowers the freezing point and can make ice cream softer, adding too much or adding it too early to a very cold base can prevent it from churning properly.
- Mistake: Not covering the surface when chilling. Failing to cover the custard base with plastic wrap can result in a thick, unpleasant skin forming as it cools. This skin can affect the final texture.
- Mistake: Over-churning. Churning for too long can incorporate too much air, making the ice cream airy rather than dense and creamy. Follow your ice cream maker’s instructions for optimal churn time.
Variations and Substitutions
Once you’ve mastered the classic vanilla, feel free to get creative with these delicious variations and substitutions.
| Variation or Ingredient | Substitution | Result |
|---|---|---|
| For richer flavor | Use 2.5 cups heavy cream and 0.5 cup whole milk. | Even creamier, luxurious texture. |
| For a lighter version | Use 1.5 cups heavy cream and 1.5 cups whole milk. | Slightly less rich but still smooth and delicious. |
| Dairy-Free Vanilla Ice Cream | Substitute full-fat coconut milk (from a can) for heavy cream and a good quality almond milk or oat milk for whole milk. Ensure no separation. | A creamy, dairy-free alternative with a hint of coconut flavor. |
| Intensified Vanilla | Add 1 split and scraped vanilla bean to the cream and milk mixture when heating. | Deeper, more complex vanilla flavor. |
| Sweetness Adjustment | Reduce sugar to 1/2 cup for less sweetness, or increase to 1 cup for a very sweet treat. | Tailored sweetness level. |
Serving Suggestions and Pairings
This classic vanilla ice cream is wonderfully versatile and pairs beautifully with a variety of desserts and treats.
Serve it chilled, directly from the freezer after it has firmed up. It’s especially delightful on a warm afternoon or as the perfect end to a home-cooked meal. Try a generous scoop alongside warm fruit pies like apple or blueberry, or serve it with rich chocolate cake or brownies. A simple drizzle of Chrysanthemum Tea with Goji Berry infused syrup could add a unique twist. It’s also fantastic blended into milkshakes or as a base for ice cream floats. For a simple yet elegant presentation, garnish with a fresh mint sprig or a few berries.
Storage and Reheating
Proper storage is key to keeping your homemade vanilla ice cream tasting fresh and creamy.
| Method | Duration | Instructions |
|---|---|---|
| Refrigerator | N/A (do not store semi-frozen items in the fridge) | N/A |
| Freezer | 1-2 weeks | Store in an airtight freezer-safe container. Press parchment paper or plastic wrap directly onto the surface of the ice cream to prevent ice crystals. For best results, consume within 2 weeks. |
| Room Temperature | Depends on ambient temperature | Allow to soften for 5-10 minutes at room temperature before scooping. Will melt if left out too long. |
If the ice cream becomes very hard, allow it to sit at room temperature for a few minutes before scooping. Stirring it vigorously after it hardens can help break up larger ice crystals if they form.
Nutritional Information
Approximate values will vary depending on ingredients, brands, and serving size.
| Nutrient | Amount per Serving (approximate) |
|---|---|
| Calories | 250-300 kcal |
| Protein | 3-4g |
| Fat | 15-20g |
| Carbohydrates | 25-30g |
| Fiber | 0g |
| Sugar | 20-25g |
| Sodium | 30-40mg |
Frequently Asked Questions
Can I make this recipe ahead of time?
Yes, absolutely! The custard base can be made a day or two in advance and stored in the refrigerator. The ice cream itself can be churned and then frozen for up to 2 weeks, though it is freshest within the first week.
Can I substitute one main ingredient?
You can adjust the ratio of heavy cream to milk for richness, or use alternative milks for a dairy-free version, but substituting the egg yolks will significantly change the texture, likely making it icier. For instance, using fewer egg yolks will result in a less creamy ice cream.
How do I know when it is ready?
The custard base is ready when it thickens enough to coat the back of a spoon. For churning, the ice cream is ready when it reaches a soft-serve consistency. After freezing, it is ready when it is firm enough to scoop.
How should I store it?
Store your homemade vanilla ice cream in an airtight freezer-safe container. Pressing a piece of parchment paper or plastic wrap directly onto the surface before sealing the lid helps prevent ice crystals from forming and keeps it fresh.
Is this recipe good for everyday use?
This recipe is a wonderful treat for everyday comfort and enjoyment! While it’s made with wholesome ingredients, it is a rich dessert and best enjoyed as part of a balanced diet. This recipe is meant for everyday comfort and is not a replacement for medical advice.
Conclusion
Making your own old-fashioned vanilla ice cream is a rewarding experience that brings a taste of pure comfort and delight into your home. This easy recipe uses simple ingredients to create a wonderfully creamy and smooth dessert that surpasses store-bought options. Enjoying a scoop of this homemade vanilla ice cream is a simple pleasure that can brighten any day. Give this classic grandma-style recipe a try, and savor the delicious results!
Print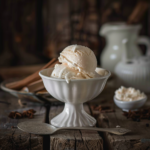
The Best Old-Fashioned Vanilla Ice Cream Recipe
- Total Time: 45
- Yield: 6-8 servings 1x
- Diet: Dairy-free (contains eggs)
Description
A creamy, homemade vanilla ice cream using a classic custard base. With rich heavy cream, whole milk, egg yolks, and pure vanilla, this easy-to-make treat offers a smooth, comforting flavor perfect for any occasion.
Ingredients
2 cups heavy cream
1 cup whole milk
3/4 cup granulated sugar
5 large egg yolks
2 teaspoons pure vanilla extract
Instructions
Whisk egg yolks and sugar until pale and thick
Heat cream and milk in a saucepan until steaming, avoiding boiling
Slowly temper egg-yolk mixture with hot liquid, then return all to saucepan
Cook over medium heat, stirring constantly, until mixture coats the back of a spoon
Strain and chill thoroughly
Stir in vanilla extract, then chill mixture for at least 2 hours
Churn in an ice cream maker according to manufacturer instructions
Freeze until firm
Notes
Use an ice cream maker for best texture; if none available, freeze in a container and stir every 30 minutes
Store in an airtight container with parchment paper to prevent ice crystals
Adjust sugar to taste preferences
Freezes well for up to 3 months
- Prep Time: 20
- Cook Time: 15
- Category: Desserts
- Method: Churning
- Cuisine: American
Nutrition
- Serving Size: 1/2 cup
- Calories: 220
- Sugar: 15g
- Sodium: 0mg
- Fat: 11g
- Saturated Fat: 7g
- Carbohydrates: 20g
- Fiber: 0g
- Protein: 2g
- Cholesterol: 65mg